Yesterday, I did not publish any article because I wanted a day wherein I am not focused on doung something productive. I wanted to be lazy for one whole day so that I can manage being a busy bee for the remaining six days of the week.
Today I had a lot of fun. I met with a friend anf we enjoyed doing a lot of things. The stories and moments that we shared are something that i treasure greatly.
Another thing that happened today is that I tried my hand at making my first ever amigurumi. I feel so devastated when I realized I misplaced the safety eyes I bought though.
But it was too late to give up, since I already made the body of the amigurumi I am making. I decided to improvise the eyes by just sewing a black thread onto the face.
It kinda looked like a sleepy bee instead of an alert busy bee but I think it looks cute. But maybe that is just me being supportive of my myself and my work haha.
I also think that having a kinda okay looking one for my first amigurumi is better.
Why do I think that?
Well, it will look cooler when I finally learn how to do better amigurumi. Don't we get a lot of admiration when we see how much people improved?
Yeah, I wanted my before and after for my crochet projects to look that cool. So I am not pressuring my beginner self to create perfect projects.
I feel proud of whatever projects I make and that is why I post all of my progress in my crochet social media accounts as well as in noise.cash.
The projects I am most proud of at the moment usually reserved a spot in my articles in read.cash too. Although, that would mean that ALL of my crochet projects will be here since I am planning on always making a project list every month.
Making a compilation of my crochet projects is one of my ways of keeping track of how much I improved.
Making my first amigurumi
I wanted to share a little bit of the thought process that I have while I was making this bee. I wanted to share that I did this with some stock knowledge that I have during my time in learning crochet.
I decided to just first use what I learned during my month of learning crochet to see if I can managed to create a simple amigurumi.
I am sharing this to say that veteran crocheter are welcome to give criticisms to my work as well as some advice in how to do better next time. I also want to hear the thoughts of people who have no idea about crocheting in my first amigurumi project.
Materials I used:
For the materials, I used a 3-ply mercerized cotton in black and yellow colors for the body of the sleepy bee. Additionally, I used a white 8-ply fine cotton yarn for the wings.
Of course I need a crochet hook for this project and I decided to use a 2.00mm hook, or the 2/0 in the Tulip double-ended hook.
The most important thing in amigurumi making is the fiber fill so I also used that.
Lastly, I used a 5.00cm stainless darning needle to weave the ends of the yarns and to sew the eyes.
A summary of the process
Body:
Using the yellow yarn, I started by making a magic ring. I then put 6 single crochet stitches into it. I tighten the ring after that.
Next, I made an increase in each stitch. So for round 2, I had 12 stitches at the end.
For the third round, I mafe a single crochet into the first stitch then I made an increase into the next one. I repeated this pattern until the end of the round. The total number of stitches for this round is 18.
I made 2 rounds of single crochet for each stitch, and then on the last stitch, I changed the yarn to black.
Using the black yarn, I made 2 rounds of single crochet. I switched to yellow yarn after that.
I made 3 rounds of single crochet using yellow yarn, while I am also stuffing the amigurumi with some fiber fill.
Using black yarn, I made a round of single crochet. In the next round I made a single crochet into the first stitch then a decrease into the next. I repeated it until the end.
For the following round, I decreased in every stitch. The total number of stitches in this round is 6.
For the last round, I made a decrease in each stitch that resulted it to only have 3 stitches left.
I fasten it off, making sure that the amigurumi is fully stuffed.
Eyes:
After I finished making the body, I sewed eyes onto my amigurumi. I eyeballed the distanced. Once I have done that I made sure to lose the yarn inside the amigurumi.
Wings:
I then made the wings by creating a magic ring using the white fine cotton yarn.
First, I made a magic ring, then put a single crochet stitch, double crochet stitch, 3 trebles, double crochet stitch, single crochet stitch into the ring.
I made 2 of these and connected them using slip knot. I then sewed the wing onto the back of the bee.
Documentation:
I only took 2 pictures of this project since I made it in a rush after I woke up from a nap.
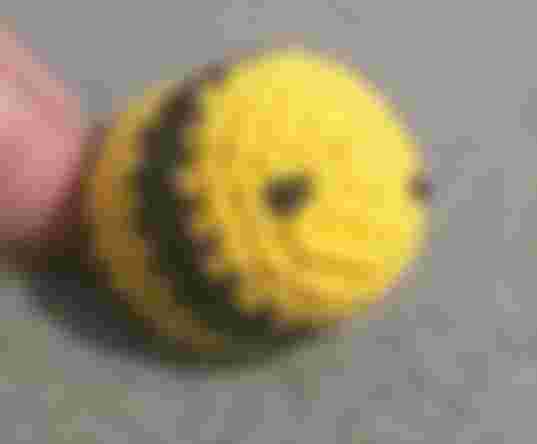
This what my amigurumi bee looked like without wings. This is where I got the idea to call it a sleepy bee since it looks like all it wants to do is sleep.
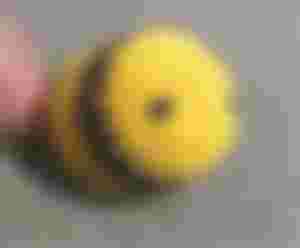
After this, I added the wings and took another picture.


This is what the final product looks like. I am planning on making it into my personal keychain once the keychain rings I ordered arrives.
What do yu guys think? Is it okay for a first time amigurumi?
My final thoughts
During the process, I learned why the normal pricing of amigurumi is P100 per inch. My hands hurt after doing this 1.0 inch × 1.5 inches amigurumi.
I had to have a tight tension since I do not want the fill to fall out. It is also incredibly hard for me to start decreasing my stitches once I filled it with fiber fill.
I learned a greater sense of appreciation for every crafters who specializes in makig amigurumi. It must have taken months to years to reach their level.
So for my fellow Filipinos out there who would love to buy some crochet products, my advice is that please do not try to belittle the work that is put into the product.
It is not easy to do, the time and the muscle aches in both hands are not worth a cheap price.
If you like a handmade product,be prepared to spend more. If you want cheaper ones then look for a machine made item ibstead if harassing crafter in lowering their prices to suit your budget.
This is only my friendly advice since I understand both sides. I just hope that more people will show appreciation for what crafters do instead of beig belittled for their efforts.
I hope you like reading this article. If you do, please consider looking through my past articles in crochet as well.
Frog bucket hat:
https://read.cash/@ZehraSky/frog-bucket-hat-6033bf4e
June crochet projects:
https://read.cash/@ZehraSky/june-crochet-projects-12f6cc62
Shooky (BT21) bucket hat:
https://read.cash/@ZehraSky/crochet-making-a-shooky-bt21-bucket-hat-for-my-sisters-birthday-ed2058d4
Twice's Momo halter top:
https://read.cash/@ZehraSky/making-a-twices-momo-inspired-crochet-halter-top-4f111086
As always, your support in me is greatly appreciated. Thank you very much!
it looks very beautiful, I think it is the most beautiful thing I've seen today, congratulations.