Details made with love for my mother's first great-great-grandchild.
Hello dear friends of this wonderful Read.cash community. You are the best judges that we handcrafters can have to present our work in which we put soul, life and heart. That is why I like to expose my creations and know what your opinion is.
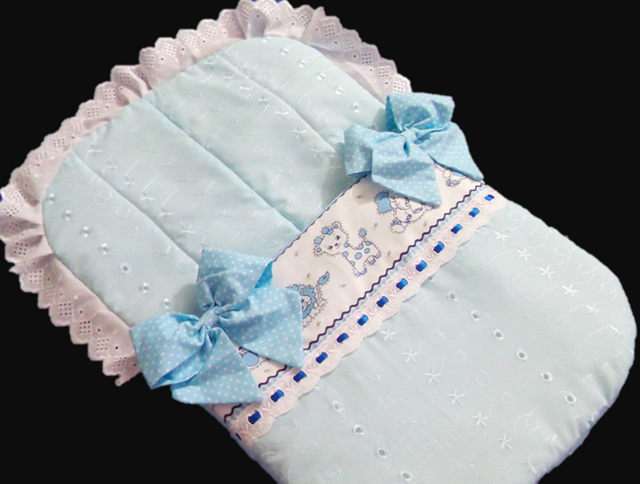
Today I come to present a lullaby I made for my niece Camila, she already had her baby and is beautiful, this is a reason for celebration and rejoicing for our family because Adrian Mathias is the first great-great-grandson of my mother and therefore my third nephew. This is a great surprise, I never thought that we would see this generation.

We are all very happy for my sister and for my nephew Pedro who is already a grandfather for the first time. Definitely the birth of a baby brings families together and it is a nice moment to be united and thank God for these blessings.
Today I made this lullaby and I did the step by step so that you are encouraged to make it for your babies. So without further ado I invite you to see the step by step.

Materials we are going to use
To make this lullaby we will need:
Half a meter of main fabric
Half a meter of lining fabric
Half a meter of F10 wadding
Half a meter of lace
Half a meter of blue satin ribbon
One and a half meter of embroidered strip lace
Fabric to match.
Let's get to work

The first thing we are going to do is to cut all the pieces and when we have them all ready we go to the sewing machine. We cut the main fabric that measures approximately 38 centimeters wide by 60 centimeters long.
Then we iron and at the same time we divide the fabric in 3 equal parts lengthwise, we overlap it on the wadding and fix it with pins so that it does not move, we sew straight seams on the lines, as shown in the image.

Now we are going to assemble the other part which is lower than the previous one and measures 38 centimeters wide by 35 centimeters long and we give the curve shape at the corners. We cut 3 pieces, one in main fabric, one in lining fabric and one in wadding.
We place the main fabric on the wadding, in this step we must place the embroidery, lace or any drawing if you want to put, then overlap the lining fabric and fix with pins at the top to pass straight seam.

Now we turn the lining fabric to the back and fix it very well so that all the corners are squared and the fabric does not run when we join it with the other piece.
We overlap one with the other and pin to get an idea from where we are going to place the embroidered strip lace.
Bastear:
Here in my country Venezuela there is a word they call bastear and it is to join all the pieces first and square the corners and then pass long stitches with needle and thread, this makes sure that what we did is well organized, we can remove any excess and then pass the straight seam with more security.

In the final step we will baste all the pieces and pass straight stitching, finally we place the lining fabric and pass straight stitching and zigzag to reinforce the work, we leave an opening of approximately 20 centimeters to flip.
We turn over and close the opening with a hidden or invisible stitch, then we decorate with ribbons or ribbons and that's it.

Final result
When we are going to make a piece like this we must take some time to think about how we want it, what design we like, what colors we want to use. When clients come to me to ask for a nana like this I ask them about everything, I like to know every detail, if they want it with a bow or two, if they like ribbons, if they want it with cross stitch embroidery or not. You have to know everything to put together the design in your mind and bring it to reality.
In the stores there is a great variety of fabrics and colors. We can also find beautiful prints especially for girls. So if you dare to make this beautiful piece, take a few seconds to think.
As you can see it is very simple, it has no complications, I made it with a few fabrics that I had saved from previous works that I have done and it is so beautiful that I could only use it for someone special. On the other hand I tell you that this kind of details can be given as a baby shower gift, for the clinic, they can also be personalized, that is to say with the baby's name embroidered in cross stitch.

I hope you liked it and if you have any opinion or question please let me know in the comments box, I wish you a happy week and take care of yourselves.






You're an awesome handcrafter.