Advanced BCH Monitoring with Tasker (Part 2: How to prepare an interface in tasker)
Previous part 1:
Refactoring
Why would we prepare an interface?
Our intended structure as mentioned in the previous article needs modularization so we can mutate it easily, adding new features, solving bugs or swapping between different services and all of it, keeping the code maintainable and readable.
Of course, we can create lots of independent tasks and call them as we need it, but that would clutter up our task list on relatively small projects, imagine on the big ones. For those cases, it's better to group tasks inside tasks so we can have a few bigger but well-sorted tasks instead of many unordered small tasks.
Tasks inside tasks?
Yes, thanks to the Perform Task action we can pass up to two parameters to a task, combined with the Anchor action and the flow control capabilities of Tasker we can create callable functions inside the task.
Let's see this with an example:


figure 1 represents an example interface we are going to prepare, it will have a variable called IValue, and three sub-tasks: setValue, getValue and compute. We'll see about them later.
Preparing the interface
In order to prepare an interface, we will create for anchor actions, an anchor action is just an action that does nothing but serves both as a label to jump with control flow actions and to sort out code sections :
entrysetValuegetValuecompute
Preparing the entry anchor
Why the entry anchor?
As for calling a task we use the Perform Task action and it does not give us the chance to set an anchor as the preferred entry point, we'll use this anchor to jump into the other anchors.
How do we prepare it?
The Perform Task action can be set up to two parameters that will be accessible inside the task as the %par1 and %par2 local variables. Our intent is to use the first parameter to point out which anchor we want to access and use the second parameter to pass the rest of the actual parameters.
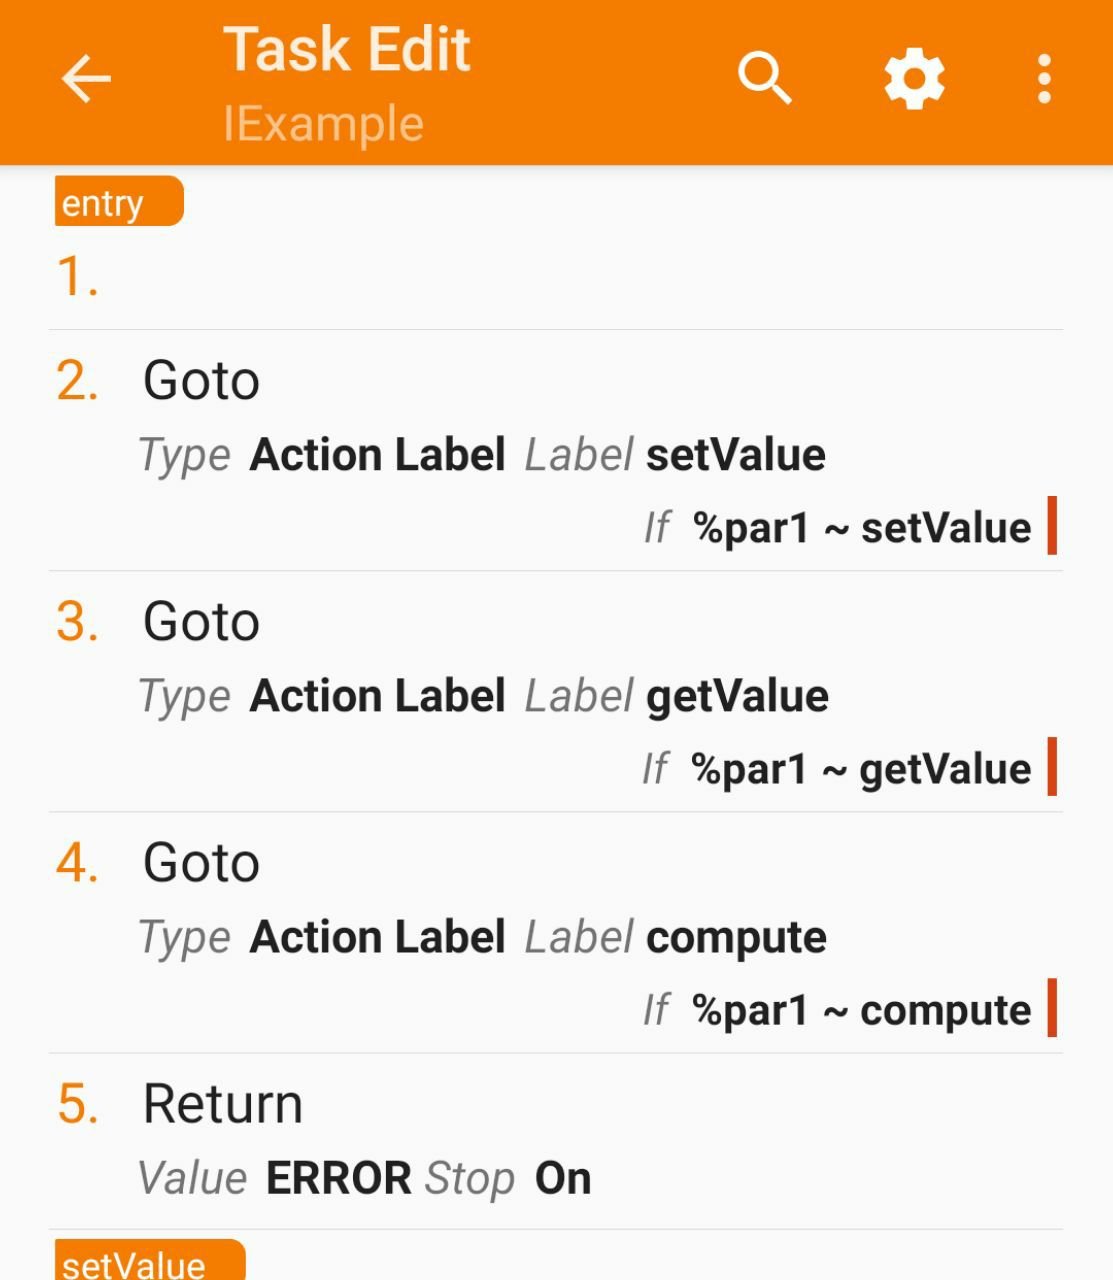
What we want is to call IExample with, the first parameter set as "setValue" and having our control flow jump to that anchor, this snippet of pseudocode shows how are we going to do that with the Goto action:
entry:
    Goto(Type="Action Label", Label="setValue", If(%par1 ~ "setValue"));
    Goto(Type="Action Label", Label="getValue", If(%par1 ~ "getValue"));
    Goto(Type="Action Label", Label="compute" , If(%par1 ~ "compute" ));
    Return(Value="ERROR", Stop="On");
setValue:
( . . . )
We added the return to halt the task execution if we pass something unexpected on the first parameter, without it, that case would keep the flow running until the next action, usually with undesired behaviors.
.
.
.
On the figure 2, we can see how does this looks at the Task's action list and compare it to the upper code section. Keep it in mind, from now on I'll show code with the upper code section because as you can see, it's a more efficient way to show code.
.
.
.
.
.
Preparing the rest of anchors
The anchors that we are going to prepare are just getting the structure ready to start implementing.
setValue and compute will receive a single integer parameter so for preparing it we will set %par2 into the local variable %input_value. (note that tasker interprets any lowercase-named variable as local, and just having an uppercase character on a variable name turns it into a global)
getValue and compute will return an integer, so we will prepare a %retval variable and pass it into a Return action.
setValue returns nothing so we will have it return "SUCCESS" instead.
The whole interface, prepared
entry:
    Goto(Type="Action Label", Label="setValue", If(%par1 ~ "setValue"));
    Goto(Type="Action Label", Label="getValue", If(%par1 ~ "getValue"));
    Goto(Type="Action Label", Label="compute" , If(%par1 ~ "compute" ));
    Return(Value="ERROR", Stop="On");
setValue:
    VariableSet(Name="%input_value", To="%par2");
    Return(Value="SUCCESS", Stop="On");
getValue:
    VariableSet(Name="%retval", To=0);
    Return(Value="%retval", Stop="On");
compute:
    VariableSet(Name="%input_value", To="%par2");
    VariableSet(Name="%retval", To=0);
    Return(Value="%retval", Stop="On");
Now we have this interface, that actually does nothing, but, as Tasker does not implement Object Oriented Programming (without calling the built-In Java and Javascript related actions, that would complicate things even more than this) we are going to use this as a template to create new classes.
Sum and division examples
We are going to create two new classes copying the Task IExample in the project list and renaming it as SumExample and DivisionExample.
In both of them setValue will push the passed value to the %SumValue and %DivisionValue variables respectively and getValue will return the last pushed value.
The difference comes on compute that will run the operation that gives name to our examples, adding up its parameter on the SumExample class and dividing the parameter by the %DivisionValue variable on the DivisionExample class.
SumExample
entry:
    Goto(Type="Action Label", Label="setValue", If(%par1  "setValue"));
    Goto(Type="Action Label", Label="getValue", If(%par1  "getValue"));
    Goto(Type="Action Label", Label="compute" , If(%par1 ~ "compute" ));
    Return(Value="ERROR", Stop="On");
setValue:
    VariableSet(Name="%SumValue", To="%par2");
    Return(Value="SUCCESS", Stop="On");
getValue:
    VariableSet(Name="%retval", To="%SumValue");
    Return(Value="%retval", Stop="On");
compute:
    VariableSet(Name="%input_value", To="%par2");
    VariableSet(Name="%retval", To=(%SumValue+%input_value), DoMath="Yes");
    Return(Value="%retval", Stop="On");
DivisionExample
entry:
    Goto(Type="Action Label", Label="setValue", If(%par1  "setValue"));
    Goto(Type="Action Label", Label="getValue", If(%par1  "getValue"));
    Goto(Type="Action Label", Label="compute" , If(%par1 ~ "compute" ));
    Return(Value="ERROR", Stop="On");
setValue:
    VariableSet(Name="%DivValue", To="%par2");
    Return(Value="SUCCESS", Stop="On");
getValue:
    VariableSet(Name="%retval", To="%DivValue");
    Return(Value="%retval", Stop="On");
compute:
    VariableSet(Name="%input_value", To="%par2");
    VariableSet(Name="%retval", To=(%DivValue+%input_value), DoMath="Yes");
    Return(Value="%retval", Stop="On");
Testing our examples
In order to test if our examples work properly, we are going to write an interactive test task and run it.
Setters:
    InputDialog(Title="INPUT SUM A", Text="enter first input", DefaultInput=0, InputType=12290);
    PerformTask(Name="SumExample", Parameter1="setValue", Parameter2="%input", ReturnValueVariable="%return");
    InputDialog(Title="INPUT DIV A", Text="enter first input", DefaultInput=0, InputType=12290);
    PerformTask(Name="DivisionExample", Parameter1="setValue", Parameter2="%input", ReturnValueVariable="%return");
Getters:
    PerformTask(Name="SumExample", Parameter1="getValue", ReturnValueVariable="%return");
    Popup(Title="SumValue", Text="%return");
    Wait(Seconds=1);
    PerformTask(Name="DivisionExample", Parameter1="getValue", ReturnValueVariable="%return");
    Popup(Title="DivisionValue", Text="%return");
Compute:
    InputDialog(Title="INPUT SUM B", Text="enter second input", DefaultInput=0, InputType=12290);
    PerformTask(Name="SumExample", Parameter1="compute", Parameter2="%input", ReturnValueVariable="%return");
    Popup(Title="SumResult", Text="%return");
    Wait(Seconds=1);
    InputDialog(Title="INPUT DIV B", Text="enter second input", DefaultInput=0, InputType=12290);
    PerformTask(Name="DivisionExample", Parameter1="compute", Parameter2="%input", ReturnValueVariable="%return");
    Popup(Title="DivisionResult", Text="%return");
Testing it


.
.
.
if you want to get this example project, you just have to follow this link from your android device.
I hope you enjoy it and see you in the next part!
.
.
.
.
.


Special thanks to Blockchair.com for providing an API key.
Don't forget to subscribe, feedback will be appreciated!

Very nice note