This is the third part of the project, and i thank you in advance for reading it, there's a lot of exciting things about this project, so, before i continue with the third part, let's summarize the order you must follow to create a room (and some tips i forgot to tell):
1. Create the concrete base.
In the first part, i forgot to mention that in order to create a nice concrete base, you need to frame it, in a way it can resist the weight of the concrete, because it's a lot, so what you must do to get it in line is to use stakes nailed to the ground and screwed to the frame, so the frame can have a nice resistance, and the secod thing i forgot to mention is this: never use only concrete mix for the concrete base, you must use steel mesh, and it must be placed inside all the framing. This will help in case of a seismic activity, the concrete base stays in one piece and it will not break/crack. And the last thing i forgot to mention is that you need to place the iron strips inside the framing, making sure it is in the place needed for the anchorage (normally in straigh lines near of the edges of the frame.
2. Align the anchorage with the base wood.
That is simple but tricky. You need to make holes to the wood, aligned with the iron strips so they all can fit and giving the lines of the room fixed. That helps to the structure be steady.
3. Lift the structure.
With stakes (flechas) screwed to the structure we keep the wall's skeleton leveled, and we can merge all the walls in a full structure, and making all as a one piece placing the wood pieces on the roof.
4. Install the rooftop.
This is the first thing you must have in order to be able to work with power tools during rainy seasons.
5. Install the OSB plates and the asphaltic paper.
I pretty much explained this in detail in the previous article.
And now it's time to the third part of this project, the part when you start to see the outside part as a bedroom.
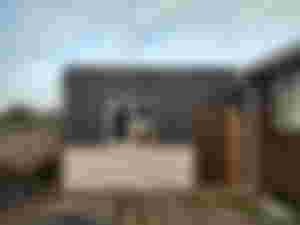
It's time to install the Siding, and the siding i chose for this project is Northway. Northway is a concrete fiber plate that installed gives you a look of scales. It's water resistant, and weather resistant, and it needs low to none maintenance, perfect for our weather.
This is one of the most repetitive parts of the entire process, because you have to place each one of the them one by one, from the bottom to the top, line by line, and one above the other. it has its technique.

In my case i prefer to do a straight line as far as it goes, then, i cut a northway with the measurement of the remaining part of the wall, and i place it with screws, completing the line (let's call it A), making sure it's leveled, and marking 2-2,5cm from the top of the northway (that mark is the limit of the next line).
That will be the guide for the rest, because the second line will be the opposite, starting from the short part placing a full northway as far as it go, and i cut a northway with the measurement of the remaining part of the wall, and i place it (let's call it B) and making a 2-2.5cm mark on the plate, then the process repeats, starting with A, then B, and so on until you get to the top of the structure.


The same goes to all the walls, making sure the lines of northway on the corners of the walls are the same, you don't want to have visible mixed lines on the corners, because that looks awful.


When you finish it, you can finally start the finishing touchs of the outer structural work, using plane zinc to merge the walls to the rooftop. Outer structural work finished. now it's time for the details.
there's a lot of things you can start with, i chose to start with the painting because of one reason, it was about to rain, and i need the siding fully protected.


So i started painting each and every one of the northway plates with water repelent paint (i wasn't picky about that, there's a lot of cheaper options for that, but it was on sale so i took it). I did two hands of painting, and that was more than enough. Now the siding can protect the inner structure without any problem.
But that raised another problem to be fixed: ¿What if the rain hits the door and the water starts leaking from below there? Well... That's a problem for the next article.
Are you enjoying this project so far? This is the third part of it, tomorrow i will post the fourth part of it, and it gets better and better, because it gets visually better in every article, reflecting the final product one step at a time.
Disclamer: I need to say, i'm not a builder, i'm just learning how to do it on the go, and i'm doing it with all my love, because this bedroom is for my nephew, it will be my birthday present for him.
Most of the materials were purchased by the noise community by simply giving hearts to the followups.
Thank you all for reading this article, and let me know what do you think about this. if you have any questions feel free to ask me, i'll be happy to answer any question from you guys.
And, if you like this kind of projects, i can do more, always funded with BCH by the community.
See you on the next article.
Its great its beauty and yes i like your project you did it and now waiting for your Fourth part