Tezos weekly chart looks amazing, and other Tezos tokens! Don't sleep on them!
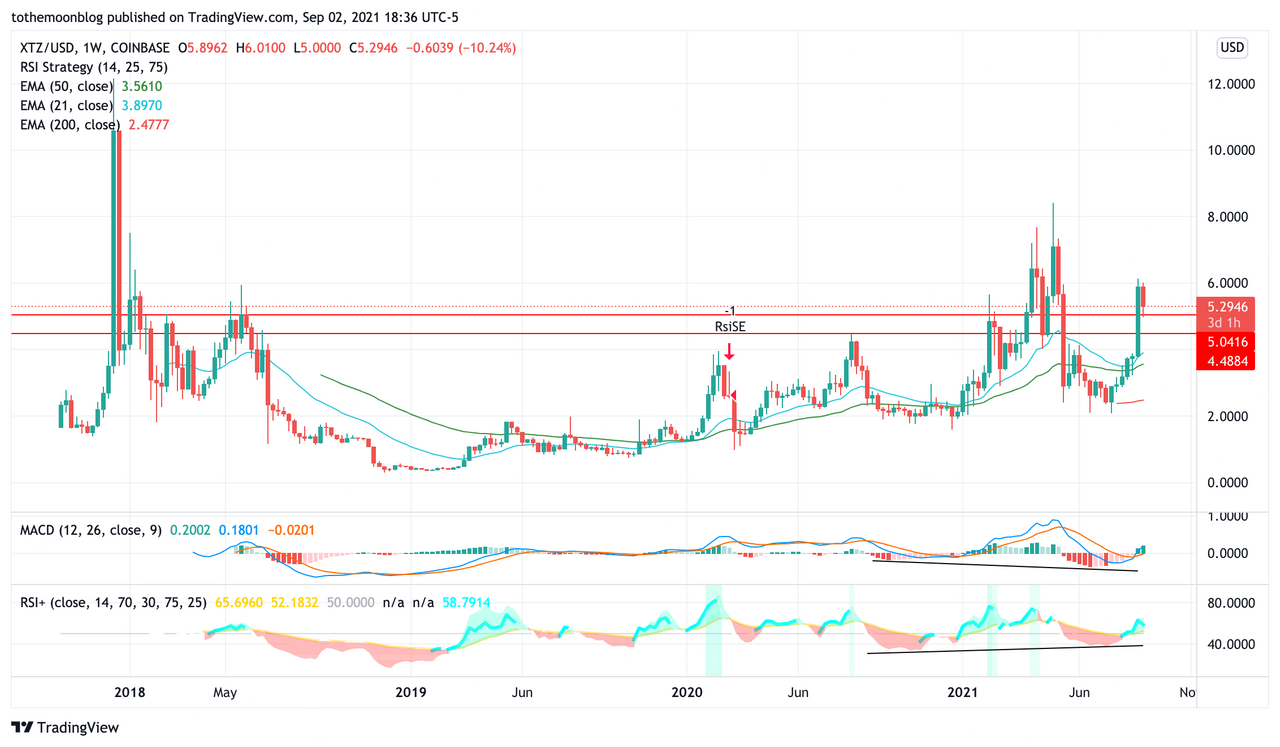
Take a look at the Tezos weekly chart. We are just now getting back into positive momentum on the MACD after creating some bullish divergence on both the MACD and RSI!
I've been bullish on Tezos for quite awhile. The price action has been subpar compared to other major tokens. But, the development and growth on the Tezos ecosystem is steadily increasing. Contract calls are setting records every month. DeFi platforms are gaining momentum, NFTs are starting to as well.
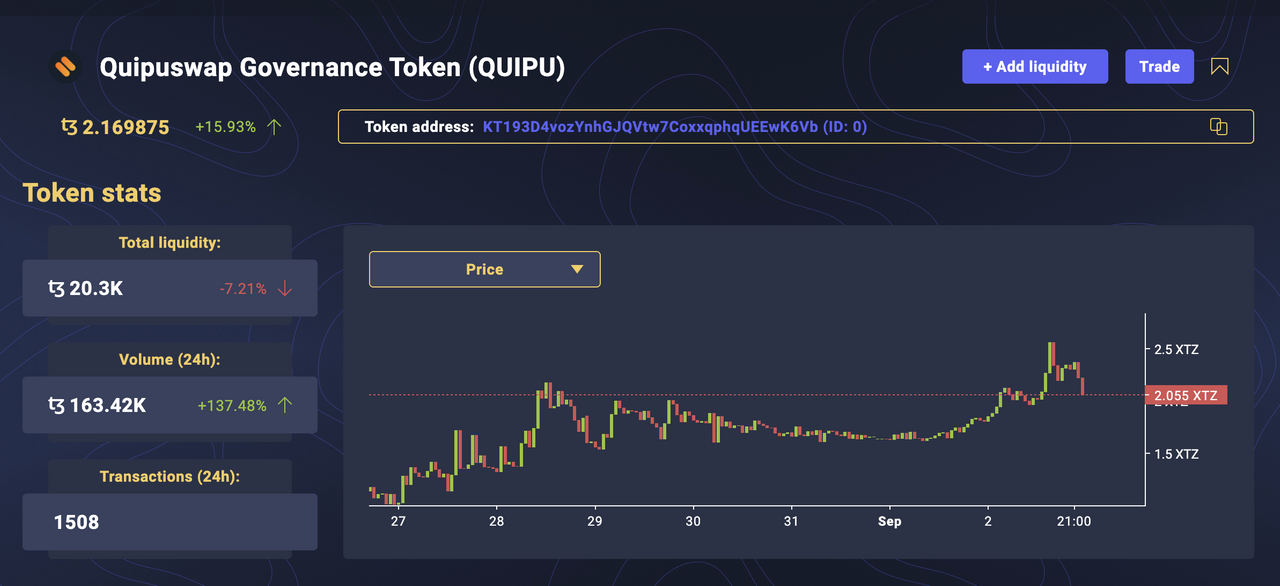
Let's take a look at the newly released QuipuSwap governance token (https://quipuswap.com/) on Tezos. Similar to Uniswap of the Tezos ecosystem (without those disgusting fees of ETH).
This token is very new and was just recently airdropped. But, the supply is low and Quipu is the top swap service in the XTZ ecosystem. I've been stocking up while I can.
Another token to check out is PLENTY. Plenty is a defi platform I've written about in the past. Similar to others like SushiSwap, CubFinance, etc. https://plentydefi.com/. They also just recently released a new UI, have surpassed $50 million in TVL, and are poised for a lot more growth.
Any other Tezos fans over here on ReadCash?
Are there currently any websites/apps that show politicians and their stances on #crypto? An idea I had.
ShapeShift FOX airdrop $150-$7000 worth of FOX!
ShapeShift has started their FOX airdrop and users will have 90 days to claim their tokens. Depending on the parameters, you can earn between 200-8500 FOX from this airdrop ($150-$7500).
I was on the lower side and received 250 FOX. I claimed them today and gas fees were quite high. If you do claim them on a higher than usual gas fee day, be sure to lower the GWEI on the tx if you don't mind it taking a bit longer to save a couple bucks.
Below are the eligibility requirements for the airdrop:
Eligible recipients
Over 900,000 ShapeShift customers and KeepKey owners
Every customer who has ever traded $1 or more of ETH or any ERC-20 token through ShapeShift prior to June 9, 2021 is eligible:
1-4 trades: Receive 200 FOX
5-9 trades: Receive 350 FOX
10-24 trades: Receive 750 FOX
25-99 trades: Receive 1,500 FOX
100+ trades: Receive 8,500 FOX
Every customer with a wallet registered with ShapeShift holding crypto as of June 9, 2021:
Receive 250 FOX
Every KeepKey customer who connected their KeepKey with ShapeShift as of June 9 2021:
Receive 900 FOX
THORChain traders of ETH/ERC-20 assets and those who upgraded ETH.RUNE for Native RUNE as of June 16th at 2 p.m. MST:
500 FOX
RUNE ERC-20 token holders as of June 9th:
350 FOX
https://fox.shapeshift.com/airdrop

How I've made hundreds in Bitcoin doing almost nothing with these apps
Fold - Debit Card
Fold is the best way to earn bitcoin back on everything you do. Use the Fold Visa debit card, and purchase gift cards from the Fold Store, to earn bitcoin on everyday purchases. https://use.foldapp.com/r/3KWWVUPC
Here are the two flagship services from Fold:
Fold App: The Fold app for iOS and Android lets you buy gift cards, then earn rewards in the form of bitcoin. You can earn 3% to 20% kickbacks in bitcoin for each gift card you buy through the Fold app.
Fold Card: Fold recently launched the Fold Card, a prepaid Visa debit card. You can spend the Fold Card at any online or offline merchant that accepts Visa. You load it with money from your bank account, then earn rewards in the form of bitcoin on every purchase. The average purchase provides 3% cashback in bitcoin.
With Fold, you can earn BTC from the daily wheel spins, wheel spins on qualified purchases, and in cashback from the purchase of giftcards (6% on Amazon is where I get a lot back). https://use.foldapp.com/r/3KWWVUPC
Lolli – Browser Plugin/Cashbac
I recently stumbled across a browser plugin called Lolli.Lolli is one of a few plugins that allows you to earn cashback from online purchases in the form of Bitcoin OR cash deposited to your bank account. This is an excellent way for new users and non-techies to earn some Bitcoin without having to bother with exchanges, KYC laws, and all the other hoops that exist between them and Bitcoin. https://lolli.com/share/LgUPSCm59b
We started Lolli with the goal of making it easy to earn, own, and share bitcoin with as many people as possible. We strongly believe in bitcoin’s power as a global alternative currency and universal store of value and want to share it with the world.
What makes Lolli stand out from it’s competitors is the major retailers featured in their cashback program. I was surprised to see massive names on the list like Walmart, Hotels.com, Groupon, Priceline, Barnes & Noble, and a whole laundry list of others. Below I’ve included a screen shot of some of their more than 500+ retailers and brands that they are partnered with. Everybody shops at Walmart. So why not get cashback, or should I say BTCback, and be making a nice investment in a great technology while you do it? There isn’t a reason why not. So do it!
I believe that we will continue to see more services similar to Lolli as time goes on. It serves as an excellent adoption vehicle for newcomers and as a nice way to stash away some extra coins for current users and investors of Bitcoin. The more products and services built around cryptocurrencies, the better it will be for all of us in the end. We all know that cryptocurrencies are superior to fiat in nearly every aspect and I believe it’s only a matter of time until crypto becomes serious competition against fiat.
Pei – Mobile Application/Cashback
An additional way for you to earn some Bitcoin cashback is by linking your existing cards to Pei.
Pei is a mobile application that links to your existing debit and credit cards and returns you automatic cashback for extra savings in Bitcoin or USD (Paypal). https://getpei.app.link/invite?code=khhuax
Pei launched in 2018 and since then they have gained quite the following. You won’t be hearing many people saying they hate the app. No can hate getting cashback, especially when Pei has made it so easy. https://getpei.app.link/invite?code=khhuax
You just simply link your cards to your Pei account and the next time you shop at a partner merchant using that linked card, Pei will automatically return your cashback rewards! They also have a wallet that earns 6-8% on your BTC holdings, however I personally withdraw it every so often.
Pei is affiliated with over 60,000 locations nationwide and thousands of retailers, from Target to Trader Joe’s to Sephora, which gives you ample opportunities to earn cash back pretty much all the time, any time you shop. https://getpei.app.link/invite?code=khhuax
So far I’m really liking the Pei app and the cashback opportunities it provides. I’ve found the app easy to use, the earnings available quickly and haven’t had any glitches so far with the interface.
Does the Pei app sound like something you want to try? If so, be sure to download it here and use our affiliate code “khhuax” to receive a $2.50 bonus!
2 months of DeFi on Tezos
DeFi on Tezos
I recently began exploring defi on the Tezos chain a little over a month ago when PlentyDefi was lauched. Since then I've explored the Tezos defi space a bit more and we will be talking about some other options available like Wrap and Youves.
So far my experience as a whole has been very good. Transactions are pretty quick. Fees are extremely low. Feels great compared to what I've experienced with Ethereum.
Plenty Defi
Plenty is a decentralized yield farm running on the Tezos blockchain with "a goal to bring more liquidity and users to DeFi in the Tezos ecosystem."
I got involved nearly right away and made a nice little profit. However, since then the token price has dropped about 90% from it's peak. But, TVL seems to be holding steady at 30M.
Plenty allows you to earn PLENTY and other tokens by liquidity pool farming, staking pools, and staking ponds (ponds let you stake PLENTY and receive another coin as the payout).
Plenty is the app I've been with longest on Tezos. I'm currently building up my wallet and planning on holding it for a bit. The project is backed by Tezsure and Draper Goren Holm. So, I'm thinking there is a lot of potential for upside in the future as it grows.
youves
youves is a decentralized, non-custodial and self-governed platform for the creation and management of synthetic assets. Minters of synthetic assets earn a passive income in YOU, the governance token on youves.
YOU tokens are awarded to minters by the youves protocol in relation to their minted synthetic assets. YOU holders have voting rights and the possibility to stake YOU tokens and receive their share of the platform profits.
youves allows you to mint, save, and stake. Each of which provides slightly different ways to utilize your crypto.
youves uses uUSD, a Stable Token pegged to the USD. It is fungible by design and backed by tez collateral. Conversion rights for the minter and the holder strengthen the peg. uUSD offers interest income in uUSD to its holders.
Wrap Protocol
The Wrap Protocol is a decentralized bridge between the Ethereum and Tezos blockchains. Through the Wrap Protocol, users can transfer their Ethereum ERC-20 and ERC-721 tokens to the Tezos blockchain in a decentralized way.
Through Wrap, users issue wTokens (wrapped tokens) which are representations of ERC20 and ERC721 tokens on the Tezos blockchain. wTokens can then be used on the Tezos blockchain, and their value is pegged to the original tokens. Wrap is a decentralized protocol, relying on a strong federation (the Signers Quorum) that guarantees the stability of the protocol, and a community of $WRAP governance token holders.
Users can earn tokens on Wrap by staking their Wrap Governance tokens in a pool (I currently stake mine in wCEL), or by providing tokens to one of the liquidity pools available in the app.
Conclusion
Well there's a quick rundown of the 3 defi apps I've recently gotten familiar with in the Tezos ecosystem. Overall my experience has been pretty positive. If you're into defi, definitely give the Tezos ecosystem a shot.
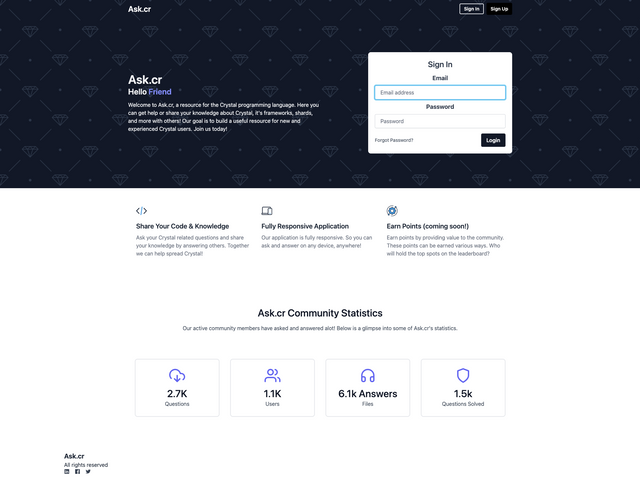
Anyone in the mood of helping support an open source project? It's a Question/Answer site built specifically for the Crystal programming language ecosystem. My goal is to spread this awesome tech and help build a single place where people can find answers to their questions!
The code is open source and can be seen here with various crypto donation addresses as well as a fiat option *yuck). https://github.com/nolyoi/ask.cr (it will be live @ askcr.il/ soon!
Noise.cash tips help a lot, but donating BCH directly can even more!
bitcoincash:qpgr0cynas2drss4l6rqjp3zeccjc75cks6vl8yux9
Using a beta language and framework in production, Crystal and the Lucky framework
Crystal and Lucky
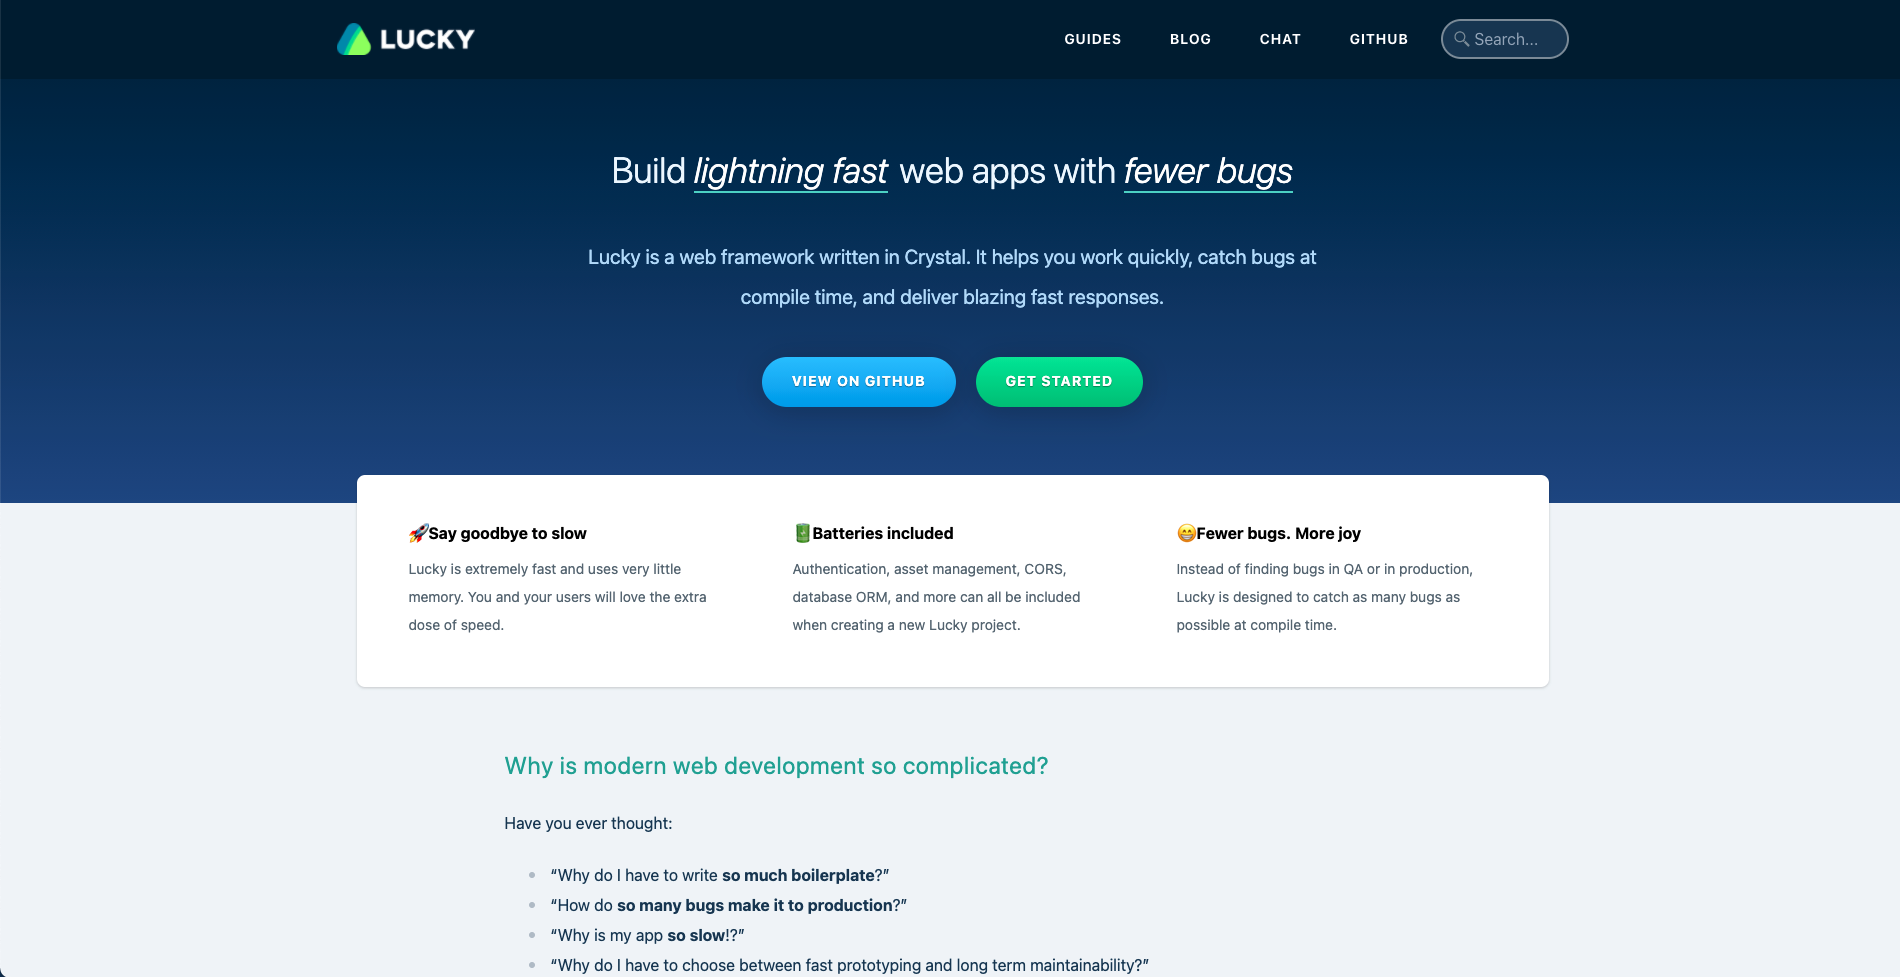
It's been awhile since I've posted. But, I've been hard at work building an application using Crystal and the Lucky framework. In this post I will go over how the project has been going and what it's been like using a language and framework that are both still in beta.
Due to a non-disclosure agreement, I can't give too many details. However, as I stated, we have been using Crystal and Lucky for a couple months now. This is all currently set up in a Docker container.
Our development process is pretty typical. Clickup has been amazing for issue tracking, sprints, and all of that good stuff. Our branche names are generated in Clickup via their Github integration, so all you have to do is copy the git code given to you and it will checkout a branch and link it up to clickup.
From there we use some GitHub actions to check various things such as code formatting, run our tests, deploy the branch to a small testing container and more.
One issue I did encounter was with how Lucky handles forms. Forms basically have a 1 to 1 relationship right now and there isn't support for nested forms that you can find in Rails. This leads to creating separate save and update operations. Creating attributes for the fields that belong to the model that would normally be nested that now have to get a default value set for them by creating methods to query the model. Then the nil checks on top of it. That can get messy very quickly. Thankfully, nested forms are on the roadmap for the 1.0 release of Lucky. Whew.
Another thing that can be a bit bothersome is the time it takes to compile and test the app. Every time you save, Crystal has to recompile the entire app before you can use it because it is a compiled language. It's not terribly slow, but it can definitely slow you down a bit. Same goes for the tests. If you have a lot of tests to run, it can be quite slow. Hopefully some shards get written in the future to address this possibly by using concurrency or, a unique solution I've seen in Ruby, run tests only on the files that have changed.
Overall, the experience has been pretty great imo. I've been big on Crystal for a little while now and now that I've gotten pretty deep into Lucky, I'm loving it as well. But, it still does have some shortcoming being such a new framework. Their documentation is great, but having such a small community, you won't find much else help. They do have a Discord channel with very active devs, I can't really say I've had a moment where I was completely stuck and couldn't figure out the solution to the problem.
I'm looking forward to working on more projects in the Crystal language. If I ever have the opportunity to use this pair again in the future, it will definitely be near the top of my list.
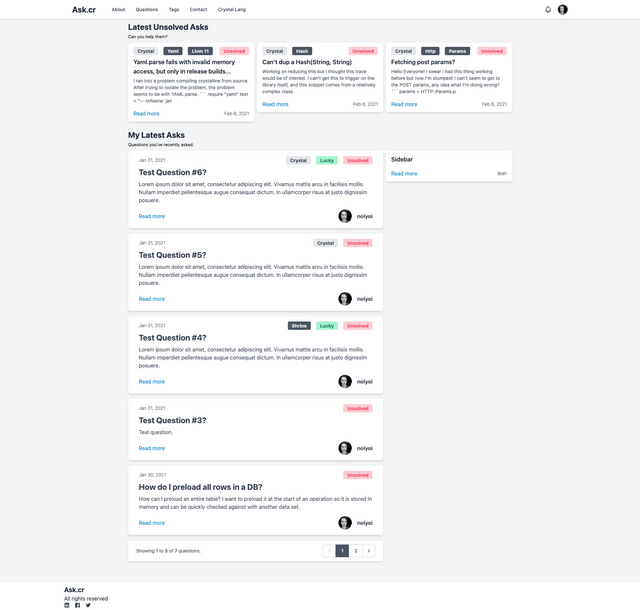
I've actually started a personal project using Crystal and Lucky. It is an app inspired by StackOverflow but tailored specifically to the Crystal ecosystem. I'll attach some screens below though I am still a bit away from finishing it.
If you'd like to learn more about Crystal or Lucky, please checkout their websites and get involved!
Crystal: https://crystal-lang.org/
Lucky: https://luckyframework.org/
Hired on to 2 new projects and what else I've been up to.
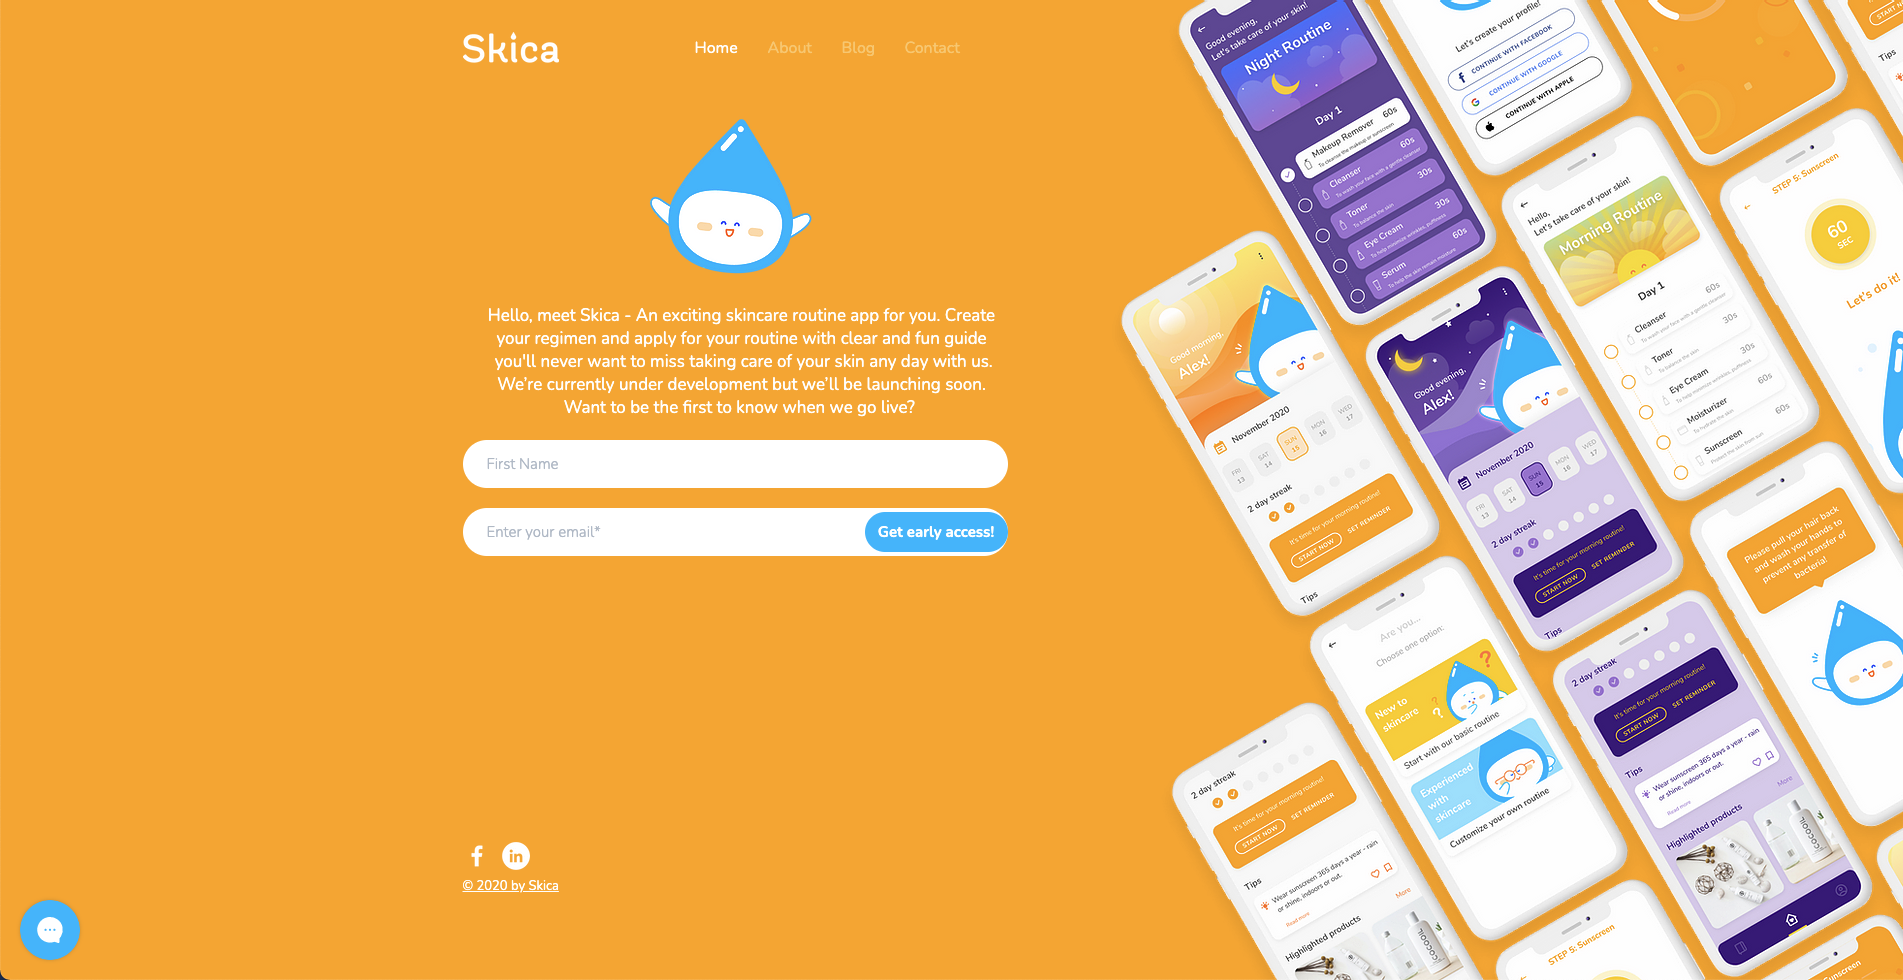
Over the last couple of months things were a bit slow. I have been working on the Skica mobile application in Flutter (though that isn't a paid project, yet), doing some cryptocurrency trading, and blogging on Hive and some other platforms. But, as far as work is concerned, I was having a bit of a dry-spell.
However, over the last month-month and a half that has changed quite a bit! First, I was contacted by Solar CRM. I had an initial interview with them right before Christmas. Due to the holiday's it was a few weeks before I finally heard back from them and had gotten confirmation I was being hired for the job.
Solar CRM
For this project I will first be working with Ruby on Rails which runs their support ticket and knowledgebase application. After spending a couple months working with Flutter, I'm excited to get back to the web side of things and working with Ruby and Rails is probably the best way for me to do so.
If all goes well with the Rails application, I will also be brought on to Solar CRM's main application which is written in Python with the Django framework. My experience with Django is quite limited. I have done some messing around with it on my local machine. But, I'm confident in my ability to pick everything up quickly as I'm familiar with Python. I'm also always picking up new languages and technologies, so I guess you could say the versatility is a skill of mine. 😎
I've already submitted a few PR's on the support app. I'm looking forward to doing more work with these guys and helping them build a successful company and application. I hope we have a long future working together.
CattleFinder
The second project I have been brought on to is a bit more random. Anyone that knows me knows that I am a big fan of the Crystal programming language. Well, while on their forum I saw a post of someone looking for developers to help out with a project. So, I inquired, we did an interview, and unfortunately I wasn't selected.
BUT! A few months later I get a message from him asking me if I'm still available and if I'd still be interested in joining the team for this project. Having only one part-time gig going on at the moment, of course I said yes!
This project is an application built using the Crystal programming language and the Lucky web framework (probably the only Crystal and Lucky job in existence, which is cool). As the name CattleFinder suggests, the app is being built to help those buying and selling cattle, especially breeders.
I just submitted my first PR today. But, the guys that have been working on it have done an amazing job and had accomplished a lot more than I expected over the last few months.
I'm looking forward to contributing the best work I can to this project as well. Hopefully, it will turn into something more long-term as well. The current timeframe is a bit of an unknown.
Skica
Skica is the mobile skincare application that I have written about in other posts. We are a 3 person team and I am the only developer. The mobile app is being built with Flutter.
Not too much has changed since my last post about it. But, I do have about 95% of the homepage completed. I'm also about 50% of the way through completing the skin routines feature. Once that feature is complete, the rest of the project should be creating the user profiles, cleaning up code, optimizing, and preparing to release an MVP.
After the MVP release, we plan to add in additional features with a lot more customizations. It will be neat! Stay tuned!
Well, there's a little update on what I've been up to. The winter had started out very slowly, maybe because of the holiday season, but now things are finally starting to pick up. I can say now that I am happy with the amount of work I have to do. I'm excited to see what else the future holds!

My review of Bybit futures exchange.
I've been trading cryptocurrency futures for a few years now. Recently, I was kicked off of Binance (I guess for using a U.S. IP address) so I had to find a new home for futures trading.
In the past I've used PrimeXBT as my primary futures exchange. But, despite their wide range of offerings (forex, stock index, gold, silver, all BTC settled), they lacked in the alt-coin department only offering Ethereum, EOS, Ripple XRP, and Litecoin.
So, one of my primary reasons for moving to Bybit was for the extra alt's such as ChainLink and Tezos. Though the altcoin futures offerings are still small at Bybit and nowhere near what Binance offers, it's still more than Prime. https://www.bybit.com/en-US?affiliate_id=4855&group_id=0&group_type=1
Anyway let's get on to the review, shall we?
What is Bybit?
Bybit is a relatively new cryptocurrency futures exchange founded in March of 2018. Bybit legally is structured in the British Virgin Islands, with their headquarters based in Singapore, known as a fintech friendly country. https://www.bybit.com/en-US?affiliate_id=4855&group_id=0&group_type=1
Bybit offers a variety of contracts. In-coin settled pairs include BTC/USD, ETH/USD, EOS/USD, and XRP/USD. You can also trade USDT settled contracts (my personal choice) which features a couple different coins. Those pairings are BTC/USDT, ETH/USDT, LTC/USDT, BCH/USDT, LINK/USDT, and XTZ/USDT. https://www.bybit.com/en-US?affiliate_id=4855&group_id=0&group_type=1
All of these contracts can be traded with up to 50x leverage and up to 100x with Bitcoin pairings. Though I HIGHLY recommend never doing such a thing. If you really want to lose your money, you could save the time and send it to me instead. 😝
*Inexperienced traders should be very cautious and start with small positions or simulated trading (also known as paper trading). Never risk more than you can afford to lose.*
An awesome mobile application
Another big reason I moved to Bybit is because of their excellent mobile application. I'm always looking at my phone and scouting out charts and prices, looking for my next trade. So, a good mobile app is pretty important to me.
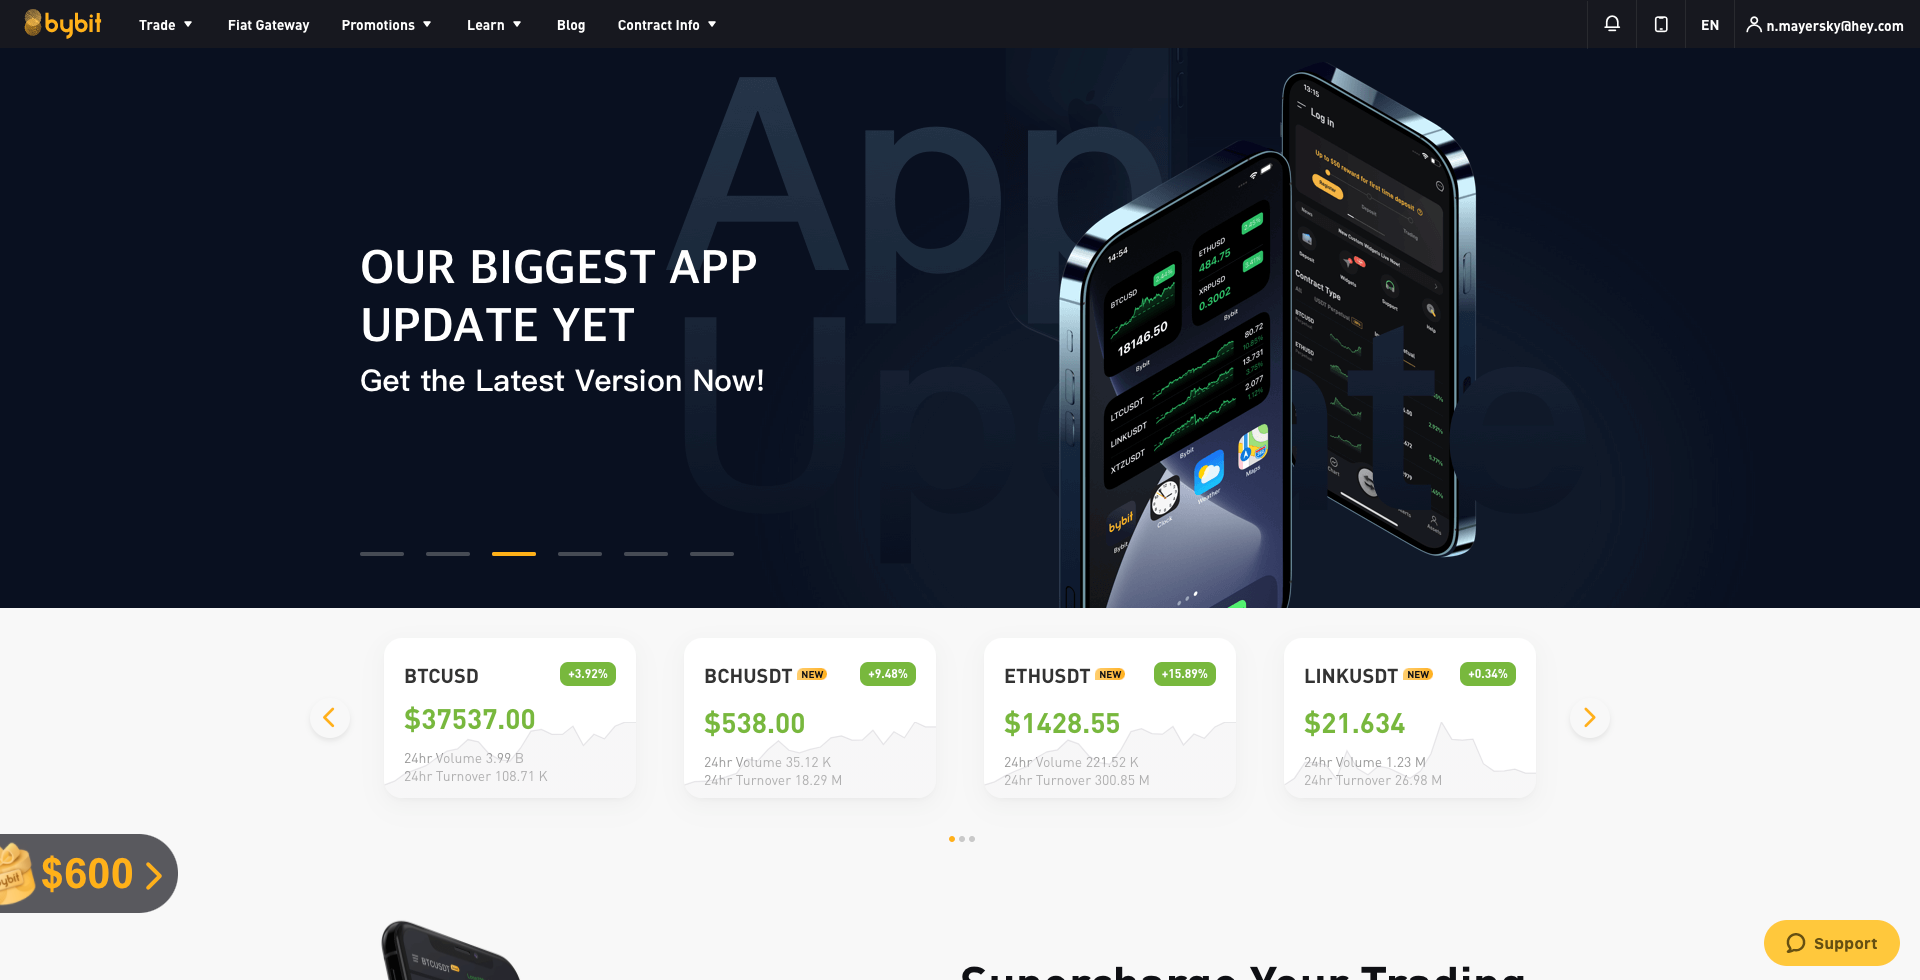
As far as futures exchanges go, I think they have the best mobile app in the game. The UI is very appealing to the eyes with both a dark and light mode (I prefer dark).
The application also has all of the features you'd find on the exchange while using your computer. You have your stop loss/take profit, limit orders, market orders, conditional orders, and literally everything else that's available on desktop. Props to Bybit for the awesome mobile app!
Oh, the Bybit mobile app now has widgets that you can enable too! These widgets display price feeds in a small box that you can put anywhere on your screen. These price feeds always sit on top of the screen, so no matter what you're doing you can see what price action is going on with your favorite pairings. https://www.bybit.com/en-US?affiliate_id=4855&group_id=0&group_type=1
Swapping currencies
Another awesome feature that Bybit has enabled is currency swaps. By heading to the ‘Assets’ tab, you can find an ‘Asset Exchange’ button. This button allows you to easily swap between any of the assets offered on the platform. You can also swap to USDT as well! https://www.bybit.com/en-US?affiliate_id=4855&group_id=0&group_type=1
The only downside to this is that they charge a fee. The fee for converting from BTC is a bit high. But, any other coins the fee is negligible. If they could implement a more dynamic fee structure for smaller amounts, this would be a killer feature.
Trading Fees
The fees are identical to Bitmex and most other industry competitors. If you always limit in and limit out, you can get paid to trade here. See below:
**Takers** (market order) pay ***0.075%*** on each trade, **Makers** (limit order) ***receive 0.025%*** on each trade. Funding occurs every 8 hours at 16:00 UTC, 00:00 UTC and 08:00 UTC. You will only pay / receive funding if you hold a position at one of these times.
Customer Support
Bybit has a live chat that operates 24/7 and is able to speak multiple languages. So far my experience with Bybit’s customer support has been excellent — they have always solved my problems / answered questions about the platform quickly and professionally. https://www.bybit.com/en-US?affiliate_id=4855&group_id=0&group_type=1
Conclusion
Overall, I have to say I really enjoy trading with Bybit. Over the few years of it's existence it has gained a large amount of users, enough to make it serious competition for other exchanges. With fees comparable and even lower than that of some of it’s competitors and an absolutely stunning user interface, Bybit has set itself up for plenty of future success. https://www.bybit.com/en-US?affiliate_id=4855&group_id=0&group_type=1
If you’re into derivative trading or are interested in getting started, ***I very highly recommend*** giving Bybit a chance. You will not be disappointed, that I can assure you. https://www.bybit.com/en-US?affiliate_id=4855&group_id=0&group_type=1
Oh, they also constantly have promotions going on. After signing up, head to the "Rewards" tab in the top navigation where you can unlock various BTC and USDT rewards to put towards trading fees or to use as additional margin!
Use my link below and enter the code "JACKPOT" in the Rewards page for an exclusive bonus!
https://www.bybit.com/en-US?affiliate_id=4855&group_id=0&group_type=1
Using Bootstrap in Rails ActionMailer
While working on a project for a client today, I ran across an issue when trying to use the standard Bootstrap CSS within the Ruby on Rails ActionMailer.
That problem had to do with compatibility issues. The way it gets rendered in different e-mail clients and on different providers websites is unique and this causes problems. What you'd like to see isn't what the client always sees.
This is where the `bootstrap-email` gem comes in handy. It gives you some basic Bootstrap classes to work with so it feels like you're using the traditional Bootstrap HTML and CSS. But, behind the scenes it gets converted to tables to ensure the same output on all clients.
Example:
<body class="bg-dark">
...content...
</body>
Would be converted to this:
<body>
<table class="body bg-dark">
...content...
</table>
</body>
The setup for this gem is rather simple. We will go over the few steps to get it up and running below.
How to setup Bootstrap for ActionMailer
1: Add the `bootstrap-email` gem to your `Gemfile` like so (note: I leave little comments on everything just so I, and anyone I'm working with knows exactly what is what. It's a nice practice when working with a team.):
# Bootstrap e-mail compatibility.
gem 'bootstrap-email'
2: Create or edit a mailer template. This is where we will yield the core content of our e-mails. Similar to how `layout.erb` works. Create the file `/app/views/layouts/mailer.html.erb` if it does not already exist and paste this HTML snippet inside:
<!DOCTYPE html PUBLIC "-//W3C//DTD XHTML 1.0 Strict//EN" "http://www.w3.org/TR/xhtml1/DTD/xhtml1-strict.dtd">
<html>
<head>
<meta http-equiv="Content-Type" content="text/html; charset=utf-8" />
<%= stylesheet_link_tag "application-mailer", media: "all" %>
</head>
<body class="bg-dark">
<%= yield %>
</body>
</html>
3: If you change the `mailer.erb` filename you will need to edit your `/app/mailers/application_mailer.rb` file to reflect that change. You would simply replace the `'mailer'` portion in single quotes below with your new mail layout file name.
# /app/mailers/application_mailer.rb
class ApplicationMailer < ActionMailer::Base
layout 'mailer'
end
If you get stuck, you can refer to the official ActionMailer documentation for more detailed information on using different layouts for different mailers. http://guides.rubyonrails.org/action_mailer_basics.html#action-mailer-layouts
4: Create a new CSS stylesheet `/app/assets/stylesheets/application-mailer.scss` and import `bootstrap-email`. Should you want to add any custom styles or override any of the Bootstrap defaults, you should do so within this file:
# /app/assets/stylesheets/application-mailer.scss
@import 'bootstrap-email';
5: Go to your `/config/initializers/asset.rb` file and let Rails know that it should watch for your new SASS file to be precompiled:
# /config/initializers/asset.rb
# Precompile bootstrap SASS for mailer.
Rails.application.config.assets.precompile += %w( application-mailer.scss )
6: Create your view/body file `/app/views/example_mailer/your_mailer_name.html.erb` and begin to style your e-mail using the Bootstrap classes available at https://bootstrapemail.com/docs https://bootstrapemail.com/docs/body
7: You should also create the textual view `/app/views/example_mailer/your_mailer_name.text.erb`. It's best to have both incase an e-mail client doesn't support HTML in their e-mails for whatever reason. A lot of privacy focused e-mail services and individuals tend to do this.
Usage
Now all you need to do is replace the `mail()` method that is typically used, with the `make_bootstrap_mail()` method to kick off Bootstrap Email compilation! This is where the HTML gets converted to tables for compatibility! Neat-o!
class ExampleMailer < ApplicationMailer
def greet
make_bootstrap_mail(
to: 'to@example.com',
from: 'from@example.com',
subject: 'Hi From Bootstrap Email',
)
end
end
You can also use `format`.
class ExampleMailer < ApplicationMailer
def greet
make_bootstrap_mail(
to: 'to@example.com',
from: 'from@example.com',
subject: 'Hi From Bootstrap Email',
) do |format|
format.html { layout 'custom_bootstrap_layout' }
format.text # here example_mailer.text.erb is used
end
end
end
Hopefully, this guide gets you started on creating beautiful ActionMailer templates for your application! The setup is super simple and the benefits of having guaranteed compatibility and a guaranteed similar output across all of the popular e-mail clients and apps is a big plus!
Enjoy!
How to earn interest on your Read.cash earnings and 35 other coins!
Earn 4.5%+ on your BCH holdings!
Are you making the most of your Read.cash and other crypto earnings? I'm willing to bet most of you aren't. You probably have your funds transferred to a wallet where you are not earning interest on the coins your holding? Why not when you can be earning ***over 4.5% on your BCH holdings***!?
Some may make the security claim. That's fine. I understand that argument. But, the service I'm referring to is insured, so your coins and money are safe. It's also a top 20 project by market cap. The project/wallet I'm referring to is Celsius. https://celsiusnetwork.app.link/1820074c46
What is Celsius?
Celsius is a cryptocurrency wallet and service that not only allows you to earn interest on the coins in your wallet, but you can also take out a loan on your assets so you don't have to cash them out, and when sending assets you pay no fees (Celsius pays all transaction fees! So, no need to worry about that ETH gas fee)! https://celsiusnetwork.app.link/1820074c46
The goal of Celsius is to help you **unbank** yourself. By the looks of it they're doing a damn good job. The interest rates you can earn on your crypto assets (even stable coins) far exceeds the interest rates you'd get from a traditional bank (at least here in the USA).
Celsius held their ICO in March of 2017 and since then they have grown exponentially. As of the time of writing, Celsius currently ranks #21 by market cap according to CoinGecko.
They have processed over **$8.2 billion** in loans, have over **330k** users, and over **$5.3 billion** in community assets.
The Celsius platform provides members with curated services unavailable through traditional institutions. Our goal is to act as a catalyst for financial disruption on a global scale by offering services that will bring the next 100 million people into cryptocurrency.
As stated before, Celsius is a legal and licensed business that you can trust. They are registered in the USA and are compliant with all regulatory bodies!
To learn more about Celsius, follow my link at the very bottom of this article! ***You can also earn a $20 BTC bonus when you signup by using my referral code below!***
What coins are supported?
Right now, Celsius currently supports **36 different crypto assets** as of the time of this post. But, they are always adding more with plans to add LINK, ALGO, TRX, BNB, ZEN, BAND, IOTA, KAVA, and more in the very near future.
Celsius supports most of the large and most well-known currencies such as Bitcoin, Bitcoin Cash, Litecoin, Ethereum, XRP, and Tether. But, they also support many other stable coins (many from the True stable coin family and many from Paxos), ERC-20 tokens, and others.
You can also see a list of tokens they are planning to release within the near future. Those include LINK, ALGO, TRX, BNB, ZEN, BAND, IOTA, KAVA, and more as stated at the beginning of this section.
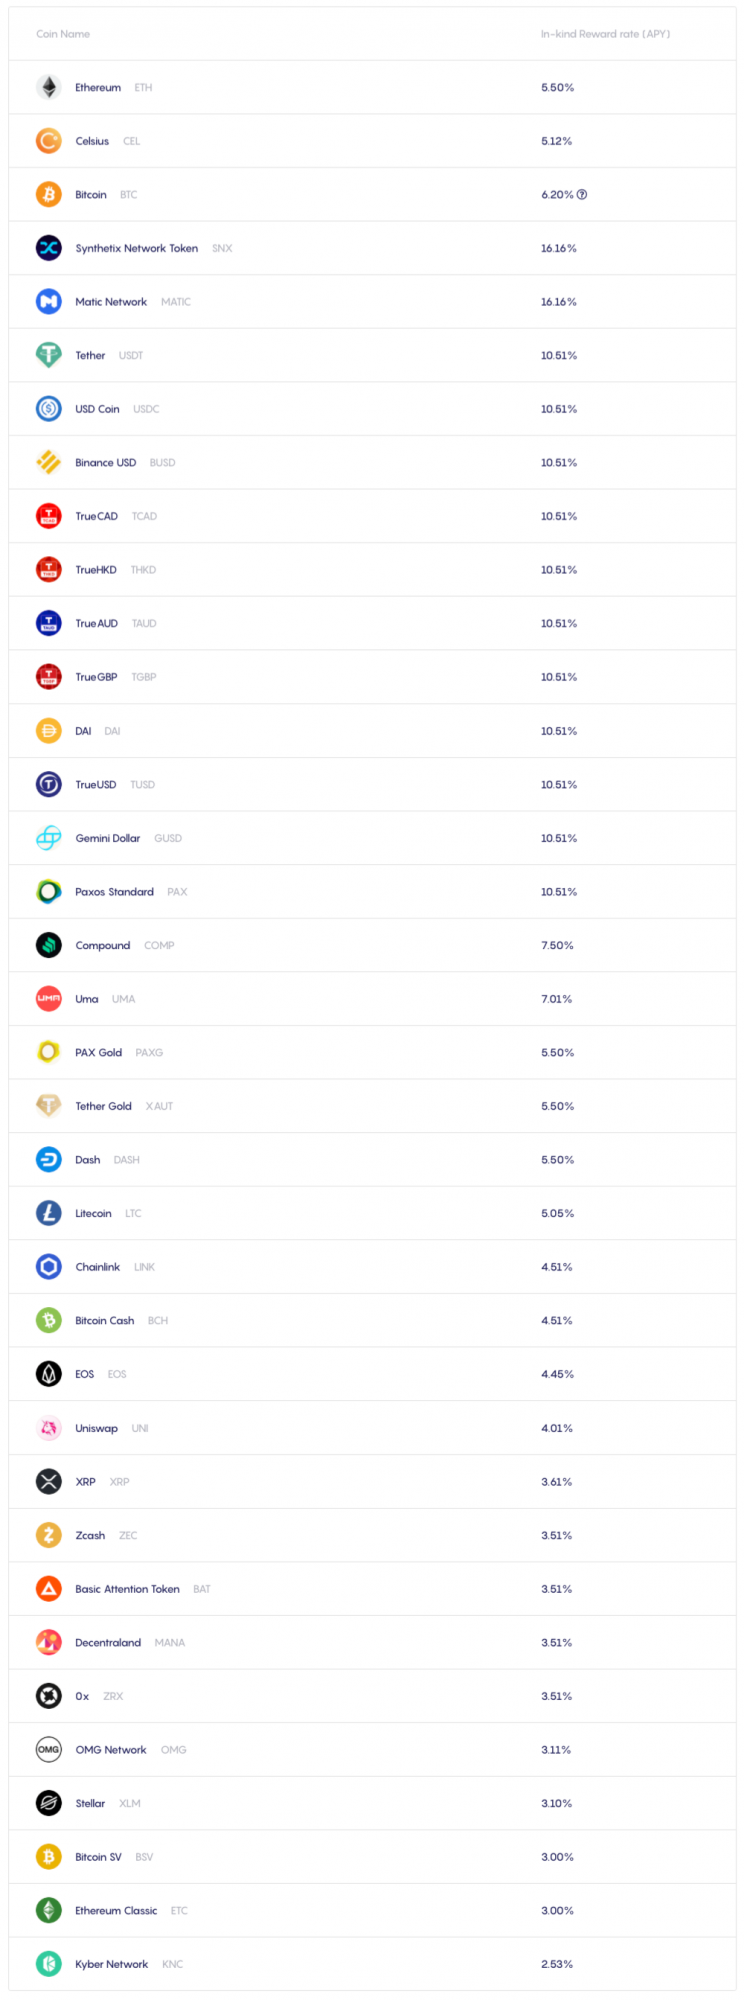
Below is a screenshot with a list of all the currently supported assets taken directly from their website. Here you can see the coin names along with their current interest yield rate (Annual Percentage Yields).
So, what are you waiting for? Follow the link below to get started earning interest on your crypto assets now! Don't just let them sit there earning 0% interest. ***Make your money work for YOU.***
Personally, I have had a Celsius account for almost 2 years now. But, it wasn't until recently that I finally decided to put it to use. I couldn't say no to earning interest and paying no TX or gas fees when sending assets. The no TX fees alone is almost enough incentive for me to use Celsius. 😝
Get a $20 BTC bonus!
If you'd like to give the Celsius wallet a whirl, be sure to follow the directions below or else you will miss out on the opportunity to earn a $20 bonus in Bitcoin!
If you use my referral link, you will also get a ***$20 bonus in Bitcoin if you deposit $200 or more worth of assets within the first month!***
So, join Celsius Network using my referral code **1820074c46** when signing up and earn $20 in BTC with your first transfer of $200 or more! #**UnbankYourself** **https://celsiusnetwork.app.link/1820074c46**
Tips on finding jobs for new and/or self-taught developers
I've been doing freelance programming work in various languages for over a year now. For the most part, I am a self-taught developer. However, I did have *some* training that includes a bootcamp I never finished and 1 year of University. I wouldn't exactly say that they have helped me much as far as my career goes (I did learn a small amount from the bootcamp I suppose).
This post is a small guide on what I've found to be the most effective things when it comes to finding freelance jobs. These also carry over to full-time company gigs as I've had several offers, but refused as I enjoy the freelance life.
Tip #1: Keep a tech blog and personal portfolio.
This one should pretty much be a no brainer and is my #1 recommendation to anyone looking for a programming job.
Combine your blog and portfolio to one site. A single place where you can showoff your knowledge of the field. Get a domain name for it (mine is https://nolanm.dev/). I always recommend trying to get a domain that includes your name in someway. Try to avoid nicknames or usernames. It seems very unprofessional, imo.
Make sure you use that blog! If you learn something new, write about it. Write your own guide or tutorial about it. This is a great way to show off what you know. It could also help out someone else that stumbles across it randomly on the web. I try to write on mine at minimum of once a month.
Be sure to keep your portfolio updated. Mine is always up to date (except right now as I'm currently working on 2 gigs that I will add once completed).
Recruiters and people doing the hiring ***WILL*** be taking a look at your blog/portfolio. So, make sure it's nice and easy to read and navigate. I personally like to keep things minimal and clean since I'm no designer. Refer to the link to my blog/folio above. Very simple, yet I get plenty of compliments about how neat, clean, and organized it is.
Tip #2 Build that blog/portfolio on your own!
This one is simple. Use your favorite tech stack and framework to build your blog and portfolio.
Do not use Medium, WordPress, or other pre-made blogs or CMS's. It looks lazy.
Plus, it gives you something else to add to the portfolio! Personally, I built mine with Ruby on Rails. But, I'm planning on re-doing it sometime here in the near future.
Tip #3 Keep an updated resume.
This is another obvious one, but keep an updated resume! Many people slack on this part of the job search.
Make sure to include a good amount of your past work. If you have no past professional experience, then include your personal projects, certificates, or anything else that shows what you know!
Tip #4 Create and keep your LinkedIn profile updated.
I constantly get contacted by recruiters on LinkedIn simply because I keep mine up to date. Often times these recruiters have good paying offers too. It's just a matter of finding one that fits your experience level and interests.
Tip #5 Explore freelance platforms to gain experience
This is what got me started on professional experience. I found a lot of part-time gigs through freelancing platforms like Gun.io (my favorite because they only deal with companies that pay US rates), UpWork, Toptal, etc. https://gunio.referralrock.com/l/1NOLANMAYER79/
Once you land your first client, the next ones become a lot easier!
Also make sure you keep these platform profiles as up to date as possible!
Conclusion
Well, that's all. I hope some of you new developers have found this article somewhat helpful. Most of this stuff is common sense and just not being lazy. If you're passionate about what you do and genuinely enjoy the craft, it should be easy to get all this stuff done and you'll be well on your way to landing your first interviews and jobs!

How to simulate a domain on your local dev machine
Do you hate using "localhost" or "127.0.0.1" while your working on your projects? If so, just know that you are not alone. And here at my blog, we have the solution to your problem! That's right! We can end your suffering now! 🤣
Fortunately, it's a pretty quick fix.
Below I will show you how to do this on any unix system. This includes any Linux distributions as well as MacOS!
The first thing we will want to do is use our favorite terminal text editor (I suck at vim so I just use Nano 😝) to modify our `/etc/hosts` file.
I've also provided the command to access the hosts file on Mac as well as it's *slightly* different from the Linux command:
# Linux
sudo nano /etc/hosts
# Mac
sudo nano /private/etc/hosts
# Your host file should look something like this here. It will probably have
# a couple other entries so don't worry if it's not the exact same.
GNU nano 4.8 /etc/hosts
127.0.0.1 localhost
...
# We will be adding this line!
127.0.0.1 my-made-up-domain.dev
# We could also add subdomains too!
127.0.0.1 subdomain1.my-made-up-domain.dev
127.0.0.1 subdomain2.my-made-up-domain.dev
All we are doing here is mapping our localhost/domain `127.0.0.1` to our made up domain. So, when we type in our made up domain in a browser, it will just be accessing localhost or 127.0.0.1. It's just a cosmetic difference, that's all!
Setting it up for Rails or other App development
If you'd like to use a simulated domain with Rails, Sinatra, Django (or another software), we can do this 2 different ways.
The first way would be to start our rails server with the standard command and just add a `-b my-made-up-domain.dev` to that command like so:
rails s -p 3000 -b my-made-up-domain.dev
But, that's kind of annoying having to type that out every time, right?
What I will do is write an alias for this command in my shellp configuration file. So that when I type "mmud" into my terminal (you can use any alias you want, it could be "chocolate rainbow" if you want it to be), it will run that rails command automatically.
To do this, we will need to edit our terminal config file.
Again we need to pull up our favorite terminal text editor (sorry vim you still suck) and modify our shell's config file. Depending on if you use Bash or ZSH, this can vary. Note: Mac users use ZSH by default.
# FOR BASH
sudo nano .bash_profile
# OR
sudo nano .bashrc
# OR
sudo nano .profile
# FOR ZSH
sudo nano .zshrc
Once there, we only need to add one small line. I'd also add a comment above it so you don't forget what it does if you ever come back and edit this file later. It's a good practice to use.
# Rails my-made-up-domain.dev.me alias command (mmud)
alias mmud='rails s -p 3000 -b my-made-up-domain.dev'
That's it!
Now when I want to run my rails server on my local dev machine, I just type mmud into my terminal and it executes the `rails s -p 3000 -b my-made-up-domain.dev` command. That's way neater and easier to remember right?
As I said before, you can follow these same steps for other softwares like Sinatra, Django, Phoenix, or any other framework that boots up in a similar fashion.
Hope you found this helpful! Enjoy!
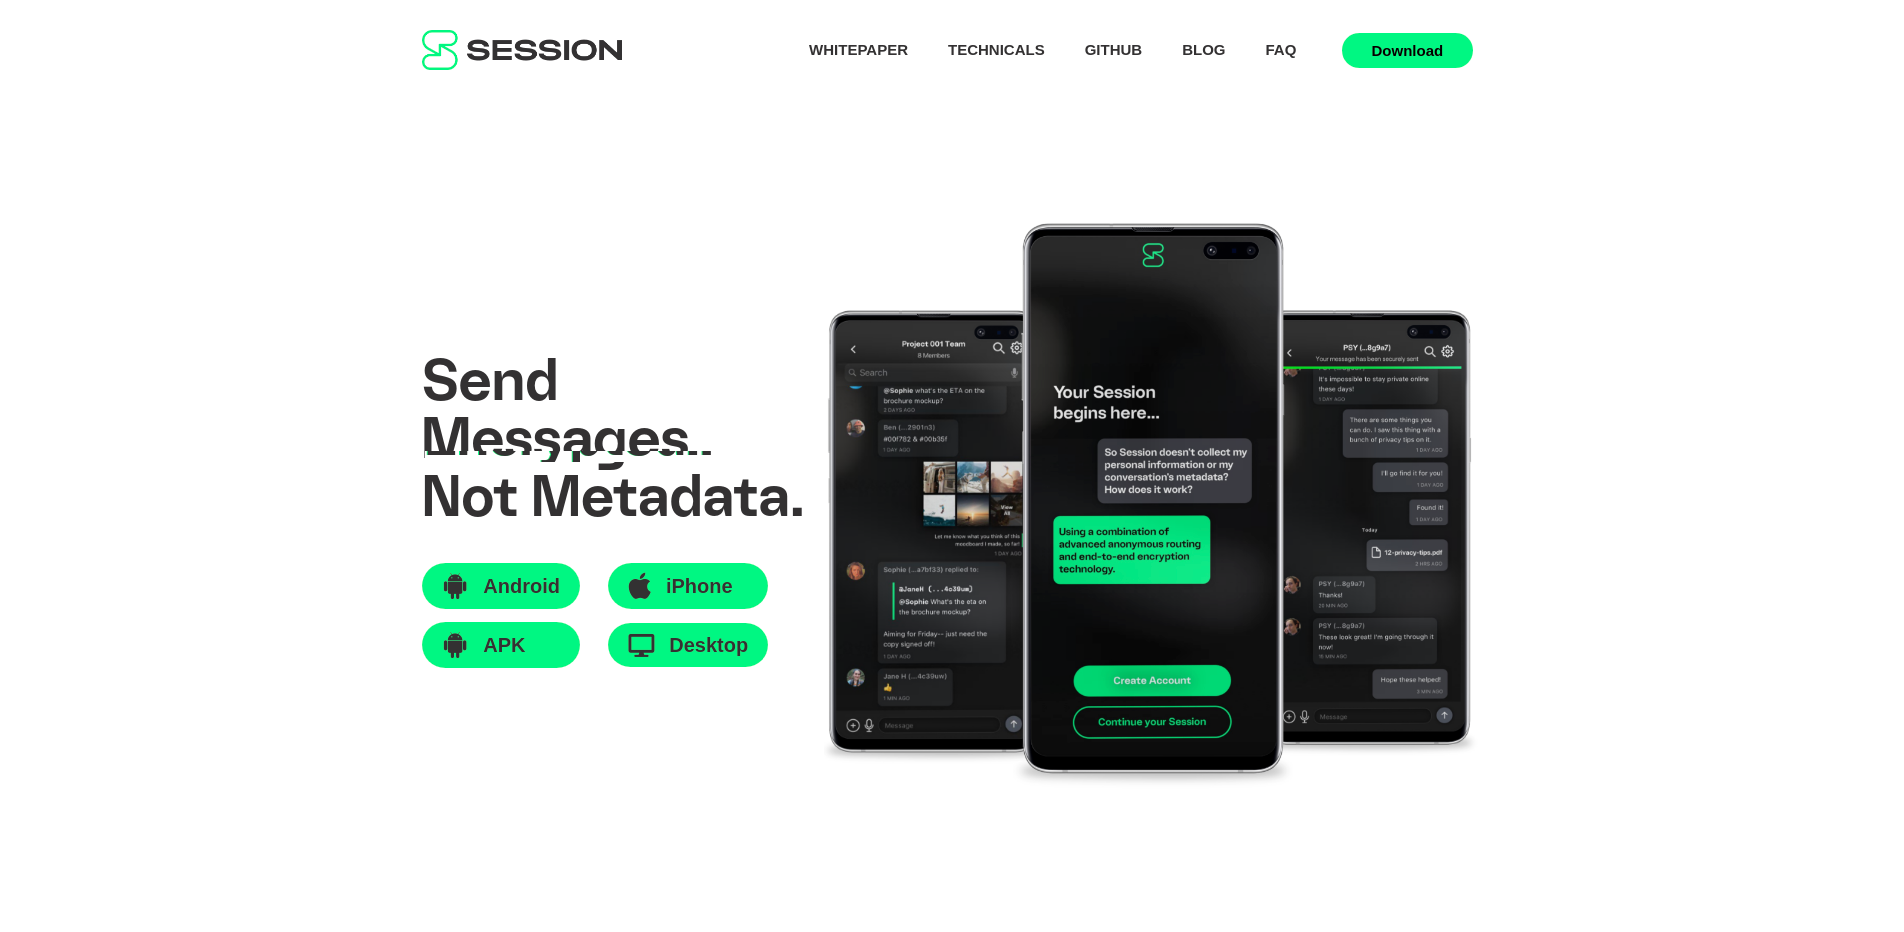
Session Messenger by Oxen - Why you should pay attention!
I have been following the Loki project (which has now rebranded to Oxen and will be referred to as such throughout the rest of this article) and their development team for a couple years now.
They are behind a few different privacy tools in addition to their privacy coin.
Oxen is a cryptocurrency based on the same protocols as Monero, with a proof-of-stake model rather than proof-of-work. Oxen also offers some unique privacy tools as well.
Oxen Coin - A cryptocurrency based on the same protocols as Monero, but utilizing a proof-of-stake consensus model with "service nodes" that are similar to "master nodes" you'd see on some other popular networks like Dash.
Lokinet, being one. It is similar to Tor, however it is supposedly less prone to sybil attacks simply because the cost and logistics of doing such.
Session Messenger being another.
In this post we will be going over Session, and why you should be using it now or at the very least, paying attention to it. Especially if you value privacy!
Features
Session masters the usual chat functions. There are voice messages, a GIF search (with privacy warning), file sharing and group chats.
You can add new contacts by scanning a QR code or exchanging the session ID/public key. You can share your groups via a link.
Another advantage Session has over similar competitors Signal or Telegram or WhatsApp is the end-to-end encrypted group chats. Up to ten people can network **completely anonymously**.
Session is available in the Play Store (or as an APK), in the App Store for download for Windows, macOS, iOS, and Linux.
You can use the same Session ID on all your devices at the same time. I currently access mine from my Samsung Note 10+ and Pop_OS 20.04 desktop.
After installing Session, it creates a - hence the name - new session.
This is protected by a recovery phrase. So if you change your smartphone, you can continue your session on the new device using this phrase.
Or you can setup multiple devices such as your phone and. PC, both using the same keys to communicate! Nice!
Who is behind Session?
Session is part of the Oxen Foundation, which is a non-profit organization without a permanent seat. The CEO is Simon Harman from Australia.
Despite the project being a non-profit, it wants to monetize it's products. Parts of the infrastructure are based on a blockchain network, $OXEN/$LOKI.
Session is also forked from the popular encrypted messaging app Signal.
However, unlike Signal and other popular encrypted messaging apps, Session **DOESN'T** require any of your information to start using it.
No e-mail addresses or phone numbers or any other revealing informations required!
This is because Session uses private keys, like Bitcoin! Neat!
Lots of Potential
Session is still very young. But, it has a ton of potential.
The decentralized nature and lack of data collection makes it a really interesting to those who value their privacy.
Especially considering all the censorship and data collection that has been happening with the tech giants and big social networks like Google, Facebook, and Twitter just to name a few.
If this sounds something you'd be interested in checking out, go ahead and click the links to the Session and Oxen official websites I've pasted below!
There you will find heaps of more information and the download links to give it a test-drive yourself! Enjoy!
Session Official Site - https://getsession.org/
Oxen Official Site (currently under construction as of writing this post) - https://oxen.io/
Be sure to spread the word! Privacy is an important part of the internet and we all should value it highly! Don't let the big tech giants continue to make money by selling your valuable data! You'd be amazed if you read the Terms and Conditions and Privacy Policies of some of these sites and apps!
Flutter CI/CD using Codemagic is buttery smooth! Highly recommend!
Flutter CI/CD using Codemagic
Previously for my Flutter apps, I was using Microsoft's AppCenter for CI/CD purposes.
I decided to move away from this for primarily 2 reasons. The first reason being the lack of support for Flutter. Without native support for Flutter applications, you need a separate build for every app (Android, iOS, Web, Windows, etc.). So, if I'm developing a mobile app, I have to create a separate build for Android and another for iOS. With Codemagic, it's all done within a single build/repo.
Secondly, the pre and post scripting to get it to work with Flutter. In addition to requiring multiple builds, you also have to run pre and post scripts just to get it to build the Flutter application properly. Another thing that can be avoided and result in less overhead with Codemagic.
While researching CI/CD solutions for Flutter, one of the first I came across was Codemagic.
Codemagic provides 500 minutes of build time per month for free, which is a pretty nice deal. It should be enough for any small or single developer projects. I personally have not exceeded the limit in my use of Codemagic, yet. I don't use it THAT much, so 500 is plenty for me.
They also offer a pay as you go plan as well. So, after you use your 500 minutes, you can pay X amount per minute after. All build are done on a Mac OS virtual machine.
The main reason I switched to Codemagic is because they ACTUALLY support Flutter! 1 build that tests all of the apps! Like I said before, with AppCenter you have more builds which means more overhead. And more overhead means more potential problems. Right!? This simplifies a lot of the process I was doing with MS AppCenter.
Getting Started with Codemagic
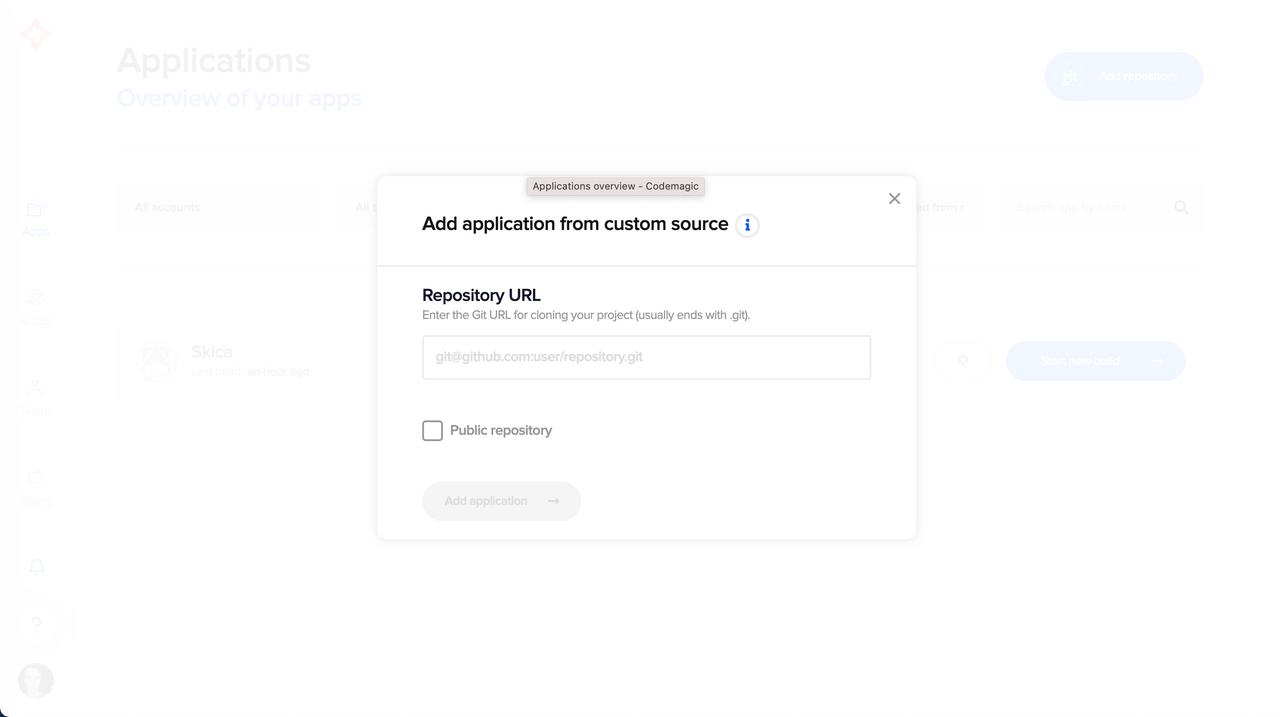
After creating an account, you can add your application from a given source, whether that be GitHub, GitLab, BitBucket, self-hosted, or any other Git source. I myself use the classic Github. :) I'm quite traditional. :P
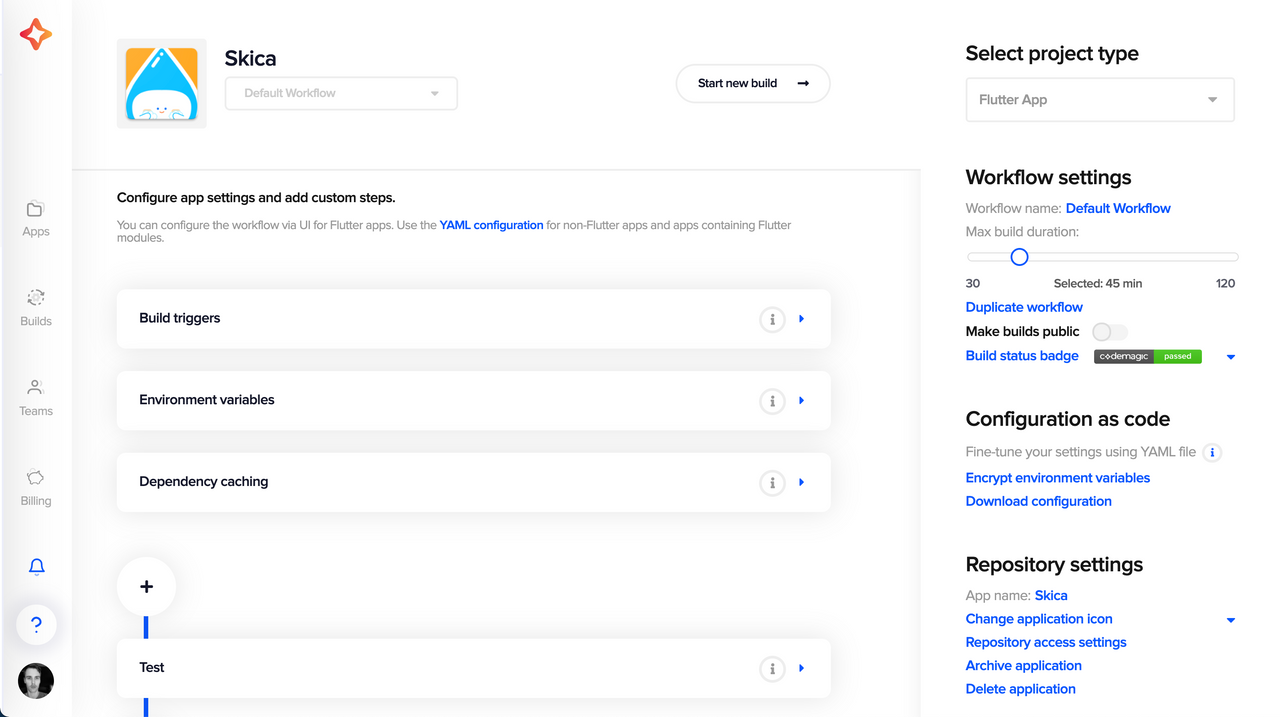
From there, you a presented with a screen where you can set your various build options.
This includes things such as the build triggers (I use commits to the Master branch as my trigger), which branches you want builds ran on, environment variables, tests dependency caching, publishing, pre and post build scripts, other misc. settings and more!
Once you have your options set, then you are ready to run your first Codemagic CI/CD build!
I noticed the build did take a bit longer than expected, well, my iOS build took longer than expected I suppose. I found out later this has to do with iOS podfiles and more specifically the Firebase Firestore one.
If you use Firebase on Flutter, you can expect longer build times with iOS. Hopefully they can get this fixed soon. The build time is about 8x that of Android! But, we have to work with what we have, right?
Below is a screenshot of what the build screen looks like as your app build is being ran.
Conclusions - I LOVE IT!
My experience with Codemagic thus far has been great! I really have no complaints other than the slow iOS build. But, as I stated above, that isn't a Codemagic issue, it's a Firebase issue and will be the same in any CI/CD application.
The integration with Flutter is buttery smooth. It was super easy to get set up compared to AppCenter. I literally had my app being built in less than 10 minutes as opposed to hours with AppCenter and that's pretty awesome if you ask me.
If you are a Flutter dev or are developing any other Codemagic supported softwares, definitely give them a look as they offer a very reasonable free plan in addition to reasonably priced pay as you go services.
I've included a screenshot below of their pricing models for anyone who is interested in that information.
Randomizing data with Flutter and Firebase. My walkthrough of various solutions.
*So*, recently while working on the Skica Flutter application, I struggled with a problem of randomizing data and calling it the way I wanted to. Below goes through the various transformations of my code
The 'tips' Cloudstore collection reference, a Random, and a 'next' function that randomizes a number between a given min and max range.
class _TipsCardState extends State<TipsCard> {
CollectionReference tips = FirebaseFirestore.instance.collection('tips');
final _random = new Random();
String next(int min, int max) =>
(min + _random.nextInt(max - min)).toString();
String _randomTip;
int _tipsCount;
Future<int> countDocuments() async {
QuerySnapshot _myDoc = await tips.get();
List<DocumentSnapshot> _myDocCount = _myDoc.docs;
print(_myDocCount.length);
return _myDocCount.length;
}
Future<DocumentSnapshot> getTips() async {
_tipsCount = await countDocuments();
_randomTip = next(1, _tipsCount);
return await tips.doc(_randomTip).get();
}
The problem I ran in to was trying to accomplish this all in a single function. There really is no reason to over complicate functions. Though, I'm pretty sure it can be done, it's better to just seperate things if it makes the code more readable, imo.
First is the `countDocuments` function.
This one is very simple. We're simply querying the `Tips Collection`, then getting the documents that belong to that collection and returning it's length. This gives us the amount of `Documents` in the Tips `Collection`.
**Note:** In Firestore, a Collection contains Documents.
In the body of the app, the `getTips` function is called within a `FutureBuilder` widget. Since it returns the `DocumentSnapshot` of the database.
But! I ended up simplifying this even more by using a provider! I added a `StreamProvder<Tip>` to my app's `MultiProvider` like so. The code to randomize the tips remains the same, however now I manually set the range instead of generating it. dynamically. No biggie.
class App extends StatelessWidget {
static FirebaseAnalytics analytics = FirebaseAnalytics();
final _random = new Random();
String next(int min, int max) =>
(min + _random.nextInt(max - min)).toString();
String _randomTip;
@override
Widget build(BuildContext context) {
_randomTip = next(1, 33);
return MultiProvider(
providers: [
ChangeNotifierProvider<AuthProvider>(create: (_) => AuthProvider()),
StreamProvider<User>.value(
value: FirebaseAuth.instance.authStateChanges(),
),
StreamProvider<Tip>.value(
value: TipProvider().streamTip(_randomTip),
),
],
The `StreamProvider`'s value is `TipProvider().streamTip(_randomTip)` which is the following code below:
class TipProvider with ChangeNotifier {
final String uid;
TipProvider({this.uid});
final FirebaseFirestore firestore = FirebaseFirestore.instance;
bool loading = false;
Stream<Tip> streamTip(String id) {
return firestore
.collection('tips')
.doc(id)
.snapshots()
.map((snap) => Tip.fromFirestore(snap));
}
The `TipProvider` also contains other useful methods related to tips such as `addTipLike`, `removeTipLike`, `addTipBookmark`, `removeTipBookmark`, etc.
This is a much more clean way of organizing this code, imo. We can store methods/functions related to the Tips in the `TipProvider` file.
Plus, having it set up as a `StreamProvider` allows the data to be kept updated in real time! And there is virtually no extra cost in Firebase, as compared to calling it manually each time.
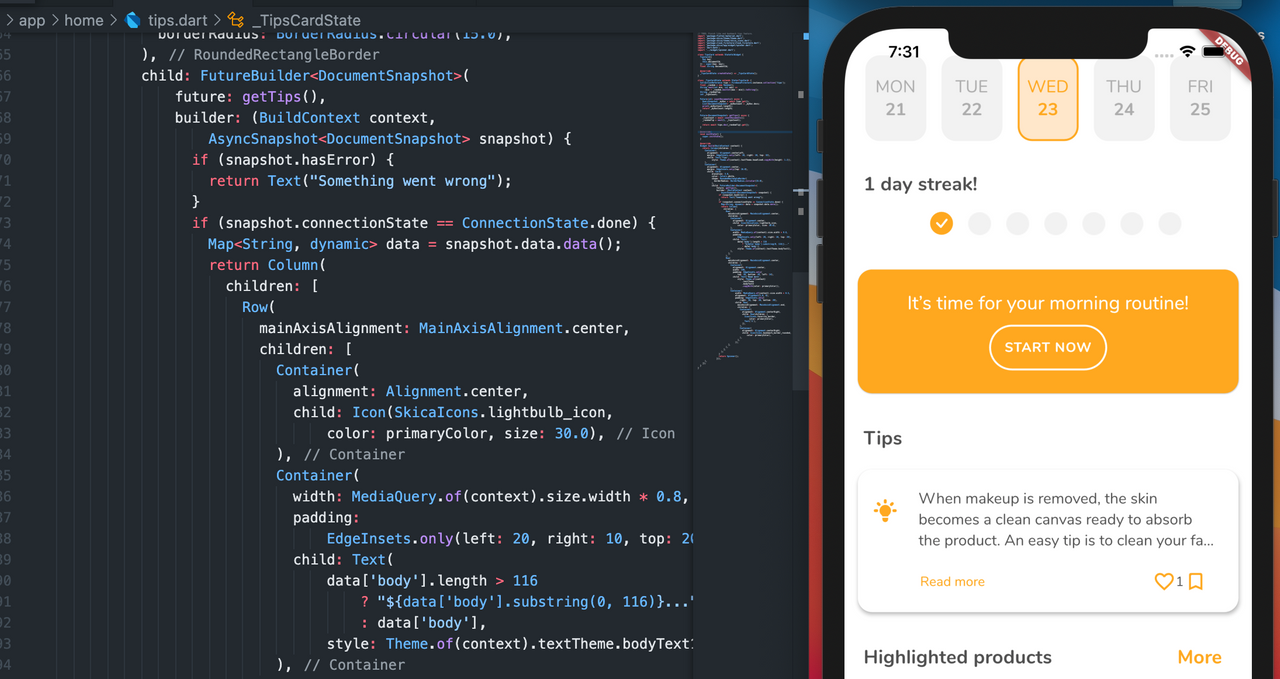
The end result is displaying that tip within the app like so, with real time updates to the likes count! Neat right!?
Flutter State Management - Using Provider to check if user is already logged in.
Flutter and State Management
While working on the Skica app, one issue I noticed is that when closing and reopening an app, the users are asked to login every time since the login screen is the first page they're intended to see.
I started thinking of different solutions. But, the one I ended up settling on was using a "wrapper" that is loaded first. This wrapper checks to see if a user is already logged in. If so, it sends them to the home page. If not, to the login.
Because the Wrapper is a top-level page, we must use the Provider package (Provider is the standard for state management), to pass that information up our widget tree to the Wrapper.
I will show you how this was done below.
`app.dart`
class App extends StatelessWidget {
static FirebaseAnalytics analytics = FirebaseAnalytics();
@override
Widget build(BuildContext context) {
return MultiProvider(
providers: [
ChangeNotifierProvider<AuthService>(create: (_) => AuthService()),
StreamProvider<User>.value(
value: FirebaseAuth.instance.authStateChanges(),
),
],
child: MaterialApp(
home: Wrapper(),
navigatorObservers: [FirebaseAnalyticsObserver(analytics: analytics)],
theme: skicaTheme,
),
);
}
}
This is the entry point to the app. As you can see, `MaterialApp` has Wrapper returned as its home option. So when the app is started, it starts by creating a `MultiProvider` widget(where we declare our different state objects) and that has a MaterialApp child.
`wrapper.dart`
class Wrapper extends StatelessWidget {
Wrapper({Key key}) : super(key: key);
@override
Widget build(BuildContext context) {
final User user = Provider.of<User>(context);
final AuthService authService = Provider.of<AuthService>(context);
if (authService.loading) {
return Spinner();
} else if (user == null) {
return LoginPage();
} else {
return HomePage();
}
}
}
Our wrapper.dart is pretty simple. If the `AuthService` is loading, it gives us a loading spinner. If user, which is equal to a Provider, is null, we get the login page. Otherwise, give us the home page.
Now to see how the state is passed, I will show a snippet of the Google auth in my `AuthService` class.
`auth.dart`
class AuthService with ChangeNotifier {
bool loading = false;
// Signin with Google.
Future<void> signInWithGoogle() async {
// See: https://firebase.flutter.dev/docs/auth/social/
loading = true;
notifyListeners();
final GoogleSignInAccount googleUser = await GoogleSignIn().signIn();
if (googleUser?.authentication != null) {
final GoogleSignInAuthentication googleAuth =
await googleUser.authentication;
final GoogleAuthCredential credential = GoogleAuthProvider.credential(
accessToken: googleAuth.accessToken,
idToken: googleAuth.idToken,
);
await FirebaseAuth.instance.signInWithCredential(credential);
}
loading = false;
notifyListeners();
}
Here you can see that the `signInWithGoogle` function has a loading boolean set to true at the beginning of the function. This is what is being referenced in the Wrapper. The wrapper is aware of this because of the line below the loading boolean which is `notifyListeners()`.
`notifyListeners()` is what notifies your Providers of the current state of something. This is why the Wrapper is able to check on the value of `authService.loading`.
Because this app is integrated with Firebase Firestore, we have a nice simple way to handle social logins. If you look back to the `app.dart` file in our `MultiProvider`, you can see where the Providers are listening for the changes.
`app.dart`
providers: [
ChangeNotifierProvider<AuthService>(create: (_) => AuthService()),
StreamProvider<User>.value(
value: FirebaseAuth.instance.authStateChanges(),
),
],
If there are changes, the state is made available to the widgets children. `ChangeNotifierProvider` and `StreamProvider` do behave in slightly different ways, but essentially they both make the state of something available.
I know to some this may seem a bit complicated. I know it was one of the harder things for me to grasp at first. But, once you start trying to implement it yourself, it becomes a lot easier to understand.
That's all for my little intro to Flutter and State!

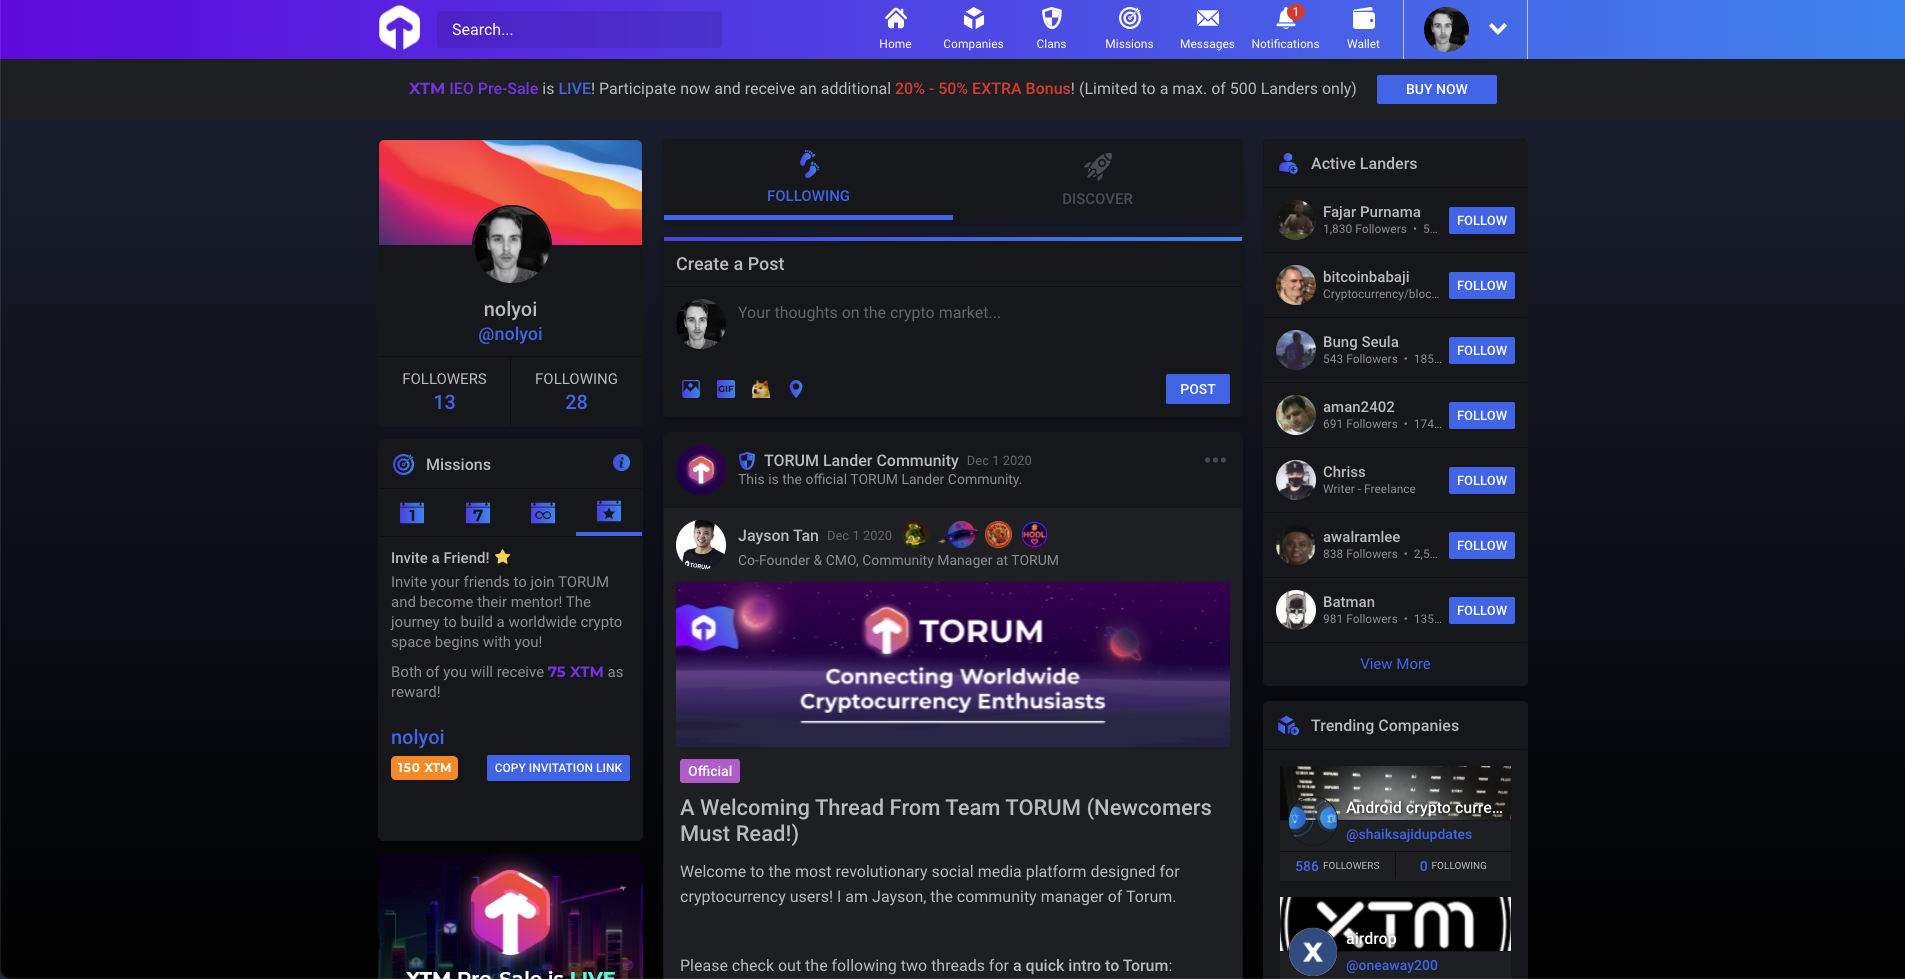
Are you on Torum? It's like crypto Twitter, but cooler looking. :P
What is Torum?
Torum is a project I have been posting on personally a bit as of late. It reminds me of a Twitter-like network that is hyper-focused on cryptocurrencies and blockchain tech. https://www.torum.com/signup?referral_code=nolyoi
Torum describes itself as: https://www.torum.com/signup?referral_code=nolyoi
A cryptocurrency-powered social media designed to form a powerful ecosystem by bridging the social gap between blockchain-based entities and cryptocurrency enthusiasts.
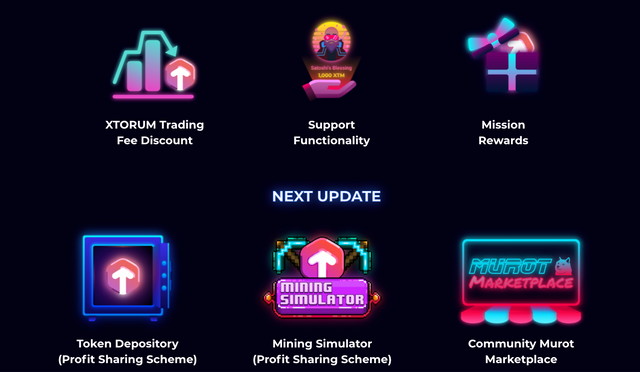
Other than allowing users to showcase their unique crypto identities, TORUM also includes various features and functionalities:
Torum also features clans which function as communities within the ecosystem. This is where people can post about and discuss related topics through either posts or the chat system.
Then there are company profiles. Company profiles are exactly what they sound like. It's a spot where you can find detailed information about different projects and get some of the latest news about them as well!
Torum also has it's own token, XTM. XTM is the ERC-20 utility token of the ecosystem which serves as the backbone of both TORUM and XTORUM with extended versatility, thus powering the entire ecosystem. The image above shows some of the current and future uses of XTM.
Overall, it seems like an interesting and well-designed project. So, I'm going to keep building up my stack of tokens while I can because you never know!
***Are there any Hive/Leo users on Torum? If so, share me a link to your profile and I'll give you a follow. I need some friends there.***
If not, use my link below to receive a ***free 75 XTM sign-up bonus***!
https://www.torum.com/signup?referral_code=nolyoi
My #FinancialGoals2021 - Build up the crypto wealth!
Well, since it seems to be the hot new trend here on LEO, you guys get to hear about my financial goals for 2021! How exciting!
Outside of my money that automatically gets deposited into my 401k, all of my other savings get invested in crypto. Why? Because I believe in it. I'd say about 50% of my investments are in cryptocurrencies and blockchain technologies. Go big or go home!
My goals
I already have a list of projects that I find useful and that I believe have a successful future. A majority of the crypto landscape does not fit that criteria and are "shitcoins" imo.
So, first up...
**Bitcoin!**
Bitcoin is the largest stake of my crypto holdings, naturally. I don't want to get into specific numbers (though it's nothing large lol), but I'd like to continue investing in BTC at nearly the same rate.
Also, I enjoy trading. And all of my trades are settled in BTC. Even my forex and stock index trades. 😎 If you'd like to have yours settled in BTC too, start trading at https://go.primexbt.com/click?pid=643&offer_id=12&l=1570530934. I've used them for over a year now! My referral link (https://go.primexbt.com/click?pid=643&offer_id=12&l=1570530934) I have some promocodes too if anyone is interested.
**Hive Ecosystem**
I recently came back to the HIVE ecosystem. I left when the Steem and Hive drama started. So, my account is a bit smaller than I'd like. But, that's okay!
By the end of 2021, I'd like to have 20,000 Hive Power. I'd also like to increase my Leo Power from ~600 to 5,000!
Hopefully I can build up the blockchains best dCity by next year as well. :)
**Privacy Coins**
I'm a huge advocate of privacy and thus privacy coins. I'd like to direct more money into zCash and Monero.
There is also an interesting project called Loki. They are a fork of Monero, but they are switching to proof-of-stake soon. They've also built a privacy messenger called Session based on the signal protocol. And they also have a privacy tool for browsing online called Lokinet.
Definitely check out Loki. They are very undervalued IMO.
**Other tokens I'd like to invest in.**
There are a few other tokens I'd like to put some money into. One of them is LBRY which I'm sure many are familiar with here. They have been around for years now and are always improving their product. I think they will continue to improve and be around for many years to come.
**Algorand**. Algorand is a platform similar to Ethereum. They do have a unique proof-of-stake mechanism though. They also have one of the strongest teams in the crypto world imo.
**Ampleforth**. AMPL is a cryptocurrency and financial building-block. Much like Bitcoin, it is algorithmic and uncollateralized. However unlike Bitcoin, AMPL can be used to denominate stable contracts. AMPL also has a team of ex Google engineers and graduates from top Universities.
**Nimiq**. Nimiq is a crypto designed to run in your browser. It is lightweight. Account creation is super simple. Payments are quick. And it's just simple overall. It's written in JS. This is why I like it. Nimiq also has a strong team that has been developing for awhile. They have a lot on their roadmap so it will be interesting to see how it improves.
If you made it this far, thank you for reading! That's awesome.
What are your top 3 crypto picks for 2021 and why? Besides BTC of course.
Skica Flutter app update! Progress slow and steady. Provider making me mad.
App update!
So, the last couple weeks I've been working on finishing up the applications home page and refactoring as much of the code as possible. I think I'm about done with that with the exception of the 'Recommended Products' section which may or may not be in the initial release.
I've begun coding the 'Routines' page. This is where users can add/edit/delete steps from their skincare routines. In the future they will also be able to add/edit products as well. I still have a long way to go for the routines features, but I'll get it done!
Check down below for an animated GIF of the app! It's super slow for some reason, but it wizzes through what I completed so far.
Some struggles
The only thing I really struggled with lately is getting Provider to work the way I want. When you have a `Stream` that depends on another `Provider/Stream` it is near impossible to get them to work together.
I originally thought `ProxyProvider` would do the trick. But, it doesn't seem to play well with `Stream` for some reason. Idk, maybe I was doing it wrong. I wanted it to look something like this, neat with a `ProxyProvider` inside my `MultiProvider`. But, you can't always get what. you want I guess.
class App extends StatelessWidget {
static FirebaseAnalytics analytics = FirebaseAnalytics();
final _random = new Random();
String next(int min, int max) =>
(min + _random.nextInt(max - min)).toString();
String _randomTip;
@override
Widget build(BuildContext context) {
_randomTip = next(1, 33);
return MultiProvider(
providers: [
ChangeNotifierProvider<AuthProvider>(create: (_) => AuthProvider()),
StreamProvider<User>.value(
value: FirebaseAuth.instance.authStateChanges(),
),
StreamProvider<Tip>.value(
value: TipProvider().streamTip(_randomTip),
),
ProxyProvider<User, UserData>(update: (_, user, __){
return RoutineProvider().userRoutineStream(user.uid)
})
],
child: MaterialApp(
home: Wrapper(),
navigatorObservers: [
FirebaseAnalyticsObserver(analytics: analytics)
],
theme: skicaTheme,
),
);
}
}
The only solution that worked for me was nesting them like so:
class App extends StatelessWidget {
static FirebaseAnalytics analytics = FirebaseAnalytics();
final _random = new Random();
String next(int min, int max) =>
(min + _random.nextInt(max - min)).toString();
String _randomTip;
@override
Widget build(BuildContext context) {
_randomTip = next(1, 33);
return MultiProvider(
providers: [
ChangeNotifierProvider<AuthProvider>(create: (_) => AuthProvider()),
StreamProvider<User>.value(
value: FirebaseAuth.instance.authStateChanges(),
),
StreamProvider<Tip>.value(
value: TipProvider().streamTip(_randomTip),
),
],
child: Consumer<User>(builder: (_, user, __) {
return StreamProvider<UserData>.value(
initialData: UserData(
name: 'Friend',
uid: '0',
),
value: UserProvider().userData(user.uid),
child: StreamProvider<Routine>.value(
value: RoutineProvider().userRoutineStream(user.uid),
child: MaterialApp(
home: Wrapper(),
navigatorObservers: [
FirebaseAnalyticsObserver(analytics: analytics)
],
theme: skicaTheme,
),
),
);
}),
);
}
}
If anyone has flutter experience here and can tell me what I did wrong in the first example, I'd appreciate it. Note: I also tried declaring `ProxyProvider<User, Stream<UserData>>` but it didn't return the way a typical `StreamProvider` would.
Anyway here's the gif of the app progress so far! Thanks for reading if you made it this far!
You can visit the app's website at: https://skica.me/ and signup to receive updates.

Bitcoin CME gap at 23k. Will we fill it?
The Gap
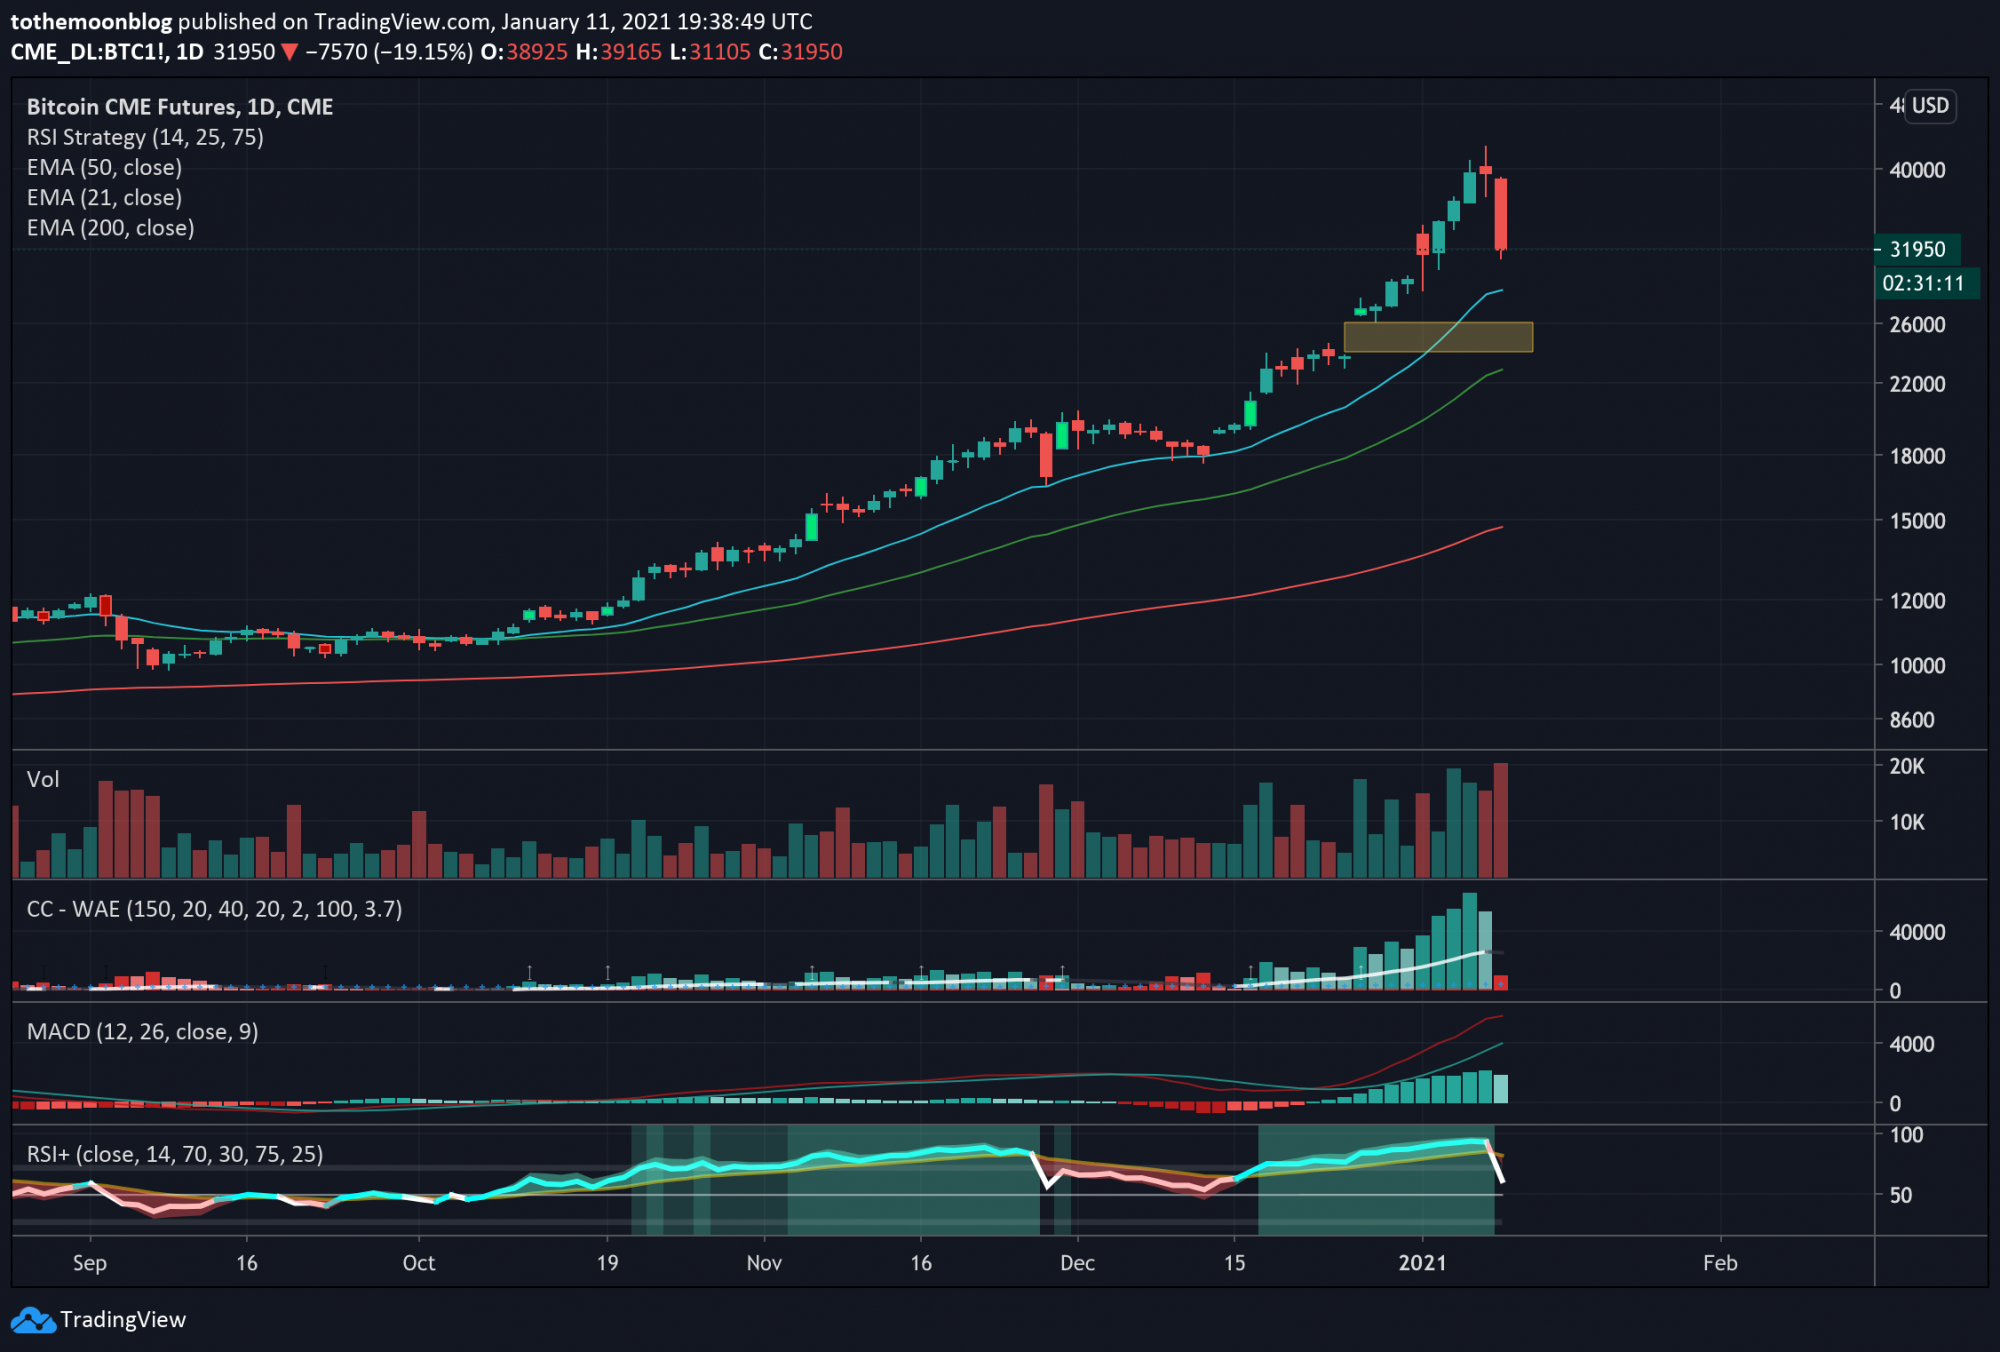
The CME chart has a rather large gap down at 23k as you can see in the chart above in the golden box.
Do you think we have a gap fill coming this week? Over the history of BTC the gaps tend to fill something like 95% of the time.
If the 30k support gets broken, I'm assuming we will fill it.
If so, I would expect it to get bought up immediately and hopefully put us back on the upward trajectory and eventually to new ATHs.
Overall, this retrace is healthy. I see a lot of people on social media freaking out about it. "OMG we dorpped 20%!" "BTC is dead" etc.
I don't know where people get the idea the an asset never corrects and just goes up infinitely. But, judging by social media apparently lots of people have that assumption lol.
BTC 4hr Spot Chart
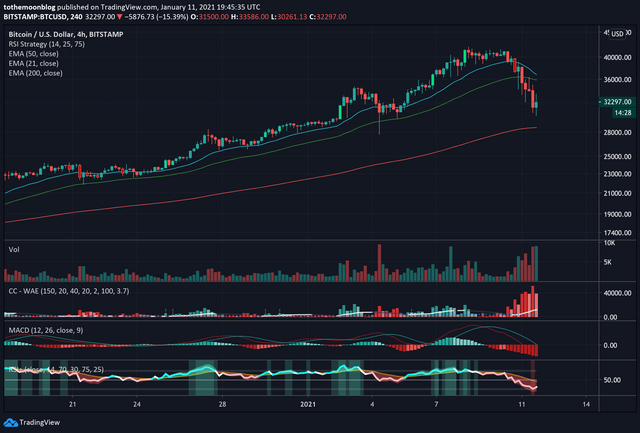
If we take a look at the 4hr spot chart, we can see that we recently had a bounce off of the support at ~$30k.
Personally, I'm only expecting a bounce here and then more continuation to the downside.
If the 30k breaks, like I said before, I am expecting that gap at $23k to fill.
But, it's also possible that the price could rebound right where we're at. There isn't a law on gap fills and it's very possible $30k could be the bottom of this correction.
What are your thoughts?
https://leofinance.io/@nolyoi/bitcoin-cme-gap-at-23k-will-we-fill-it
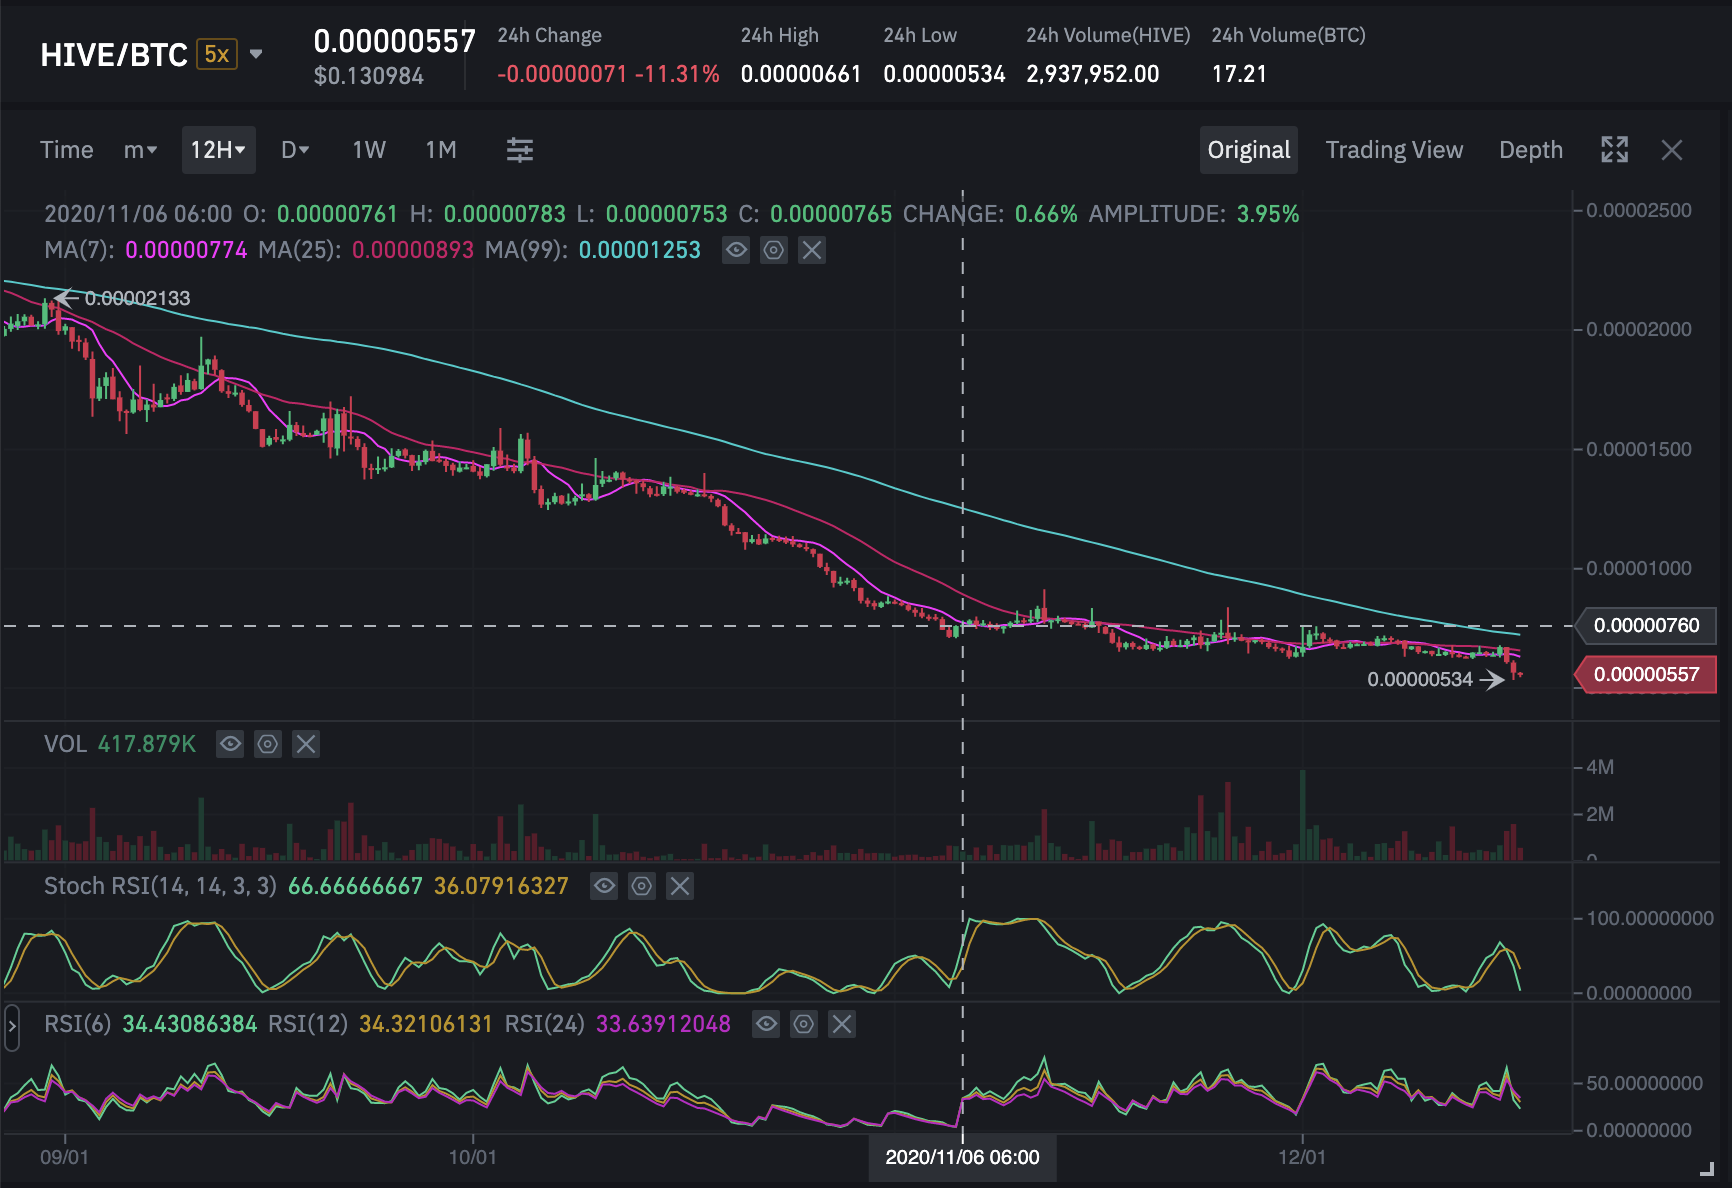
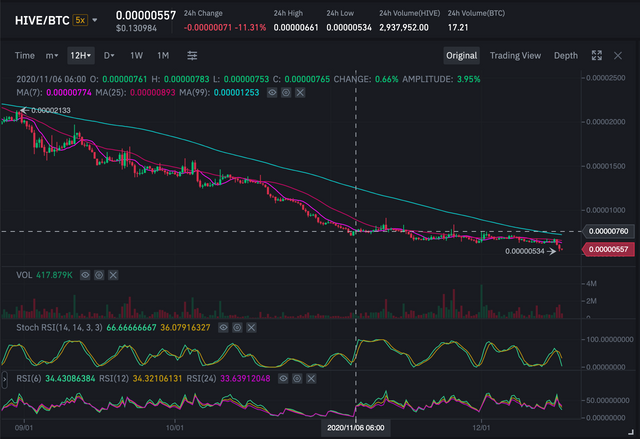
As BTC hits ATHs, HIVE is stagnant and hitting some ATLs.
HIVE trading at ATL satoshi value
As BTC is seeing it's meteoric rise, our local favorite HIVE has been pretty stagnant in terms of USD prices and is currently seeing some all-time-lows in terms of it's BTC value.
The ATL value of the HIVE/BTC pair isn't necessarily terrible in itself. BTC is setting new records. So, it's not surprising to see some coins BTC value dropping.
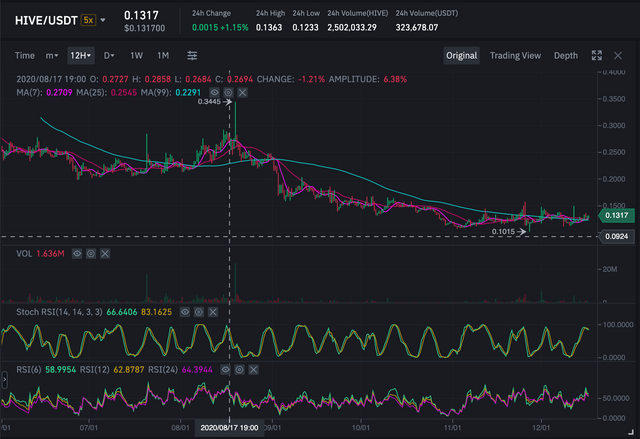
However, on the USD side of things, HIVE has been pretty stagnant. Below is a screenshot of the HIVE/USD chart going back to June.
The price action has been on a slight downtrend the last 6 months. But, pretty flat as well.
When will it change?
The charts really don't give us much to look at. It's hard for me to make any assumptions given the data. It's just been too flat. Volatility seems to be at a minimum.
It's possible we could've found a bottom on our HIVE/USD pairing at the $0.1090 mark. Given the market's overall trend up, I think that's a safe bet. And given that overall market trend, I think we can expect the HIVE/USD pair to continue in the positive direction.
But, given the ATLs in BTC price, there's no telling how low that will go. It will depend heavily on where BTC decides to settle in it's next range.
***What are your thoughts on the current HIVE price and charts?***
Recursion in Elixir
As Elixir is a purely functional language, it doesn’t have loops. Instead, it uses a wide variety of recursive functions to achieve the same or better results.
Below is an example of a list and calculating it's length. This shows how recursive functions can be used to work like a loop.
**Tail Call Optimization**
A traditional function stack looks like this, with each member of the list becoming another function on the stack:
┌────────────────────────┐
│ length([1, 2, 3, 4], 0)│ <── Each member of the list
├────────────────────────┤ becomes a function on
│ length([2, 3, 4], 1) │ the stack
├────────────────────────┤
│ length([3, 4], 2) │
├────────────────────────┤
│ length([4], 3) │
├────────────────────────┤
│ length([], 4) │
└────────────────────────┘
A tail call optimized function stack, like that used in Elixir, looks like this:
┌────────────────────────┐ ┌────────────────────────┐
│ length([1, 2, 3, 4], 0)│ <──── │ length([2, 3, 4], 1) │
└────────────────────────┘ ├────────────────────────┤
│ length([3, 4], 2) │
├────────────────────────┤
│ length([4], 3) │
├────────────────────────┤
│ length([], 4) │
└────────────────────────┘
Function calls on the stack are replaced, so there is only one function on the stack at a time.
**Requirements for Tail Call Optimization**
In order to be tail call optimized, a function must call itself as the last operation. This is not a proper tail call:
def join([h|t]) do
h <> " " <> join(t)
end
But this is:
def join([h|t], string) do
string = string <> " " <> h
join(t, string)
end
So, now let's look at some examples of a list (MyList) and calling different recursive functions that allow us to work with the list's data.
**MyList.length/1**
defmodule MyList do
def length(list) do
length(list, 0)
end
defp length([], count) do
count
end
defp length([_|t], count) do
length(t, count + 1)
end
end
**MyList.each/2**
defmodule MyList do
def each([], _fun) do
:ok
end
def each([h|t], fun) do
fun.(h)
each(t, fun)
end
end
Usage:
MyList.each [1, 5, 12], fn(num) ->
IO.puts(num)
end
# 1
# 5
# 12
# => :ok
**MyList.map/2**
defmodule MyList do
def map(list, fun) do
do_map(list, fun, [])
end
defp do_map([], _fun, acc) do
:lists.reverse(acc)
end
defp do_map([h|t], fun, acc) do
result = fun.(h)
acc = [result | acc]
do_map(t, fun, acc)
end
end
The final do_map clause could also be shortened like this:
defp do_map([h|t], fun, acc) do
do_map(t, fun, [fun.(h) | acc])
end
Usage:
list = [
{"Nolan", 30},
{"Alex", 32}
]
MyList.map list, fn({name, _age}) ->
name
end
# => ["Nolan", "Alex"]

Elixir Comprehensions - The "for" macro
In this post we will be going over comprehensions in Elixir. A “Comprehension” is another word for Elixir’s for macro. It can be used to iterate through an enumerable, like Enum or Stream:
for element <- Enumerable do
element
end
In Elixir, it is common to loop over an Enumerable, often times filtering out some results and mapping values into another list. Comprehensions are the "syntactic sugar" for such constructs.
For example, we can map a list of integers into their squared values:
for n <- [1, 2, 3, 4], do: n * n
[1, 4, 9, 16]
The for macro has three parts:
Generators
Filters
Collectibles (The :into Option)
Generators
Generators are written like this:
`element <- Enumerable`
In the expression above, n <- [1, 2, 3, 4] is the generator. It is literally generating values to be used in the comprehension. Any enumerable can be passed on the right-hand side of the generator expression:
for n <- 1..4, do: n * n
[1, 4, 9, 16]
You can have multiple generators in a single for comprehension:
suits = [:hearts, :diamonds, :clubs, :spades]
faces = [2, 3, 4, 5, 6, 7, 8, 9, 10,
:jack, :queen, :king, :ace]
for suit <- suits,
face <- faces,
do: {suit, face}
Generator expressions also support pattern matching on their left-hand side; all non-matching patterns are ignored. Imagine that, instead of a range, we have a keyword list where the key is the atom :good or :bad and we only want to compute the square of the :good values:
values = [good: 1, good: 2, bad: 3, good: 4]
for {:good, n} <- values, do: n * n
[1, 4, 16]
Filters
Alternatively to pattern matching, filters can be used to select some particular elements. Filter expressions are written after generators like this:
for element <- Enumerable, filter do
element
end
For example, we can select the multiples of 3 and discard all others:
multiple_of_3? = fn(n) -> rem(n, 3) == 0 end
for n <- 0..5, multiple_of_3?.(n), do: n * n
[0, 9]
Comprehensions discard all elements for which the filter expression returns false or nil; all other values are selected.
You can have multiple filters:
for {suit, face} <- deck,
suit == :spades,
is_number(face),
face > 5,
do: {suit, face}
Comprehensions generally provide us with a much more concise representation than using the equivalent functions from the Enum and Stream modules.
:into
In the examples above, all the comprehensions returned lists as their result. But, the result of a comprehension can be inserted into different data structures by passing the :into option to the comprehension.
Return something other than a list with the :into option:
for {key, val} <- %{name: "Daniel", dob: 1991, email: "..."},
key in [:name, :email],
into: %{},
do: {key, val}
The above use case of :into is transforming values in a map, without touching the keys.
Let’s make another example below using streams. Fire up your IEx shell and insert the code below into it.
Since the IO module provides streams (that are both Enumerables and Collectables), an echo terminal that echoes back the upcased version of whatever is typed can be implemented using comprehensions:
stream = IO.stream(:stdio, :line)
for line <- stream, into: stream do
String.upcase(line) <> "\n"
end
Now type any string into the terminal and you will see that the same value will be printed in upper-case.
`uniq: true` can also be given to comprehensions to guarantee the results are only added to the collection if they were not returned before. For example:
for x <- [1, 1, 2, 3], uniq: true, do: x * 2
[2, 4, 6]
**Note:** The targets must support the Collectable protocol. https://hexdocs.pm/elixir/Collectable.html
Variable Scoping
All variables used in for are local:
name = "Daniel"
for name <- names do
String.upcase(name)
end
name # => "Daniel"
Enum vs. Stream vs. for
Try it!
Create a function, using for, which will return all the even numbers up to a given number.
Write a function, using for, which joins a list of binaries together with a separator.
Documentations
"For" Documentation https://hexdocs.pm/elixir/Kernel.SpecialForms.html#for/1
Collectable Protocol https://hexdocs.pm/elixir/Collectable.html
Resources
https://nolanm.dev/posts/17-elixir-comprehensions-the-for-macro
https://peakd.com/hive-169321/@nolyoi/elixir-comprehensions-the-for-macro

 @nolyoi