Using a VueJS LSP in KDE's Kate Editor
The Language Server Protocol (LSP) is a standard protocol for editors and IDEs to communicate with language servers that provide various language services, such as code completions, definitions, references, hover information, etc. LSP allows for a common way for these language services to be implemented and used in a variety of editors and IDEs, providing a better language support experience for developers. The protocol uses JSON-RPC, a remote procedure call (RPC) protocol encoded in JSON, over a standard communication channel, such as stdio or a network socket.
KDE's Kate Editor supports Language Server Protocol (LSP) which transforms it into an incredibly powerful IDE for many languages. In fact, many of the necessary configurations are already built in for the more popular languages, requiring you to only install the corresponding LSP on your system.
I do a lot of work with VueJS and Kate does not have a stock OOTB configuration yet. There is a (relatively) new LSP available to help with Vue specifically called "Volar". This LSP can be setup to work with Kate quite easily and has several useful features:
Code completions.
Hover information
Easy renaming variables across project.
Vue Template errors (undefined variables, etc).
Typescript support.
etc
# Copy this Vue Syntax file across to your Syntax Folder. This is what allows Kate to recognize Vue files and add syntax highlighting.
wget https://raw.githubusercontent.com/mtorromeo/kate-syntax-files/master/vue.xml -O ~/.local/share/katepart5/syntax/vue.xml
# Now, install Volar the LSP for Vue.
sudo npm install -G @volar/vue-language-server
You may have to enable the LSP Client Plugin in Kate if you have not already: Settings -> Configure Kate -> Plugins -> [X] LSP Client.
Once enabled, open Kate and go to: Settings -> Configure Kate -> User Server Settings and copy the following JSON configuration in:
{
"servers":{
"vue":{
"command":[
"node",
"/usr/lib/node_modules/@volar/vue-language-server/bin/vue-language-server.js",
"--stdio"
],
"rootIndicationFileNames":[
"package.json",
"package-lock.json"
],
"url":"https://github.com/vuejs/language-tools",
"highlightingModeRegex":"^Vue.*$",
"initializationOptions":{
"typescript": {
"tsdk": "./node_modules/typescript/lib"
},
"languageFeatures":{
"references":true,
"implementation":true,
"definition":true,
"typeDefinition":true,
"callHierarchy":true,
"hover":true,
"rename":true,
"renameFileRefactoring":true,
"signatureHelp":true,
"codeAction":true,
"workspaceSymbol":true,
"completion":{
"defaultTagNameCase":"both",
"defaultAttrNameCase":"kebabCase",
"getDocumentNameCasesRequest":false,
"getDocumentSelectionRequest":false
},
"documentHighlight":true,
"documentLink":true,
"codeLens":{
"showReferencesNotification":false
},
"semanticTokens":true,
"diagnostics":true,
"schemaRequestService":true
},
"documentFeatures":{
"selectionRange":true,
"foldingRange":true,
"linkedEditingRange":true,
"documentSymbol":true,
"documentColor":true,
"documentFormatting":true
}
}
}
}
}
Note that I am using `@volar/vue-language-server@1.0.24` - there may be breaking changes in future with the above configuration.
If you are having trouble and would like to debug the LSP, you can export the following variable before starting Kate which will show the JSON-RPC payloads between Kate and the LSP server:
export LSPCLIENT_DEBUG=1
kate
ScanToPay.Cash
VISIT https://scantopay.cash FOR A PROPER DESCRIPTION/DEMO.
THIS ARTICLE IS INTENDED TO COLLECT FEEDBACK FOR THE CONCEPT.
Why?
Bitcoin Cash merchant adoption is going great. However, there can be a few hiccups in places that are listed as accepting Bitcoin Cash, but have low customer throughput:
Infrequent BCH payments can lead to the Android Device that is being used as a Payment Terminal being neglected (not charged, not connected to WiFi, not turned on, etc).
High employee turnover can mean that many of the staff are unsure as to how to use the Payment Terminal (or don't know where it is).
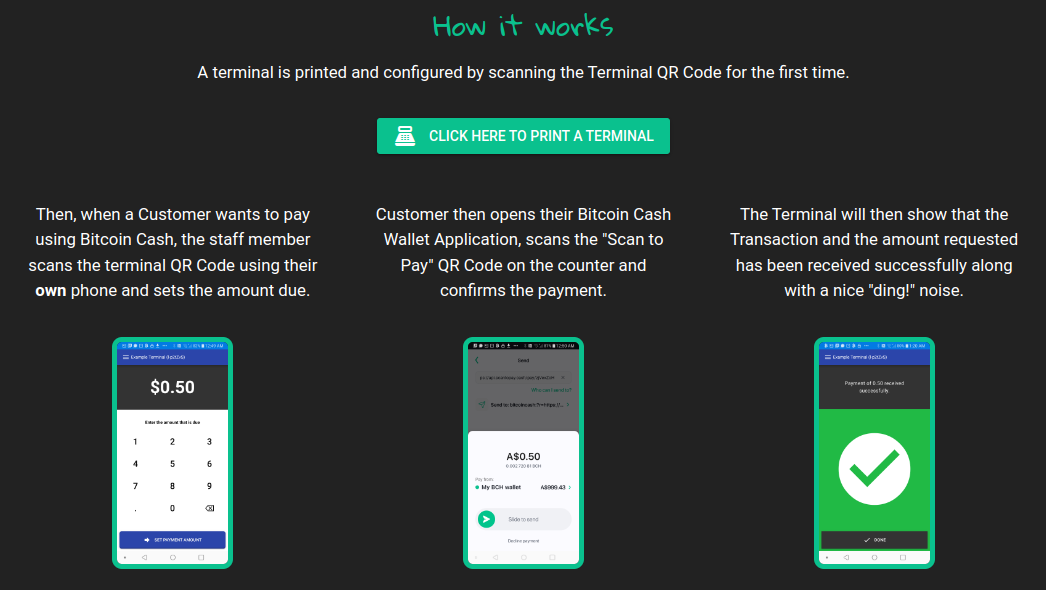
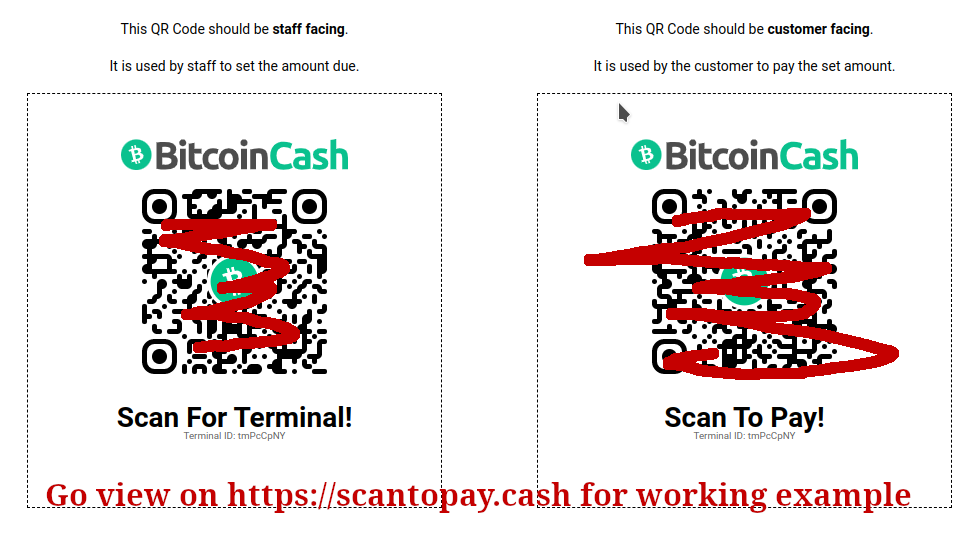
As an experimental alternative, as opposed to a merchant using a dedicated Payment Terminal Device, we might fare better allowing staff to (simply and easily) use their own phone for accepting BCH Payments.
One way in which we can do this is by having two QR Codes that we simply print on Sticky Paper:
A QR Code that is staff-facing that can be scanned to open a WebApp that allows the staff to set the amount that is due.
A QR Code that is customer-facing that can then be scanned by their Wallet App to pay that amount.
For Example
Such a setup would have a few benefits for merchants and those spreading adoption:
For merchants, there is no dedicated Payment Terminal device that the merchant needs to maintain: Staff can simply use their own phone and open the Terminal in their phone browser (no need to install an app).
For those spreading adoption, on-boarding BCH Merchants becomes cheap. There is no need to supply a dedicated terminal device - just a sheet of sticky-paper with two QR Codes.
In this PoC, the interface for merchants has been kept simple so that no training should be required and the process is (hopefully) friction-less.
Constraints
This dual QR Code approach does require the customer's wallet to support either the BIP70 or JPP Payment Protocols. This means that some wallets, unfortunately, will not be supported.
This has been tested to work with:
Bitcoin.Com Wallet
Electron Cash
... but any wallet that properly supports BIP70/JPP should work and the intent is to support any future Payment Protocols.
Adoption Potential
There may be a few additional benefits to this setup from an adoption point of view:
On the flip-side of using a Payment Protocol (like BIP70 or JPP), there may in future be opportunity to provide some incentive to spread adoption as it would be possible to cut a small fee on-top of each BCH purchase for each merchant on-boarded. Thus, we could incentivize those spreading adoption.
*(For anyone wishing to attempt this, the code is open-source and I would be more than happy to assist.)*
As an adoption strategy, due to this system being operable with paper-only, bulk-mailing adoption campaigns where these terminals are mailed to potential businesses (with setup instructions) becomes feasible.
Additional Considerations
The feasibility of the following would have to be evaluated.
In some cases, a merchant may also require purchases to be tracked internally (for inventory purposes). It may be possible to allow a guide to be written and displayed to the staff upon first scanning the Terminal QR Code to ease this process (alternately, this could just be printed on the Terminal QR Code sticker itself).
Streamlining the above, there might be the possibility of a Merchant's existing PoS system integrating directly with ScanToPay such that the Staff no longer needs to scan a QR Code - they can just input the amount in their existing PoS (which could interact with the ScanToPay API) and instruct the customer to scan the Payment QR Code.
Security
Although, not ideal, it is not currently possible to change the Destination/Receiving Address after a terminal has been initially configured. This is to prevent a malicious employee from changing the Receiving Address to their own. However, there are still some things to keep in mind:
A malicious employee (or third-party) can perform a "griefing attack" if they discover the Merchant URL and can set the amount due remotely. In this event, a customer could be presented an invoice that is incorrect, but the malicious party still cannot steal the funds to themselves (as the address will always remain the address that was initially configured). Thus, there should be little incentive in doing this, except to be a nuisance.
An malicious employee could try to replace the Payment QR code with their own. This would be like an employee "stealing money from the til" so we do not try to explicitly guard against this. However, to minimize risk and at least make this noticeable, these QR Codes could have a space for the owner to sign their signature (with pen) which should make it obvious if this has taken place. Another option is to physically secure the QR Code such that this cannot happen easily.
It would be ideal to have a mechanism for the Terminal configurations to be updated, but I do not believe a password is ideal. There are many naive store owners that may set the password to the same as all other passwords used by staff (or to something that is easily guessable), thus if anyone has suggestions that will NOT significantly hinder UX flow, please let me know. Another reason that this is useful is to prevent the griefing attack mentioned in point 1 above. If this happens to a merchant the simplest remedy would be to add a password hashbang (i.e. "#pwd=1234abcd") and then allow the Merchant to reprint the Merchant QR Code only (with this new password included in the URL).
One such approach might be to collect Email Address upon Terminal setup and then require Email Confirmation upon any changes. However, the trade-off here is that it's an additional piece of (private) information that the Merchant would have to provide.
Links
https://scantopay.cash
Git Repository: https://gitlab.com/scantopay.cash... but it needs a lot of janitorial work, so I don't recommend trying to build off it yet.
CashTags - Bulk Printing and Kiosk Mode
Service and Code:
https://tags.infra.cash/
https://github.com/developers-cash/cashtags-server
https://github.com/developers-cash/cashtags-frontend
First Article:
https://read.cash/@jimtendo/cashtags-bitcoincash-tags-that-maintain-fiat-exchange-rates-a8b507d8
CashTags TLDR summary:
*[CashTags] generates printable QR Codes (Payment URLs) whose value amounts can be specified in fiat (e.g. USD). When a user scans these QR Codes/Payment URLs into their wallet, the fiat amount specified is converted to its BCH equivalent using Coinbase Exchange Rates.*
*This helps mitigate BCH price volatility relative to fiat. If $1USD is the amount specified on the QR Code, this will always be converted to its BCH equivalent at the time the user scans it, meaning that in real-life self-serve scenarios the QR Codes will not need constant reprinting.*
Two new features have been added to CashTags:
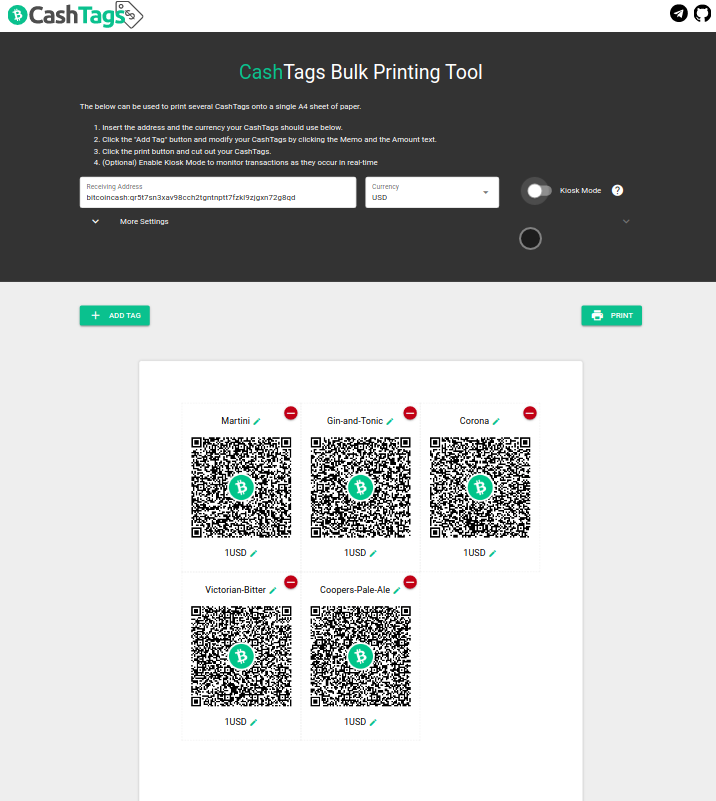
Bulk Printing
A new tool has been added to ease bulk printing of CashTags onto A4 paper.
Tags and Settings for this page are stored in LocalStorage. This means that they will be retained on the same device across visits for easy modification/reprinting.
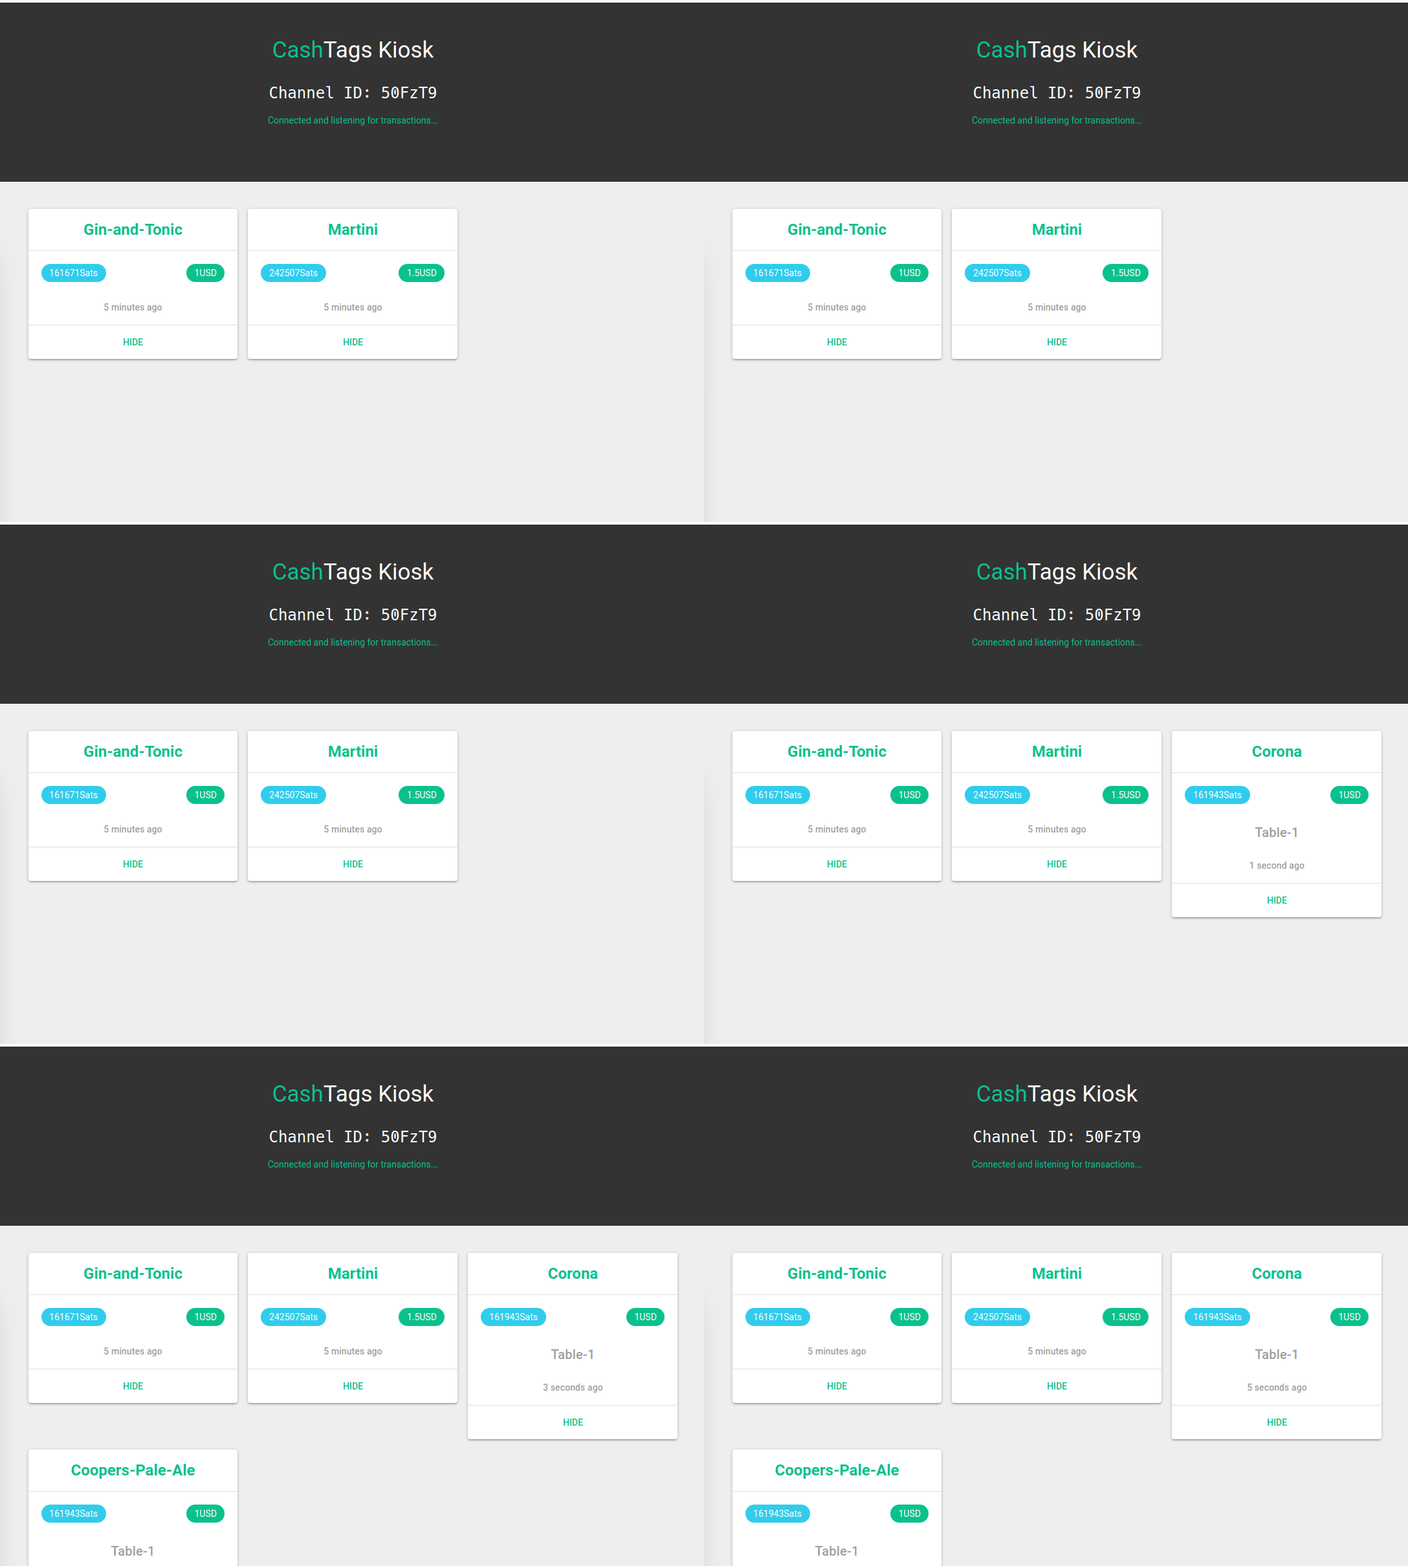
Kiosk Mode
Kiosk Mode allows a merchant to monitor transactions as they occur in real-time.
This can be enabled by clicking the "Kiosk Mode" toggle on the Bulk Printing page (which sets the Webhook URL to the CashTags Kiosk URL).
Kiosk mode is very rudimentary - it is not intended to act as a "history" of items bought. **Only transactions that are sent while this page is open will be shown**.
I plan on developing a more thorough platform for these kind of uses in future, but wanted to demonstrate this capability to spur ideas.
**Also, a big big thank you to whoever sent that generous donation!**
CashTags - BitcoinCash tags that maintain fiat exchange rates
https://tags.infra.cash
https://www.reddit.com/r/btc/comments/qrky2p/cashtags_bitcoincash_tags_that_maintain_fiat/
This service generates printable QR Codes (Payment URLs) whose value amounts can be specified in fiat (e.g. USD). When a user scans these QR Codes/Payment URLs into their wallet, the fiat amount specified is converted to its BCH equivalent using Coinbase Exchange Rates.
This helps mitigate BCH price volatility relative to fiat. If $1USD is the amount specified on the QR Code, this will always be converted to its BCH equivalent at the time the user scans it, meaning that in real-life self-serve scenarios the QR Codes will not need constant reprinting.
Some examples of where this may be useful are given below:
**Market Stalls**
A QR Code could be printed and attached to each product, allowing customers to self-serve.
**Beer Fridge**
A QR Code could be placed on a fridge encouraging beer-bandits to reimburse the cost of the beer(s) they stole.
**Bills**
A QR Code could be placed on a bill with Webhook+Metadata to allow payment in BCH.
See site for more information:
https://tags.infra.cash
CashID - OIDC Gateway
Continued from:
https://read.cash/@jimtendo/cashid-adoption-bdad3431
I've got the OIDC Gateway for CashID fairly stable now and I thin it should be safe for general use. What this means is that if your service or site supports OIDC, you should with little effort be able to integrate CashID as an authentication mechanism.
Some platforms that *I think* may support OIDC (and should therefore be compatible) are:
Wordpress
https://wordpress.org/plugins/miniorange-openid-connect-client/
Shopify
https://engineering.shopify.com/blogs/engineering/implement-secure-central-authentication-service-six-steps
Magento
https://marketplace.magento.com/miniorange-inc-miniorange-oauth-sso.html
Discourse
**https://meta.discourse.org/t/openid-connect-authentication-plugin/103632**
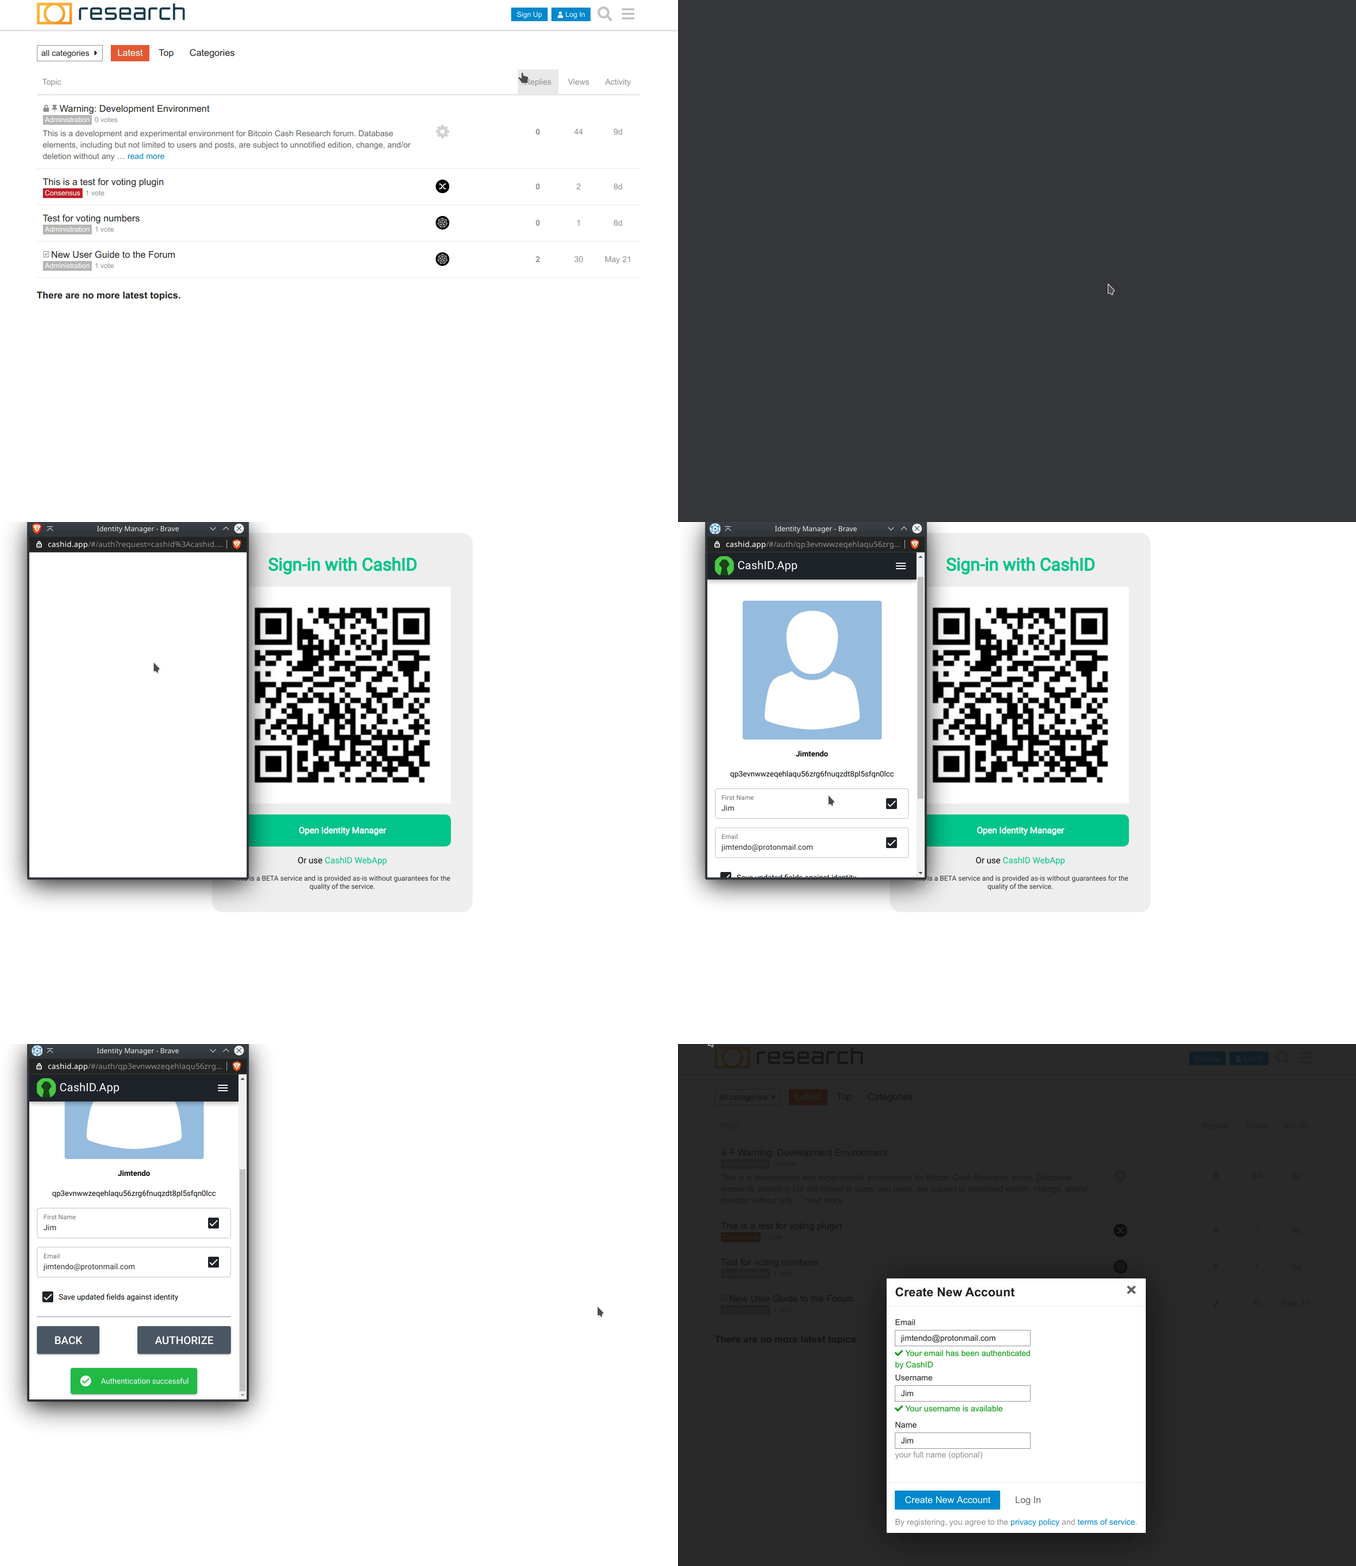
The below gives an example of how an OIDC Authentication flow using CashID might look:
You can also try it yourself using the below link (use the WebApp if you do not have a CashID App on your phone):
https://v1.cashid.infra.cash/oidc/auth?client_id=cashid&redirect_uri=https%3A%2F%2Foidcdebugger.com%2Fdebug&scope=openid%20name%20family%20nickname%20email%20country&response_type=id_token&response_mode=form_post&nonce=fhu9ts9cugp
Configuration
Would very much appreciate it if OIDC services could test the following and give feedback on success/failure:
To configure, there is an OIDC configuration file available here:
https://v1.cashid.infra.cash/oidc/.well-known/openid-configuration
Details are as follows:
**Authorize URL:** https://v1.cashid.infra.cash/oidc/auth
**Client ID:** cashid
**Client Secret:** cashid
**Scopes supported:** name, family, nickname, age, gender, birthdate, picture, national, country, state, city, streetname, streetnumber, residence, coordinate, email, instant, social, phone, postal, openid
**Response Types supported:** Code, Token, ID Token
**All URL's are Whitelisted** (see questions below)
Please reach out to me on Telegram if any problems/questions:
https://t.me/jimtendo
Questions/Answers
**What does this mean for the average BCH user?**
CashID will allow you to login to any CashID supporting services using your BCH Cryptographic Keys. In general, this means easy password-less authentication and quick registration to services as CashID can also request common information required during Registration Flows.
However, Wallet support for CashID is not quite there yet. The intent of this particular project is to prep services for when CashID becomes a common feature in BCH Wallets.
For now, an Identity Manager that can be used for testing is available at https://cashid.app .
**Is this service self-hostable or do I have to use your instance?**
The service is self-hostable, but I would not recommend hosting your instance quite yet until this has gone through more testing. Otherwise, you may find yourself redeploying while bugs are kinked out.
Nevertheless, code is available here:
https://github.com/developers-cash/cashid-gateway
**Is the personal information of users retained on the server?**
The BCH Address and the CashID payload are stored in memory for 1 minute only. This is required in order for the OIDC Code and Token flows to function correctly. However, no data is retained long-term.
**Does this follow the full OIDC specification?**
Not entirely. This is not technically an "IdP" (Identity Provider) as most traditional OIDC Providers would be. Instead, this is more of an "Identity Verifier" in that it validates the CashID payload and then forwards OIDC-compatible responses to the Relying Parties.
Additionally:
All URL's are Whitelisted (this would generally be considered bad practice, but should not matter in this case)
All services share the same Client Secret (I do not think, for this particular use, this presents a security concern as it still requires explicit user consent and a code/token to access account data)
**Is this service secure?**
I believe it should be. However, I would welcome an audit of the code if someone familiar with OIDC could take a look.
**Is the CashID WebApp complete?**
There will be some changes to the key derivation. The WebApp is mainly intended as a PoC and as a means of demonstrating the login flow.

CashID Adoption
CashID is a Cryptographic Identity protocol designed by Jonathan Silverblood inspired by an earlier spec known as BitID.
Essentially, it allows you to use your BCH Cryptographic Keys as a way to authorize actions against services - as well as send additional metadata to these services.
One of the most common use-cases for this would be Registering or Signing into a service. The below is an example of how this might look in practice (if using an OIDC flow).
If you would like to try out the OIDC flow, the following link 'should' work (choose "Use WebApp" if you do not have an Identity Manager installed).
https://cashid.infra.cash/oidc/auth?client_id=cashid&redirect_uri=https%3A%2F%2Foidcdebugger.com%2Fdebug&scope=openid%20name%20family%20nickname%20email%20country&response_type=id_token&response_mode=form_post&nonce=1vbcn6p4us2
Why CashID?
CashID offers a few advantages over traditional Social Login services:
All your information is stored on your Device(s). There is no need for Social Intermediaries - thus mitigating some of the concerns around services like Facebook mining your data.
It allows Password-less Authentication into services and quick Registration.
CashID ultimately returns a BCH Address (this is your ID).
In future services that support it could allow users to receive payments and/or communications directly to the user's CashID Address.
(In my opinion, this also provides a very good foundation for decentralised Media Services, but I'll delve more into that in a future post when I have more time.)
All payloads are cryptographically signed by your Private Key - another user (unless they have your Private Key) cannot pretend to be you.
A single CashID Account 'can' be used across several services (one consistent identifier across services).
(This is optional - a user could create a new Identity per service if desired.)
Adoption
Support for CashID in both Wallets and Services is still lacking. For the past few weeks, I've been working on a few projects to try to ease integration of CashID into services as well as make it easier to integrate into existing Wallet Applications.
As a stop-gap while we wait for Wallet Support, I've also been working on an Identity Manager WebApp.
Links to the projects along with a short description are below:
cashid-js
This is a NodeJS/Javascript Library that contains three classes:
1. CashId (Common Utility Functions for CashID)
2. CashIdServer (To ease implementation for Services)
3. CashIdClient (To ease implementation into Wallets)
https://github.com/developers-cash/cashid-js
cashid-gateway
This is a Node App that provides an OIDC Gateway for CashId. This leverages the above and is intended to provide an easy bridge for existing Services that already support OIDC to easily integrate CashId.
https://github.com/developers-cash/cashid-gateway
cashid-webapp
An Identity Manager Web Application that can be used until we have better native Wallet Support for CashID.
(Please backup your mnemonics if not used for testing purposes. All keys are stored in your browser's Local Storage so they will not be recoverable if something goes wrong.)
https://cashid.app
https://github.com/developers-cash/cashid-webapp
**NOTE THAT ALL OF THE ABOVE ARE UNSTABLE AND LACK PROPER DOCUMENTATION. ADDITIONALLY, THE API'S ARE LIKELY TO CHANGE SO PLEASE DO NOT TRY TO USE THESE YET. WILL COMMIT LATEST FOR PROJECTS NEXT WEEK.**
I plan on doing a write-up on the above when I get back next week to get some feedback on the sensibility of the API's and what else would be required to ease adoption/integration of CashID into both wallets and services.
For now, as I'm short on time, I'm just going to leave these placeholders here:
cashid-js
LINK NEXT WEEK
cashid-gateway
LINK NEXT WEEK
cashid-webapp
LINK NEXT WEEK
If anyone has any thoughts/ideas/suggestions in the meantime, please feel free to reach out on Telegram.
https://t.me/jimtendo
References
CashID Protocol Spec:
https://gitlab.com/cashid/protocol-specification
Building a simple store in less than 300LoC with CashPayServer
One of the key difficulties in building a service on top of BCH is receiving payments and identifying what that particular payment was actually for.
The problem with the traditional method of displaying a standard BCH address is that there's no additional information attached to that address. When a user sends a transaction to that address, how are we meant to know what the user has actually purchased? We don't have a Reference Number or an Invoice ID - just an Address.
The conventional solution to this is to generate a new address each time an Invoice is requested and, in our backend, "attach" the order information to that new address. Although this can work (if done correctly), it does add overhead and makes it difficult to implement services where you would like the funds to land directly at a particular address (without acting as a temporary custodian of the funds and forwarding to the target address).
This is where protocols like BIP70 become extremely useful. One of the key advantages of protocols like BIP70 is that we end up with the ability to attach arbitrary data to a payment (or technically, to the 'payment request'). This means we can attach that Reference Number or Invoice ID - and a lot of other data too if we wanted.
However, BIP70 has problems too in that it is difficult to implement. Adding to this, there's JSONPaymentProtocol which uses the same `bitcoincash:?r=pathToSomeInvoiceID` URL scheme, so some wallets may request a BIP70 invoice, while others may request a JSONPaymentProtocol invoice. This means that, if we don't support both, some wallets will fail as the Payment Request URL does not contain any information stating which protocol the service supports and which the wallet should use. Depending on the wallet, it will do one or the other.
Supporting both protocols is one of my goals with CashPayServer. I'm also trying simplify some of the other more difficult aspects of accepting payments. For example, giving the developer event hooks (broadcasted, confirmed, etc) and making it convenient to give the user quick feedback once the transaction has been broadcast to the network by providing a default UI that can be integrated on-site.
In this respect, my intention with CashPayServer is to allow developers to provide a pleasant User Experience with very little code - but also keep it extensible (and secure) enough to permit more advanced use-cases.
Integration
I'd like to demonstrate what a simple CashPayServer integration might look like, from a coding perspective. **The following was built in under 300 lines of code, in total (frontend, backend - and comments inclusive). It is not intended to look pretty, but to demonstrate how an actual CashPayServer integration might be done (from a coding perspective).**
Live Demo: https://store.example.developers.cash/
I'm not going to walk-through all of the frontend code. This isn't as relevant as most would integrate with an existing service (or a new service being built) and this is just intended as a simple example for reference. For any that are interested, it's been built with Vue's Qusar framework (and is only about 180LoC in total).
To give a brief, we have the following endpoints:
Backend (Server-Side) (Using Node/ExpressJS)
/request-invoice [POST]
This handles the creation of the invoice. The CashPay JS library supports doing generating invoices from the browser also, but to follow best-practices, I'm going to generate this server-side as, for most implementations, this is how it should be done.
/webhook [POST]
This handles the `broadcasted` and `confirmed` webhooks. These will be triggered when an Invoice has been paid (`broadcasted`) and when that transaction has been included in a block (`confirmed`).
The full backend code can be viewed here (88 lines of code)
https://pastebin.com/kw5CiuDy
Frontend (Browser)
index.html
Built as a Single-Page-App using Vue/Quasar (from CDN).
Most code in here is templating/styling.
view-source:https://store.example.developers.cash/ (180 lines of code)
/catalog.json [GET]
This stores the list of items for sale. It is static, but leveraged by both the frontend and backend.
https://store.example.developers.cash/catalog.json
Frontend (Browser)
The first thing we do is include the CashPay JS library from a CDN. This could also be included with NPM as a module - but to keep this simple, let's just use this for now.
<script src="https://cdn.jsdelivr.net/npm/@developers.cash/cash-pay-server-js/dist/cashpay.min.js"></script>
*A few lines above this, we're also including animate.css. The reason for this is that the default container will use animate.css classes to make things look a bit more visually appealing. However, this is entirely optional.*
Now let's jump to the piece of the frontend code that triggers once the user is ready to make a payment.
async onPay() {
// ... UI Code here
// Request invoice from server endpoint
let invoice = await CashPay.Invoice.fromServerEndpoint('./request-invoice', {
cart: this.cart,
customer: this.customer
})
// Hook into the broadcasted event
invoice.on('broadcasted', e => {
this.$q.notify(`Payment has been received!`)
// Wait five seconds and then clear cart and show the catalog page
setTimeout(() => {
this.reset()
}, 5000)
})
// And then load it into our container on page
await invoice.create(document.getElementById('invoice-container'))
},
What is happening here is that an invoice is being read back from our server-side `/request-invoice` endpoint. We are then setting an event listener for the `broadcasted` event so that we can make additional changes to the front-end state (empty the cart, change page, etc). We then call `create(...)` and pass it the container we want the QR code, etc, to appear in. Passing a container is optional - if this is left blank, we can still hook into the Events (`created`, `requested`, `broadcasting`, `broadcasted` and `failed`) and render everything manually - or use reactive properties if we are using something like a SPA framework. But we want this example to be simple and convenient, so we're going with the container.
Server-side
We need to do a little bit of setting up when we first initialize the server-side code.
const CashPay = require('@developers.cash/cash-pay-server-js')
const Catalog = require('./public/catalog.json')
// ...
// We need to tell our Webhook to trust any requests signed with pay.infra.cash keys
let webhook = new CashPay.Webhook()
await webhook.addTrusted('https://v1.pay.infra.cash')
// Let's store a list of Orders as InvoiceID:Status pairs. Usually these would be stored in a database.
let orders = {}
We include CashPayJS and our catalog of items (stored in a JSON). We then setup CashPay's Webhook and add the `https://pay.infra.cash` Server as "Trusted". This is necessary so that we can reject any spoofed Webhook requests (i.e. someone manually sending a POST request to our endpoint with fake data).
We also create an `orders` InvoiceIDs:Status keypair so that we can make sure that the invoices received at our Webhook endpoint were actually created by us. In a typical implementation, these InvoiceID's would probably be stored against an `orders` table in the Database backend with a status (e.g. `PENDING`, `BROADCASTING`, `BROADCASTED`, `CONFIRMED`) and other details (`items`, `total`, etc). However, we're trying to keep this example simple. In the database case, the same general principles would apply, but as the `order` and the totals would already exist, you would probably just store the relevant orderId in the privateData and then pull the other details from your database.
We then define a route for the `/request-invoice` endpoint that we leverage in our frontend code.
app.post('/request-invoice', async (req, res) => {
// Don't trust the browser to send correct prices and item details. Use the item id and read from the catalog directly.
let items = req.body.cart.map(cartItem =>
catalog.find((catalogItem) => cartItem.id === catalogItem.id)
)
// Calculate the total amount due
let total = items.reduce((total, item) => total += item.price, 0)
// Set the parameters of the invoice
let invoice = new CashPay.Invoice()
invoice.addAddress('bitcoincash:qplf0j8krjrsv95v0t3zj9dc4rcutw5khyy8dc80fu', `${total}USD`)
.setWebhook(['broadcasting', 'broadcasted', 'confirmed'], 'https://store.example.developers.cash/webhook')
.setPrivateData({
customer: req.body.customer, // Customer details
items: items
})
// Actually create the invoice
await invoice.create()
// Create an entry for this InvoiceID in our list of orders
orders[invoice.id] = 'pending'
// Return the invoice (this method will omit sensitive data (unless 'true' is passed as a param)
return res.send(invoice.payload())
})
One cool feature here is that we can pass Fiat amounts which will be automatically converted to BCH equivalents by CashPayServer (based on Coinbase exchange rates). You could also add multiple addresses/amounts which is useful for services that wish to take commission (e.g. add 10% onto the amount due and pay it to a different address).
If we run this as is, we'd now have a QR Code rendered on our page. However, if we tried to pay, it would actually fail as there is no route to the Webhook.
Let's setup the Webhook endpoint:
app.post('/webhook', async (req, res) => {
try {
// An exception will be thrown if signature does not match
await webhook.verifySignature(req.body, req.headers)
// The type of event (e.g. broadcasting, broadcasted or confirmed)
let eventType = req.body.event
let invoice = req.body.invoice
// Make sure this invoice was created by us
if (typeof orders[invoice.id] === 'undefined') {
throw new Error(`${eventType}: Invoice ${invoice.id} does not exist in our orders.`)
}
// Mark the invoice as broadcasting/broadcasted/confirmed
orders[invoice.id] = eventType
// Get the data associated with the invoice
let data = JSON.parse(invoice.options.privateData)
// Output event type and list of items to console
console.log(`${data.customer.email} ${eventType}:`)
console.log(` ${data.customer.comments}`)
data.items.forEach(item => { console.log(` ${item.id}: ${item.title}`) })
// You must send a 200 response, otherwise CashPay will throw an error
res.status(200).send('Success')
} catch(err) {
console.log(err)
res.status(500).send(err.message)
}
})
This isn't doing much. It's simply verifying that the Webhook payload actually came from the Trusted Server we added earlier (`https://pay.infra.cash`), marking the invoice as `broadcasting`, `broadcasted` or `confirmed` and then outputting the items that the user purchased to the console. A better example might do something like send an email to both the user and the merchant when payment is `broadcasted` and/or `confirmed`, but I do not have an SMTP handy.
But, that's pretty much what would be required to integrate, in a nutshell. There are some other edge-cases that still need to be fleshed out (what if your server goes down?), but that's something I'll look at covering in future as there are ways around that for now.
Summary
I'm probably still a month away from having a version of this that's safe for Public Use. Most of the schema I'm happy with, but would gladly take some developer feedback, particularly from those who could make use of a service such as this (e.g. what features would you need, what is currently not supported, improvements to the JS interface, etc).
Feel free to contact me if any suggestions:
Telegram: https://t.me/jimtendo
I will add quickly (in case someone has not seen my other posts) that this platform will be self-hostable (once stable, I'll create a Docker Container for easy deployment). There is no need to trust my https://pay.infra.cash instance - this is simply being offered as a convenience for those who wish to get up and running quickly.
Additionally, I will have some more formal documentation on the API's supported, capabilities for customization, etc, within a few weeks.
EDIT: Updated API in examples (2020-06-03)
Cash Pay Server - UI Updates, Currency Conversion and Static Invoices
This is a status update on the previous post on Cash Pay Server here:
https://read.cash/@jimtendo/cash-pay-server-b6d4983b
Updates
UI Updates
The tentative UI (default) when using the JS library now looks as follows:
This will be updated so that the confirmation is an overlay on top of the QR Code. In doing this, we make it easier to add animations, etc.
A basic example of the tentative API is here:
https://codepen.io/jimtendo/pen/vYNbEVO
Exchange Rates
Cash Pay Server can now accept fiat currencies which get converted to their BCH equivalent upon invoice creation. This (currently) uses Coinbase exchange rates and, on the pay.infra.cash server, these rates will be updated every 5m (configurable on a per-server basis via an environment variable).
Usage will likely be as follows:
var invoice = new CashPay.Invoice(...)
.addAddress('', '10USD') // String with currency code suffix
.addAddress('', '1AUD') // String with currency code suffix
Additionally, the currency that will be displayed to the user can be specified with the following:
var invoice = new CashPay.Invoice(...)
.addAddress('', '10USD')
.addAddress('', '1AUD')
.setUserCurrency('AUD') // Show final amount to user in AUD
Static Invoices
Thank you @dagur for the idea. I have integrated this into Cash Pay Server under the term "Static Invoice". The final interface for this will likely be:
var invoice = new CashPay.Invoice(...)
.staticInvoice() // Print QR code on paper and re-use me!
.addAddress(...)
To keep the interface consistent, if the Invoice is marked as static, a replica of the initial invoice is created each time a wallet makes a Payment Request and the fiat amount is re-converted to the BCH amount. All other parameters will remain the same as the initial invoice.
Additionally, all events (webhooks and websockets) will be broadcast under the original Invoice ID - meaning, if a use-case does occur where one wishes to listen for these events, they can.
A simple example of where these events might be used is in tracking inventory. Each time a `broadcasted` Webhook is received, we can assume that there should be one less beer in the fridge. Another simple use-case is for simple donation collection on Websites (or in store) where the QR Code should not expire and should be allowed re-use (while allowing dynamic currency conversion to take place)
As the term "Static Invoice" might not be very clear, am open to suggestions on this.
An example of its use is here:
https://codepen.io/jimtendo/pen/gOayjPR
Still To-Do List
Things are moving at a good pace and I'm hoping to have stable API's so that I can Alpha release within the month. That said, there are still some important pieces that need doing before this:
Finalize Static Invoice API (this term will likely change - please offer suggestions in comments).
Build easily integratable NPM packages so that developers are not confined to CDN. (Was stuck on this for a long time - and do plan on doing a write-up on how to achieve this as Webpack as this occupied > 1 day of my time painfully tinkering).
Make the default UI cleaner and more customizable.
Proper testing of the JSONPaymentProtocol (used by EdgeWallet)
General code clean-ups (we now use eslint to enforce style)
Add Unit Testing (before V1.0.0 release)
Webhook ECDSA verification (in-progress but there are some issues between Node Versions).
Raw Script output support (need to verify that JSONPaymentProto can actually work with this).
Lots more that I cannot think of at the moment.
As always, open to other suggestions.
PLEASE DO NOT USE THIS LIBRARY YET AS THE API IS STILL VERY MUCH IN FLUX AND WILL CHANGE.
THIS HAS BEEN TESTED WITH BITCOIN.COM WALLET V6.5.0 ON ANDROID - BUT HAS BEEN NOTED TO NOT WORK WITH V6.4.1 DUE TO A BUG IN THE WALLET.
Repositories if anyone would like to peek at the current code to make suggestions:
https://github.com/developers-cash/cash-pay-server
https://github.com/developers-cash/cash-pay-server-js
Donations are also very welcome. The below is an example of the Static Invoice concept which will send me $5USD worth of BCH.
Cash Pay Server
I began working on a Cash Bounty platform last year, but discontinued active development of this due to the difficulty involved in implementing some form of Payment Handling that could track transactions. One approach I was advised of was to use a different address per transaction - but, given that I wanted the funds to land directly at the recipients address (without me having to act as a mediator at all), I opted for attaching data to OP_RETURN's (via the `?op_return=xxxx` query parameter - which only has very limited support). This was not an elegant solution.
Ultimately, this has stoked me into working on a platform (Cash Pay Server) to ease this whole process via the BIP70 protocol. This has been a bit of a shitshow as wallet support is not great - and, if you implement BIP70, you should also implement the JSONPaymentProtocol (as both use the same URL scheme - and wallets can only really use one or the other). This is what I've attempted to do with Cash Pay Server.
What is Cash Pay Server?
Cash Pay Server is intended to be an open-source, self-hostable BIP70/JSONPaymentProtocol gateway for Bitcoin Cash.
At present, there are two components to this:
Cash Pay Server (The Node)
Cash Pay Server JS (Javascript Library)
The idea is to make Cash Payment Integration on sites as simple as possible.
Its usage, currently, is something like the following (feedback/suggestions welcome):
<!-- In future, will be a CDN. NPM package will also be available. -->
<script src="https://github.com/developers-cash/cash-pay-server-js/releases/download/v0.1.1/cashpay.min.js"></script>
<!-- Container QR Code will load into -->
<div id="invoice-container" style="width:256px;"></div>
<script>
// Actually create an invoice
var invoice = new CashPay.Invoice();
invoice.addAddress('bitcoincash:qz8dt7dlwkc5n4x9u6gclfwte8lr7n58gyavxt0vmp', 100000)
.setData('INVOICEID 12345')
.setWebhook('requested', 'https://webhook.site/5e22c4ae-95c6-4286-9af9-8dbb795e1539')
.setWebhook('broadcasted', 'https://webhook.site/5e22c4ae-95c6-4286-9af9-8dbb795e1539')
.create(document.getElementById('invoice-container')); // If argument given, will handle QR rendering, etc.
</script>
The above will:
Create an invoice and attach an InvoiceID (setData) to that invoice.
Render a QR code on page.
Change the QR code to a "green tick" once payment is broadcasted (via BIP70/JSONPaymentProto).
Trigger a webhook when the invoice is requested and payment is broadcasted.
This is important as most platforms would need to inform their backend systems once a payment has been made (i.e. to mark it as "paid" in their databases).
An example of this in action is available at the CodePen link here:
https://codepen.io/jimtendo/pen/LYpXKYe
Questions
**Is this ready for Production usage?**
No, not yet. I need to finalize the API's for this and implement some additional protections for the Webhooks (e.g. Signature Signing/Validation).
There's also additional features that are needed for this to be really useful (e.g. Confirmed Webhook Notifications, etc).
**Will there be a free instance available for those who do not want to self-host?**
Yes. The tentative address for this will be pay.infra.cash.
**Can this send to multiple addresses at once?**
Yes, this can be done by just calling the addAddress method.
invoice.addAddress('bitcoincash:qz8dt7dlwkc5n4x9u6gclfwte8lr7n58gyavxt0vmp', 100000)
.addAddress('bitcoincash:qreq5h8qj3cjtg3qvu82gla0kl80gu8amc859yhcdy', 100000)
**Will this support SLP?**
I'm not very well educated on SLP, but my understanding is that it relies upon OP_RETURN outputs, so theoretically this should be achievable. There is an `addOutput(...)` function available that will accept a raw output script for cases like this. Eventually, depending on whether I can find a lightweight SLP library to compile these outputs, I may integrate this directly into the JS library.
I'm unsure which Wallets (due to poor implementation of BIP70) would support this. For example, I know older versions of the Bitcoin.com Wallet did not.
**Will this support OP_RETURN?**
Same answer as above currently.
**How would I direct the JS Library to my own self-hosted instance?**
The constructor accepts a configuration object:
var invoice = new CashPay.Invoice({ endpoint: 'https://your.instance.com' });
**Is there an ETA on how long until this is usable?**
I don't want to be over-optimistic, but am hoping I can have this ready within two months. This was a side-project done inbetween a full-time job so I didn't have a lot of time to invest in this. Now, I have a bit more time.
If someone wants to send me shekels, that'll incentivize me to get this done quicker.
**Why BIP70?**
BIP70 has a bad reputation. In my opinion, this is undeserved. It is not perfect, but most of the issues with it were to do with poor wallet implementation. Additionally, BitPay's JSONPaymentProtocol actually complicated things in that they both use the exact same URL schema. Therefore, anyone wishing to implement BIP70 also has to support JSONPaymentProtocol to ensure maximum support - as the wallets can only really support one or the other. Very disrespectful.
If anyone would like more details on how BIP70 vs JSONPaymentProto should be handled, happy to do a quick write-up on this. In general though, you want a "switchboard" type approach depending on the "accept" and "content-type" HTTP headers.
**Can I render my own QR Code and not rely on the default container?**
Yes, the container is more of a convenience, but the idea is to have event hooks in the JS library to allow this. In terms of the default container appearance, if any designers want to shoot something more attractive my way (or assist with that code itself, it'd be much welcomed). At the moment, that code is very messy and the default container isn't very attractive.
Other feedback or suggestions for features to accommodate other use-cases are also most welcome.

Google Authenticator-like App for KDE Plasma
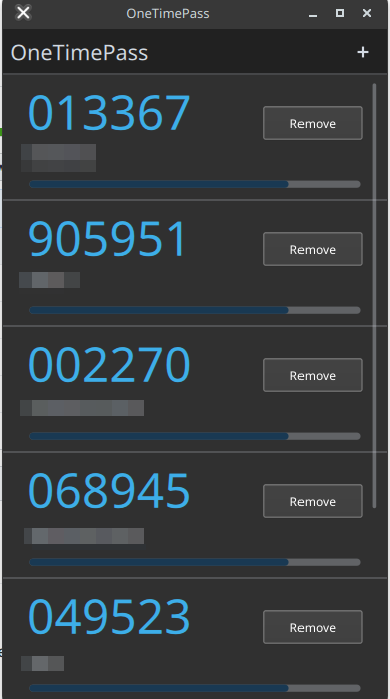
I started working sometime ago on a Google Authenticator-like App for KDE Plasma., titled "OneTimePass". This was in anticipation of Plasma Mobile - so was written in QML, and leveraged KDE Wallet (**will not work if KWallet is not enabled**).
(Note that I have not tested this on Plasma Mobile and imagine it will likely need some patching to work well on Plasma Mobile devices.)
Support is limited to TOTP (Time-based One Time Password - the most common used by Google Authenticator) at this point in time. If there's sufficient interest, happy to put more work into this to support others.
I didn't have a lot of time to stabilize this, but had some time over the weekend to fix up the QML layouts and get this into a usable state.
This comes with two components:
A UI App that will show all entries (upon clicking, saves the code to Clipboard).
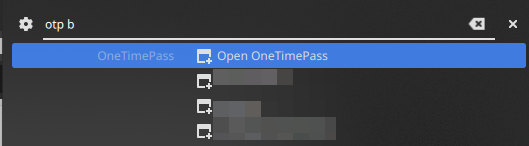
A KRunner invoked with `otp ${searchTerm}` (upon clicking, saves the code to Clipboard)
The UI App:
The KRunner:
Build notes are available at the repository (and copied below):
https://github.com/jimtendo/onetimepass-plasma
Requirements (Ubuntu 19.10):
`sudo apt install liboath-dev libkf5wallet-dev libkf5runner-dev libkf5service-dev libkf5i18n-dev`
Building
git clone https://github.com/jimtendo/onetimepass-plasma
cd onetimepass-plasma
mkdir build
cmake -D KDE_INSTALL_USE_QT_SYS_PATHS=ON ../
make
sudo make install
Bitcore - Payment Protocol Library Implementation
I recently attempted to implement the Bitcore Payment Protocol Library and ran into several pieces that took me a few hours of debugging to wrap my head around.
I've decided to share some sample code that I wrote to, hopefully, save others from this headache in case they also decide to implement using this library.
The notable "gotchas" were these:
When setting the Payment Details from an output, use the ".message" field: e.g. details.set('outputs', output.message);
Bitcore Payment Protocol Lib expects the Certificates in "der" format - not "pem". For the Private Key, ".pem" appears fine.
Be careful when you are reading the above Certificates in. You must read these as binary files - not UTF8 files.
If you're using a Certificate that is not derived direct from a Root Cert Authority (e.g. you're using LetsEncrypt), then you must include the chain of certs.
Code with GOTCHA lines is below (untested, but is mostly copy+paste of what I used with a few modifications).
This doesn't appear to be working with Bitcoin.com Wallet still. If I work out why, I'll post amended code - but BIP70 implementations seem to be inconsistent across the board.
const express = require('express')
const fs = require('fs');
const router = express.Router()
// GOTCHA - Not mine, but apparently order here matters!
const PaymentProtocol = require('bitcore-payment-protocol');
const bitcore = require('bitcore-lib-cash');
// BIP70 Payment Request Endpoint
router.get('/req', async (req, res) => {
// Setup certificates
// GOTCHA: NOTE THAT THESE ARE IN .der FORMAT - DO NOT READ AS UTF8
var certificate = fs.readFileSync('./cert.der');
var chain = fs.readFileSync('./chain.der');
// GOTCHA: NOTE THAT THIS IS IN .pem and that I'm therefore reading as "utf8"
var privKey = fs.readFileSync('./privkey.pem', 'utf8');
var now = Date.now() / 1000 | 0;
// Create an output
// GOTCHA: ADDRESS MUST BE A BITCOINCASH: ADDRESS!
var address = bitcore.Address.fromString("bitcoincash:qz2fn6wwwxs2wcdf9cfdhv4ln0qvjadg6csjcjasuf");
var script = bitcore.Script.buildPublicKeyHashOut(address);
var rawScript = new Buffer(script.toString(), 'ucs2');
var output = new PaymentProtocol().makeOutput();
output.set('amount', 10000);
output.set('script', rawScript);
// Construct the payment details
var details = new PaymentProtocol('BCH').makePaymentDetails();
details.set('network', 'main');
details.set('outputs', output.message);
details.set('time', now);
details.set('expires', now + 60 * 60 * 24);
details.set('memo', "Message that the user will see");
details.set('payment_url', `https://your-service.com/ack`);
details.set('merchant_data', new Buffer("INVOICE_ID_AND_THINGS_OF_THAT_SORT")); // identify the request
// Load the X509 certificate
var certificates = new PaymentProtocol().makeX509Certificates();
// GOTCHA: CHAIN THE CERTIFICATES - THIS IS WHY IT'S AN ARRAy
certificates.set('certificate', [certificate, chain]);
// Form the request
var request = new PaymentProtocol().makePaymentRequest();
request.set('payment_details_version', 1);
request.set('pki_type', 'x509+sha256');
request.set('pki_data', certificates.serialize());
request.set('serialized_payment_details', details.serialize());
request.sign(privKey);
// Serialize the request
var rawBody = request.serialize();
// Set output headers
res.set({
'Content-Type': PaymentProtocol.LEGACY_PAYMENT.BCH.REQUEST_CONTENT_TYPE,
'Content-Length': request.length,
'Content-Transfer-Encoding': 'binary'
});
res.send(rawBody);
});
// GOTCHA
// In ExpressJS, due to the Content-Type header, req.body will be empty by default.
// You have to explicitly tell ExpressJS to process raw body as follows:
// app.use(bodyParser.raw({ type:'*/*' }));
// That said, I was lazy - you can probably just put this middleware straight
// into this endpoint and actually select based on Content Type.
router.post('/ack', async (req, res) => {
// Decode payment
var body = PaymentProtocol.Payment.decode(req.body);
var payment = new PaymentProtocol().makePayment(body);
var merchantData = payment.get('merchant_data');
var transactions = payment.get('transactions');
var refundTo = payment.get('refund_to');
var memo = payment.get('memo');
// TODO Send payment
// Make a payment acknowledgement
var ack = new PaymentProtocol().makePaymentACK();
ack.set('payment', payment.message);
ack.set('memo', 'Thank you for your payment!');
var rawBody = ack.serialize();
res.set({
'Content-Type': PaymentProtocol.LEGACY_PAYMENT.BCH.PAYMENT_ACK_CONTENT_TYPE,
'Content-Length': rawBody.length,
'Content-Transfer-Encoding': 'binary'
});
res.send(rawBody);
});
Useful links:
https://github.com/bitpay/bitcore-payment-protocol
https://github.com/bitpay/bitcore-payment-protocol/blob/master/docs/index.md
https://medium.com/@nusrath501khan/creating-a-bip-70-payment-request-183933c33259
Godspeed.
 @jimtendo