Drawing a Cute Chick (Digital Drawing Tutorial)
Here is another beginner friendly digital art Lesson that I post almost every week . All the art blogs I did for these series have steps really simplified so any one can draw them traditionally or digitally .
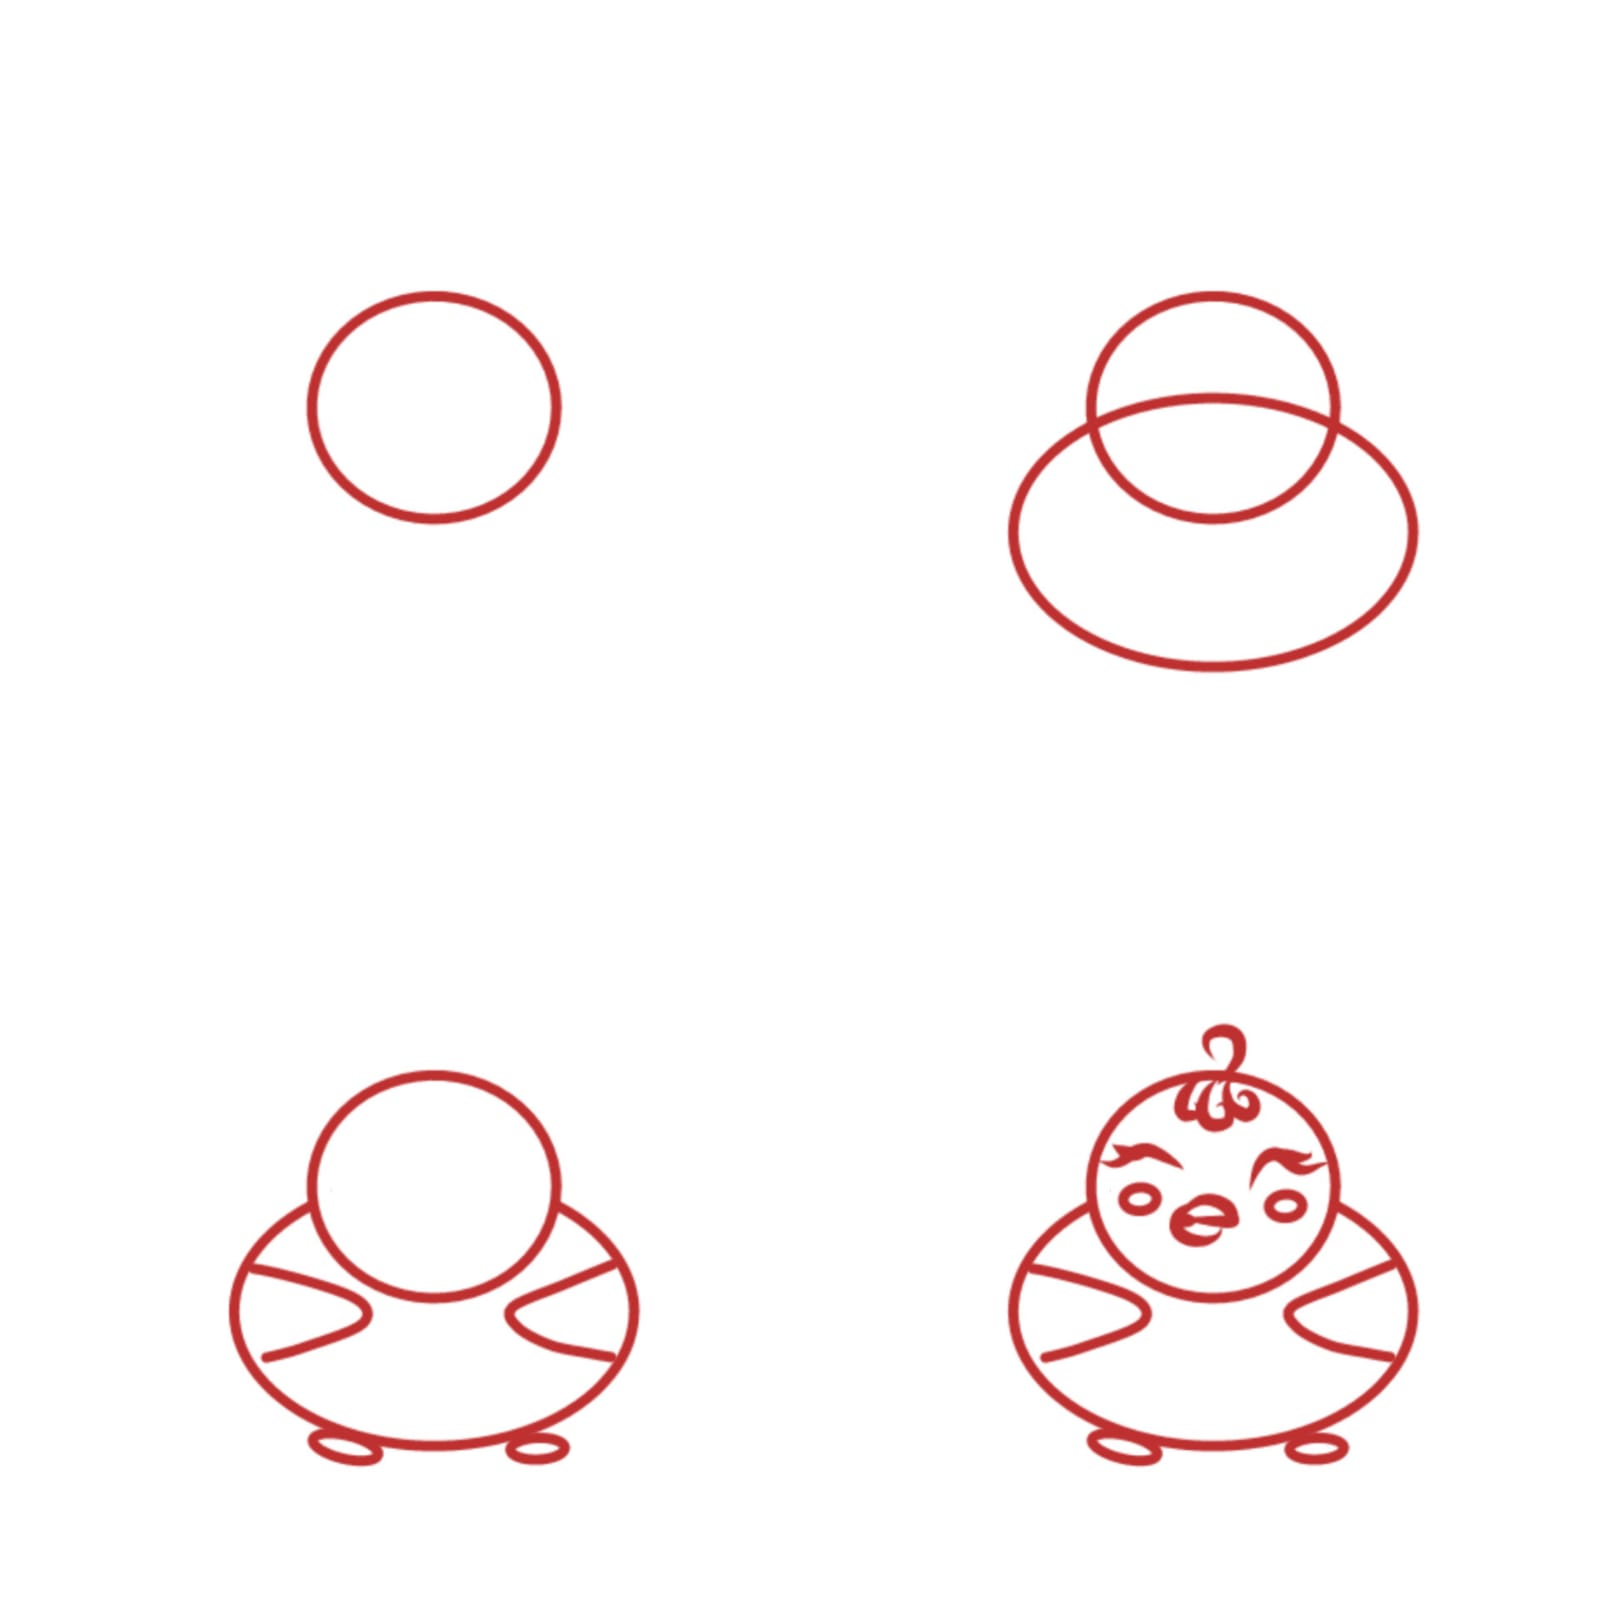
So Today we are drawing a cute little baby chick the tutorial is simple . I always start with basic shapes and everything is made from different combinations of basic shapes even our complexed faces .
For the Chick I just drew a circle for the head and a bigger circle for it's body and two triangles for the hands or wings and two ovals for the feet . Erase the extra lines and then I added some facial features like closed cute eyes and a cute beak and some curled up lines for the hair .So our Lineart is completed here
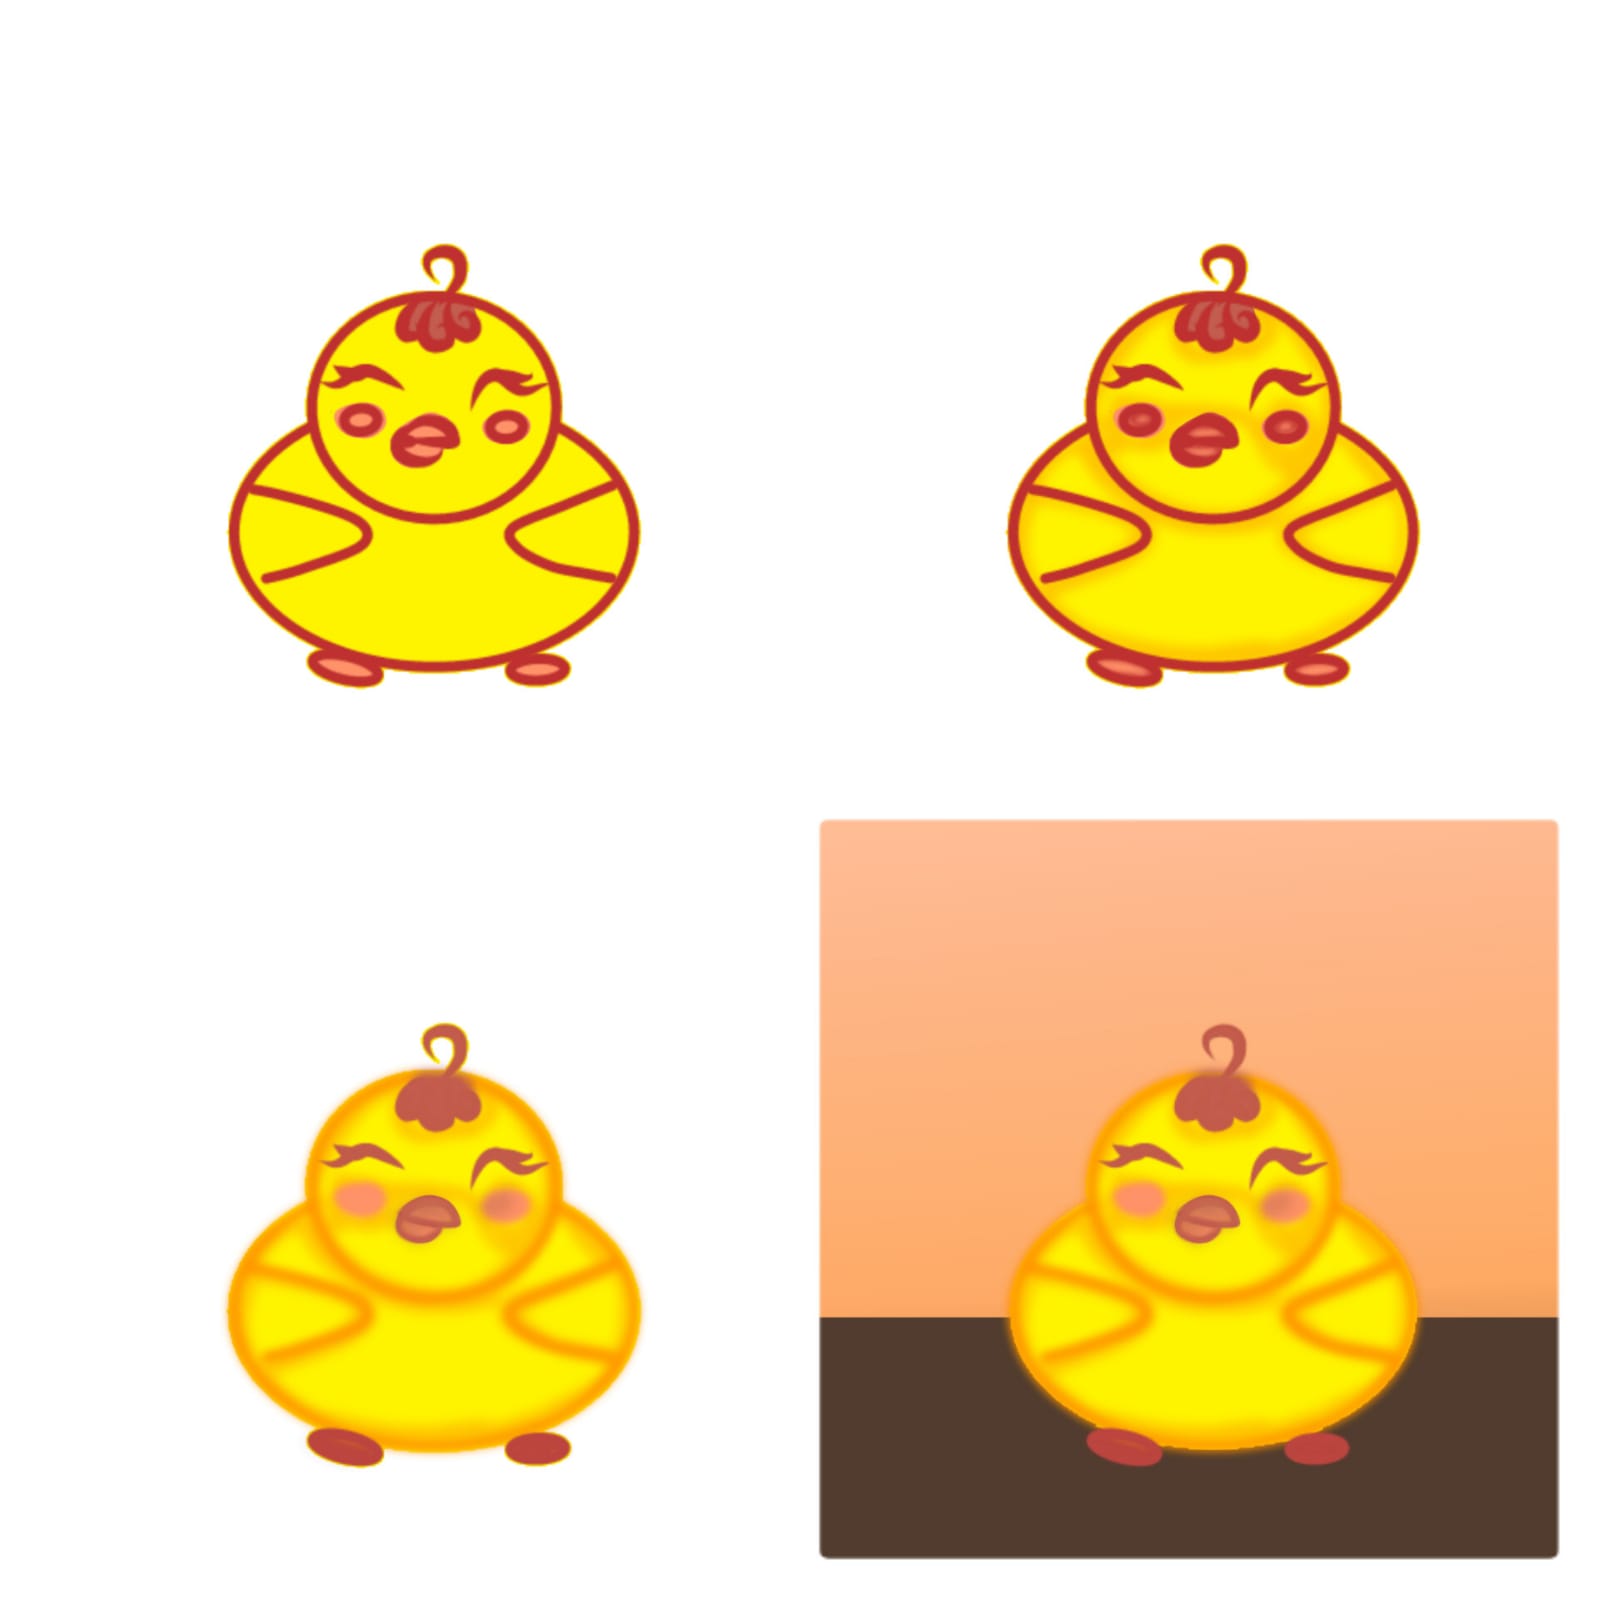
Now for the colors I just did a bright yellow and Some Orange so I filled those two basic colors next I shade with orange on add some blush and color the lineart so the character looks soft . I also gaussian blurred the lineart so it looks kind of a whispy soft lineart.
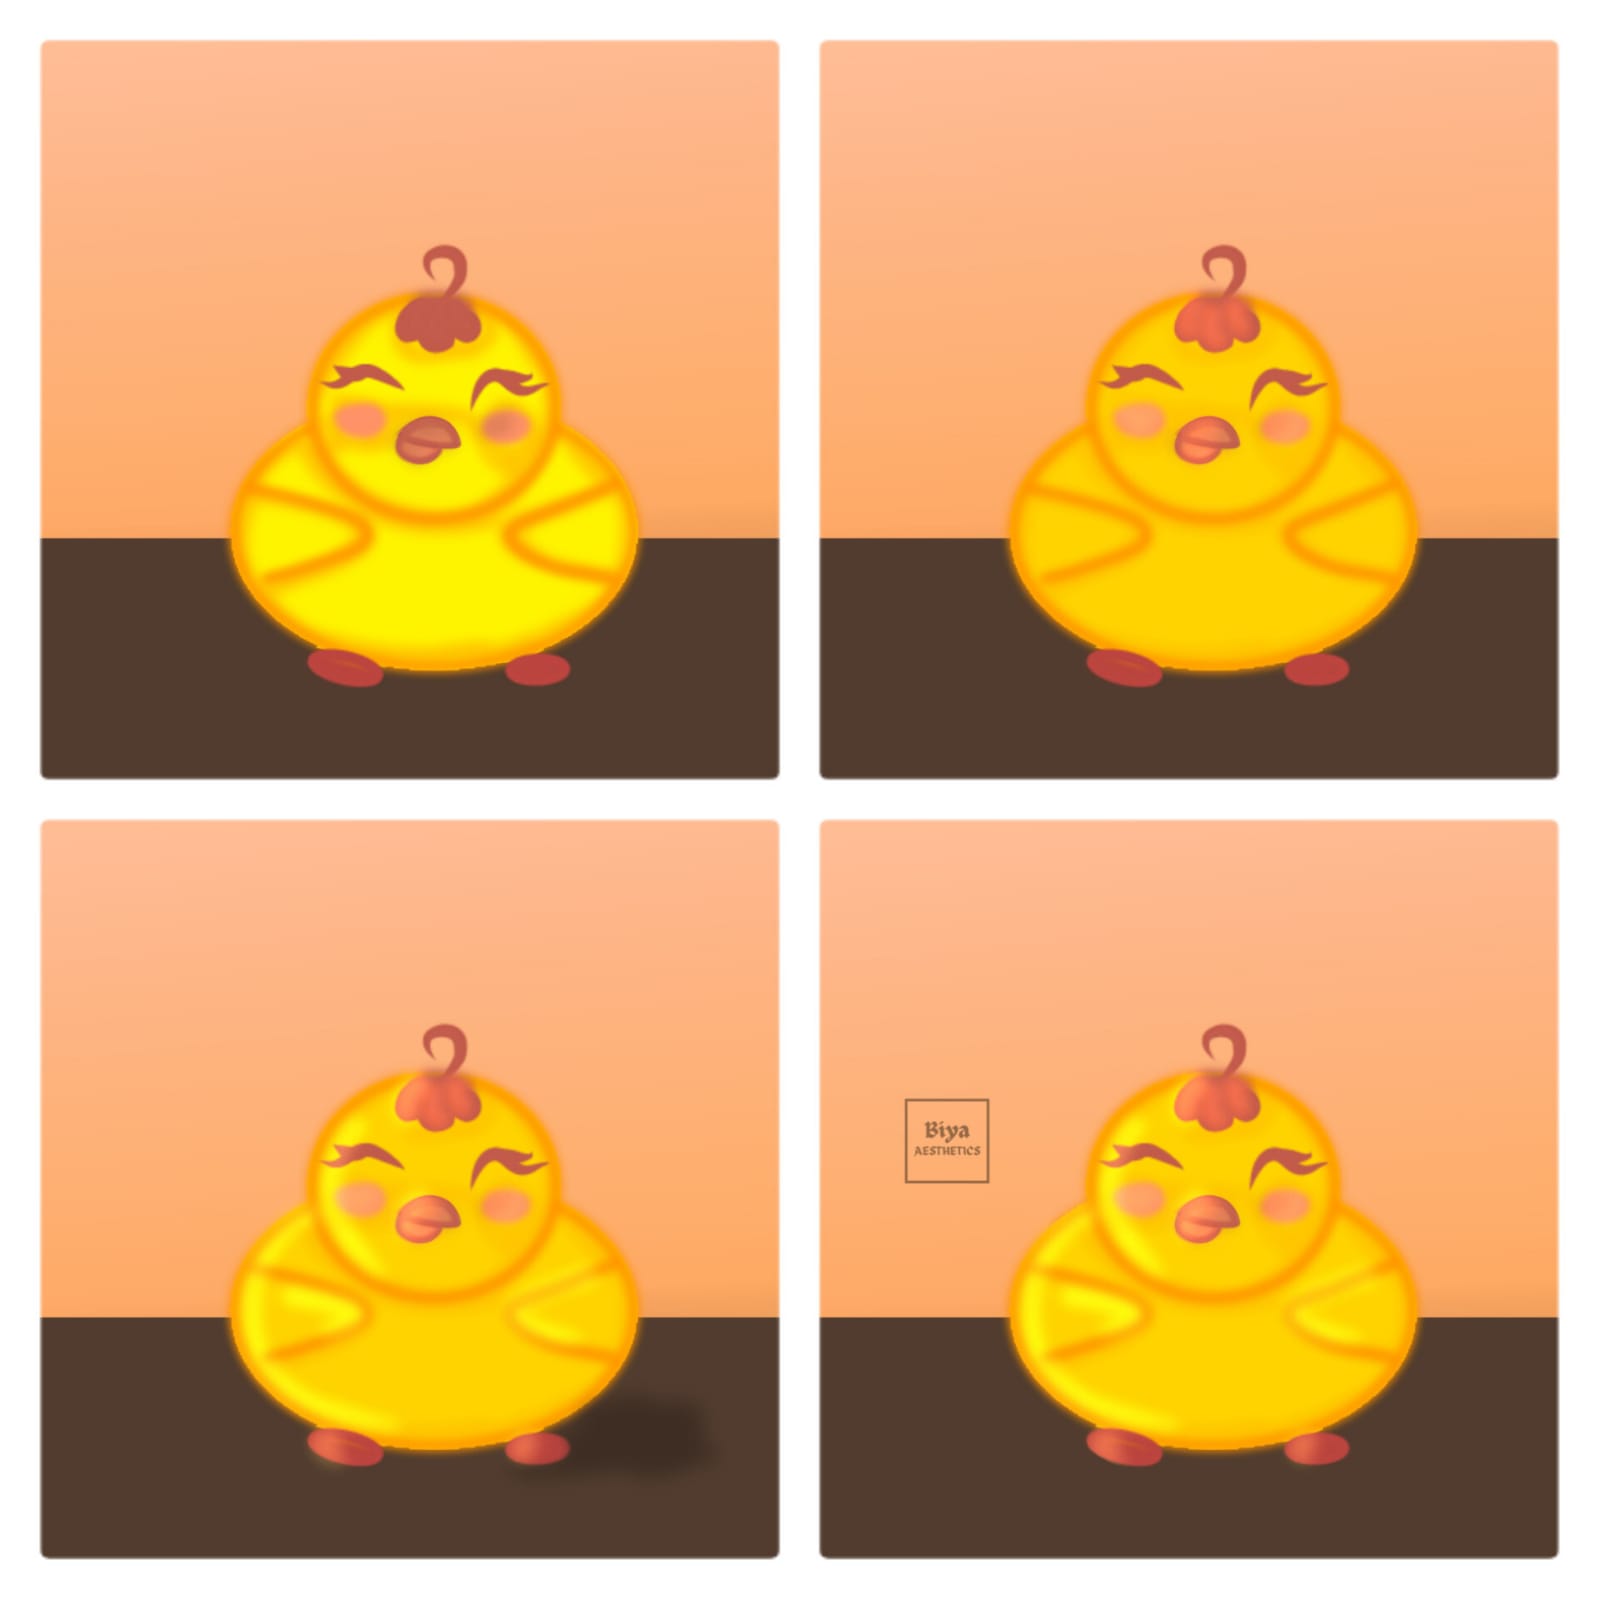
Now I added a gradient peach back ground and a brown base for a ground as our chick is standing on it.
Next i added some highlights with a air brush in pale yellow color and Set it to add in layer blending mode . Highlights tell us where the light is hitting our character so today it's from the top left that's why I just highlighted the top left side of our cute chick . Added my Water mark and here is the final look ❤️
Thank you for your precious time and support ❤️
Sketching a Guy with Katana.
Since December 2023 I have been doing some sketch studies almost every week . Its like a habit I wanna develope to know human anatomy more and be familiar with drawing faces and people of different ethnicity . Also I just love having all the things I learnt in a written format so Others can read about the whole process I follow.
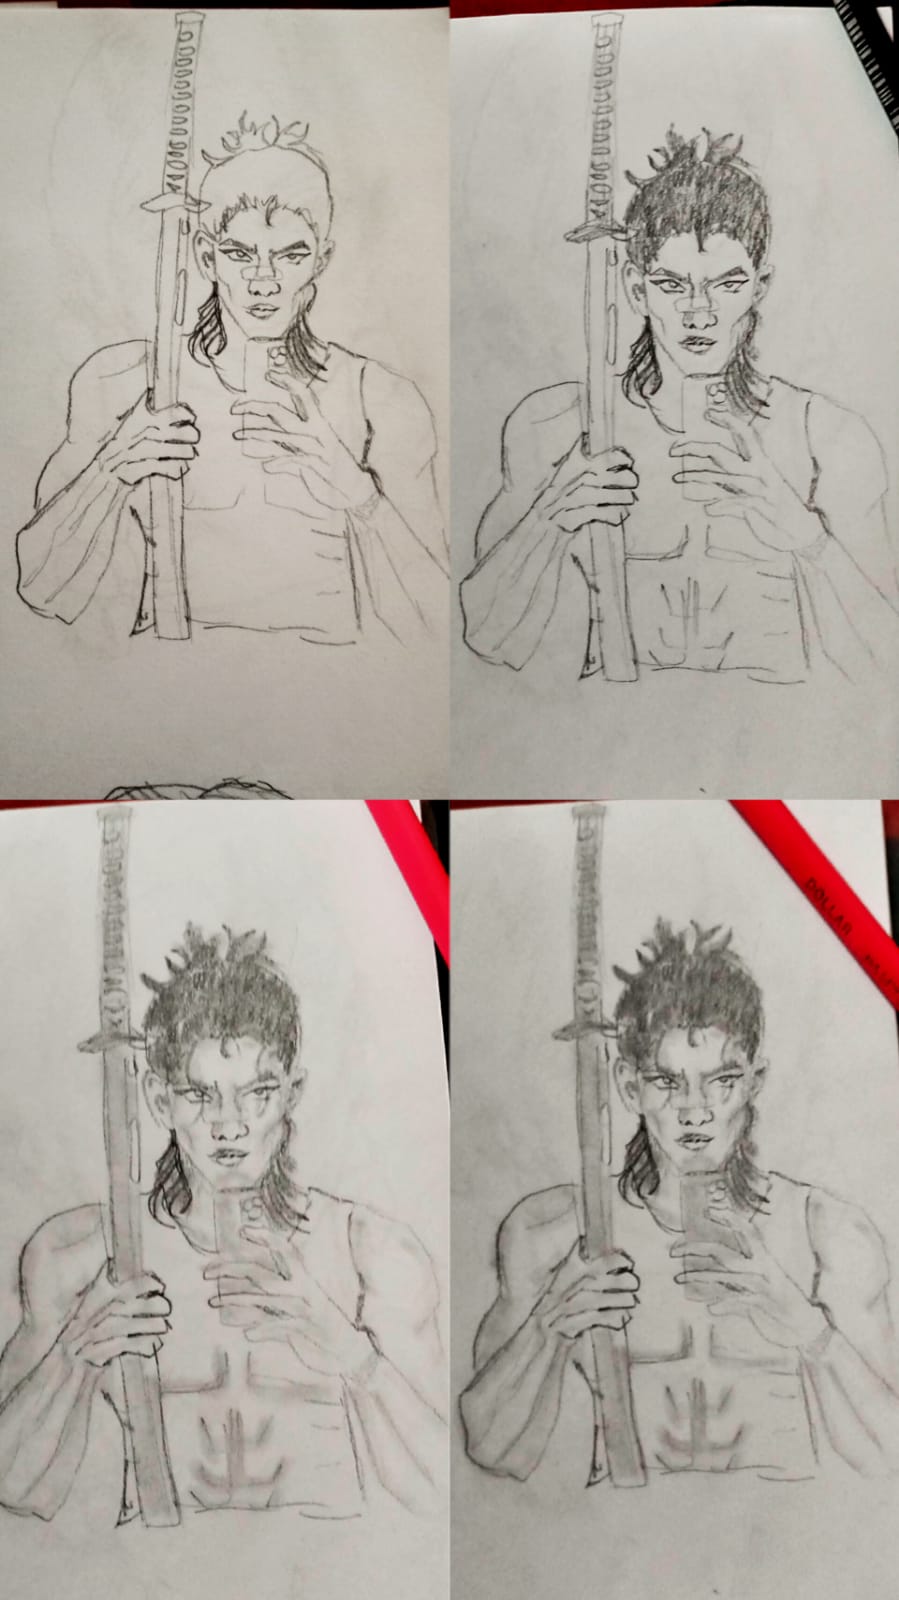
This week I'm drawing a Pinterest reference guy but I changed his expressions to make him look more aggressive and dangerous . Just wanted to experiment . So I always have this whole rough Sketch process . It's messy I just draw basic shapes and refine them making sure to look at the negative spaces then I erased it with a Kneadable erasure and just keep the details I want darken them with a 2h pencil so it doesn't smudge .
Next I kinda just shaded his hair which were in a half bun style . So I just drew the hair strands by stroking my 3b pencil in the direction the hair were tied and same way I did the half bun and the side hair then I added more muscles to his body . Apparently I'm still new at drawing muscles so its a bit tough but I'm learning this too I added some. Square lines to the chest as well as some -/ for the abs . Also added some color to the Katana handle .
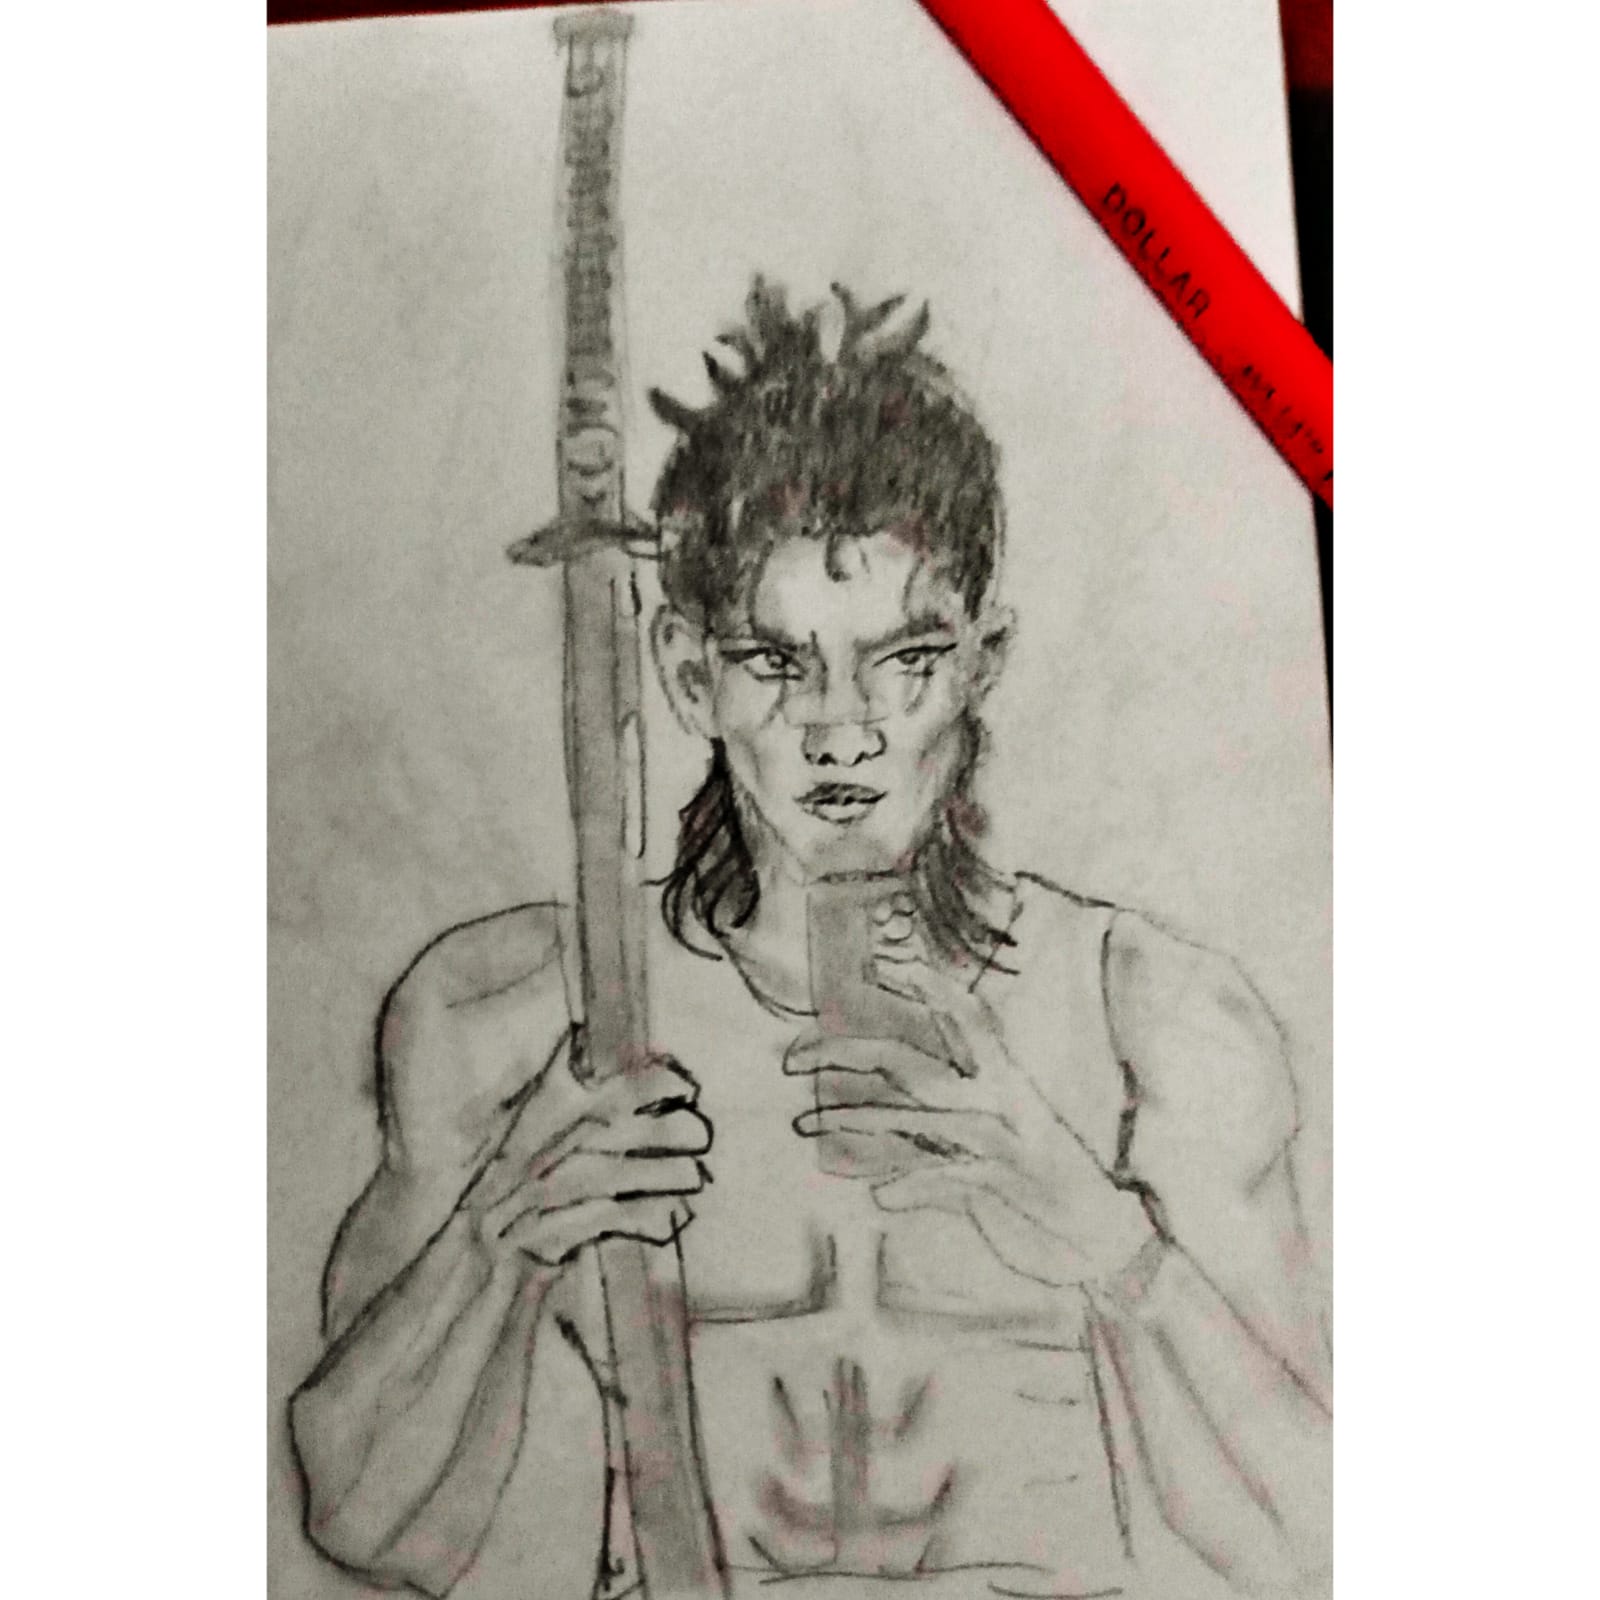
Now I took a blending stump and started blending all the lines took a 2hb pencil added some shading to the jawline and his arm muscles also temples of the forehead shaded the Katana added some highlights by erasing and here is the final Result .
This wasn't one of my bestest works but it was a great attempt I think the ear was a bit lopsided but overall I think I really got angry facial features on point .
that's all for today Thank you for your precious time and support you ❤️
Painting Sunflowers and a bee
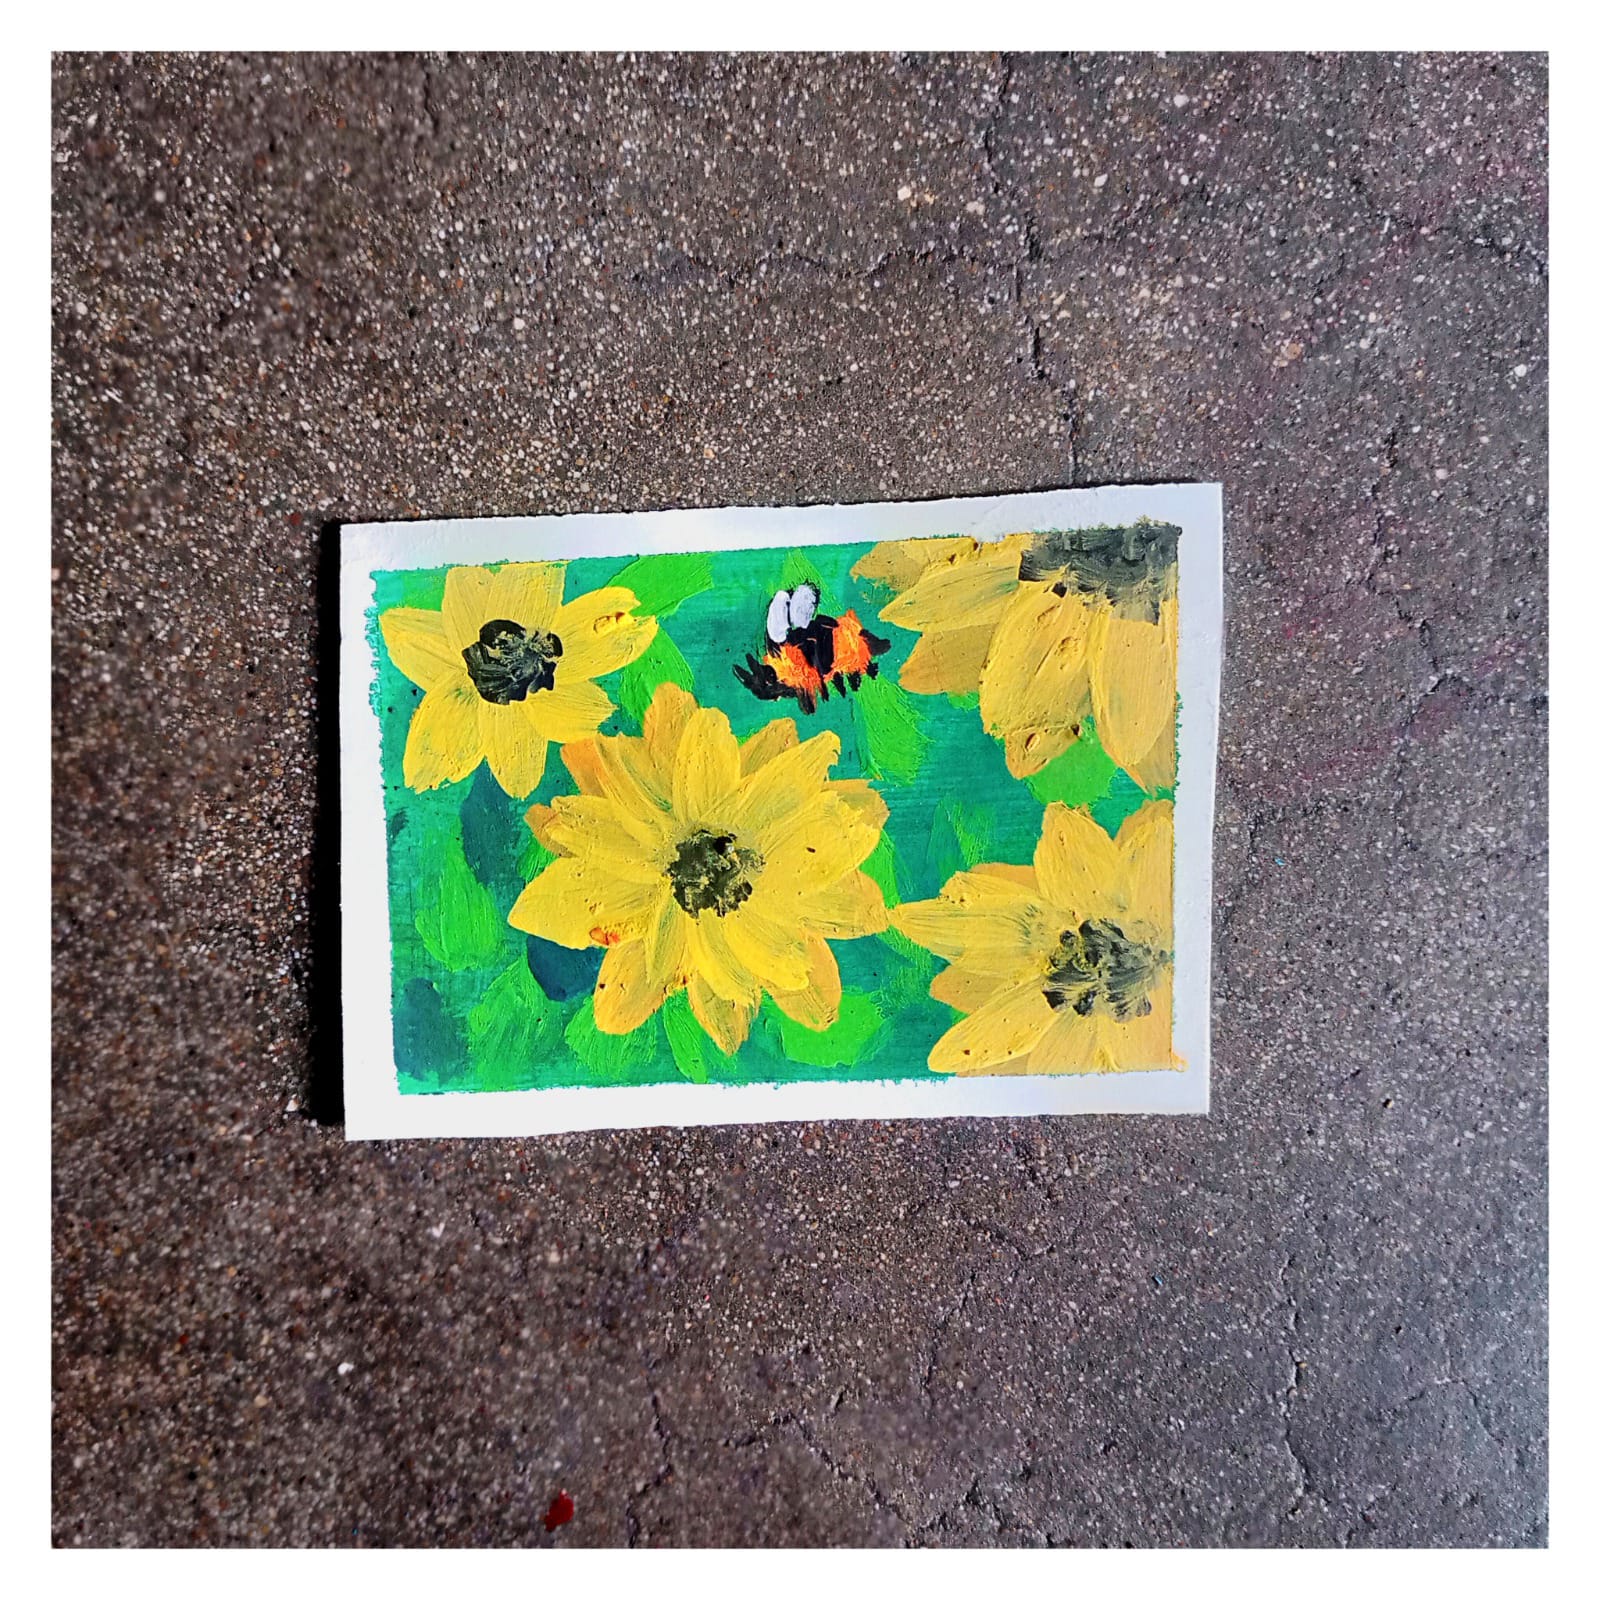
Every Week I do a miniature painting and this week I'm drawing two of my favorite things Sunflowers and bees together .
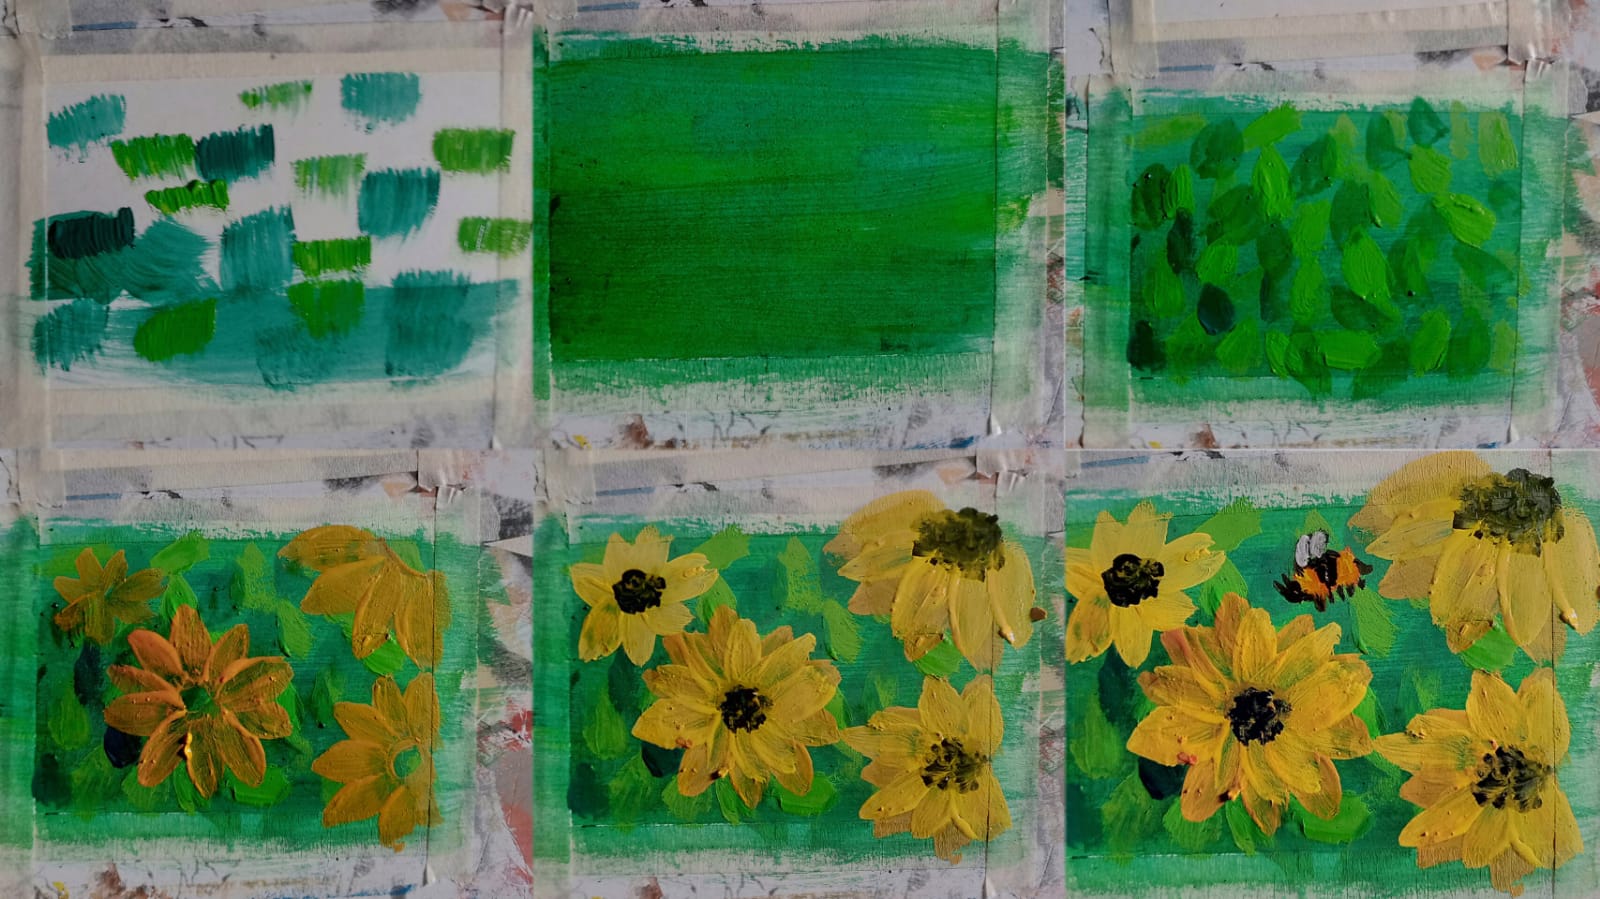
Materials I used for this painting is just a 4×6 cartridge paper and on its edges I have taped masking tape and then I'm using acrylic paints with a round brush , a half inch flat brush and a fine liner brush. Lets begin.
So firstly I start with dark green and light green stroke randomly on canvas , then I blending both shaded of green into a fine gradient this makes the. Canvas have more value and color not just a simple green solid base color because this will be like a leafy textured background. Now with a round brush I again am using the same technique and randomly putting both dark and green colored leafs now on top of this I drew a mini circle and on the edges I made yellow petals with a round brush. Now I again mix some more yellow with orange and put some more petals with round brush let it dry .
Now in the middle I took a dry brush and tapped black color randomly so it looks like the seeds of the sunflower and then I added some more brown to the seeds same ways . Using two or more colors for the same element just adds more shading and value .
Now with a fine liner brush I made a oval and made 3 black stripe on it and the space remaining I just used dry brush and put yellow and orange on that to show the fluffy body of a bee.
I added some white wings to it and 6 tiny legs for our bee .
I then removed the tape so the edges were all cleaned . Put a nice coat of clear top coat over it and Here is the final Result
That's all for today Thank you for your precious time and support ❤️
Splinterlands art contest #274 ( Enchanted Pixie)
Every week Splinterlands community on Hive holds a art contest . To participate in it you have to draw one of their card from Splinterlandscards.com in your own art style .
Any medium can be used for the contest . I take part in this contest every week and this week I'm drawing a very kawai character that is Enchanted Pixie .
The Character was cute in its own self it's a Pixie with pixie cut pink hair . The dress Is made up off two pieces fully covered in leaves and the wings are like a butterfly in color yellow and blue . Eyes of this character have yellow pupils but the scalera is all gray .
Over all the character has a chibi body with alot of vibrant elements .
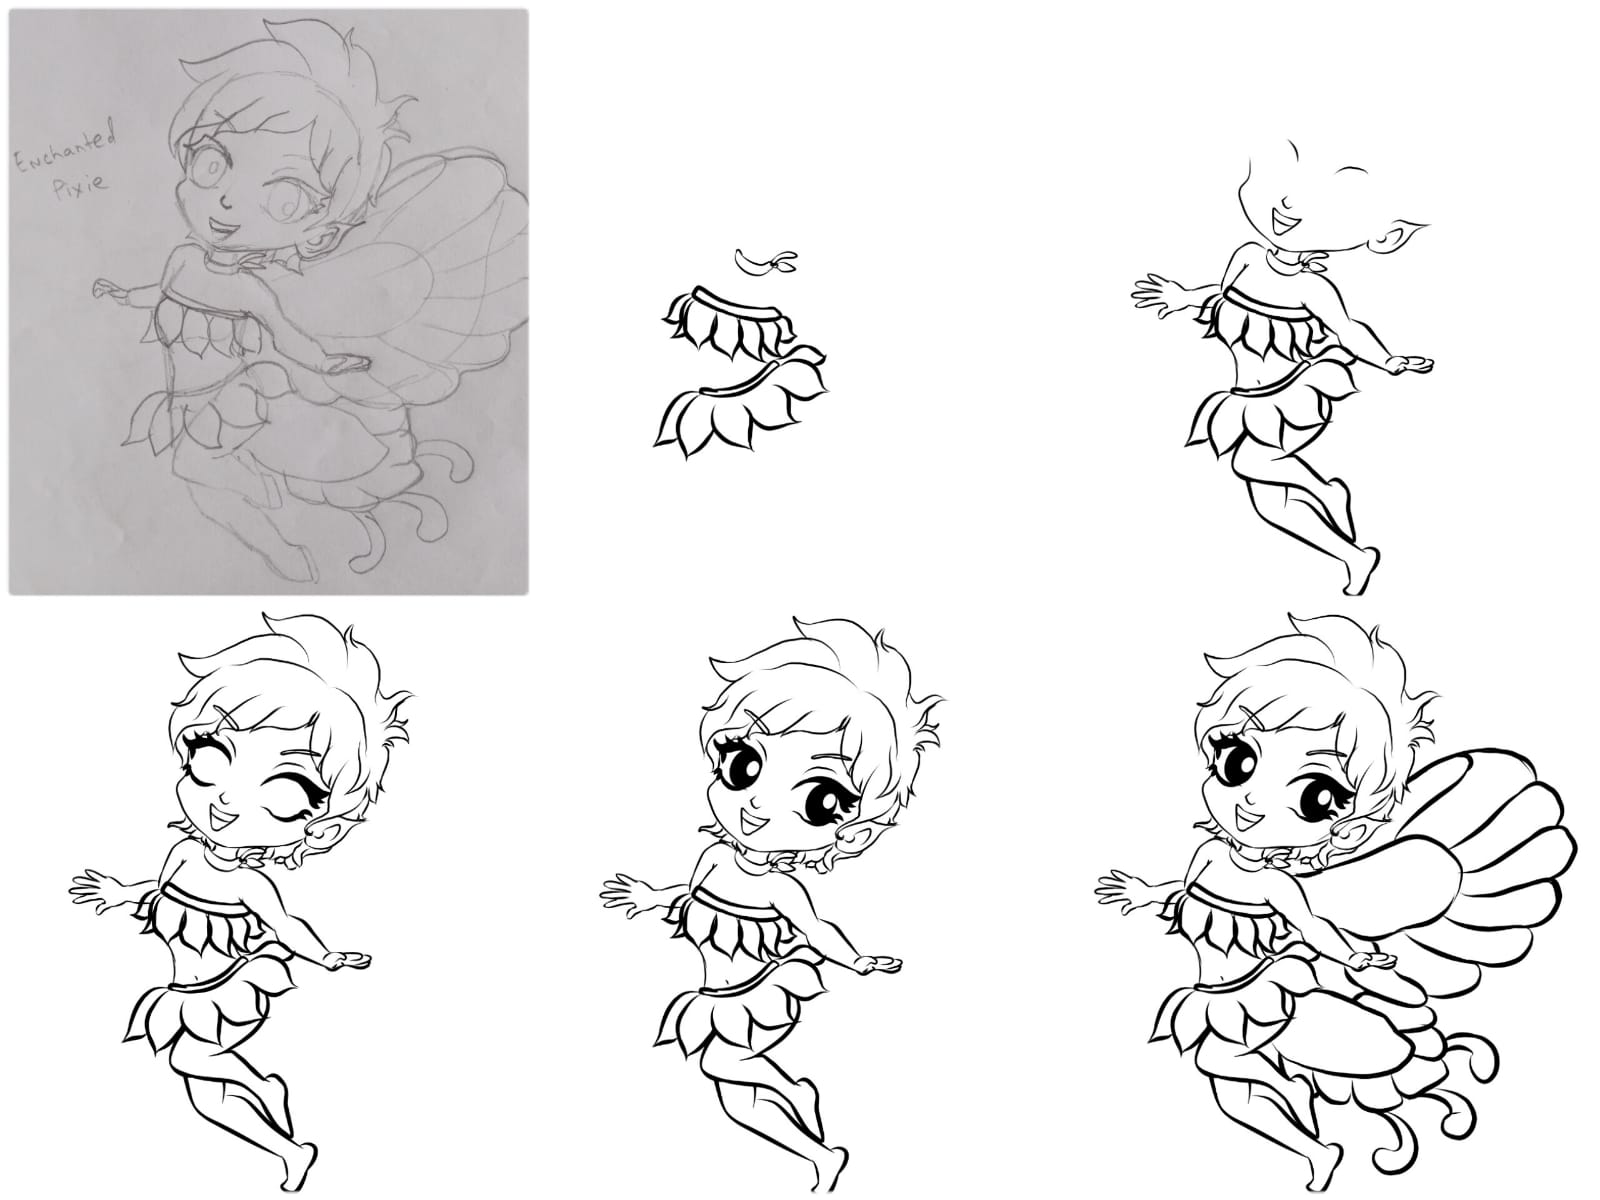
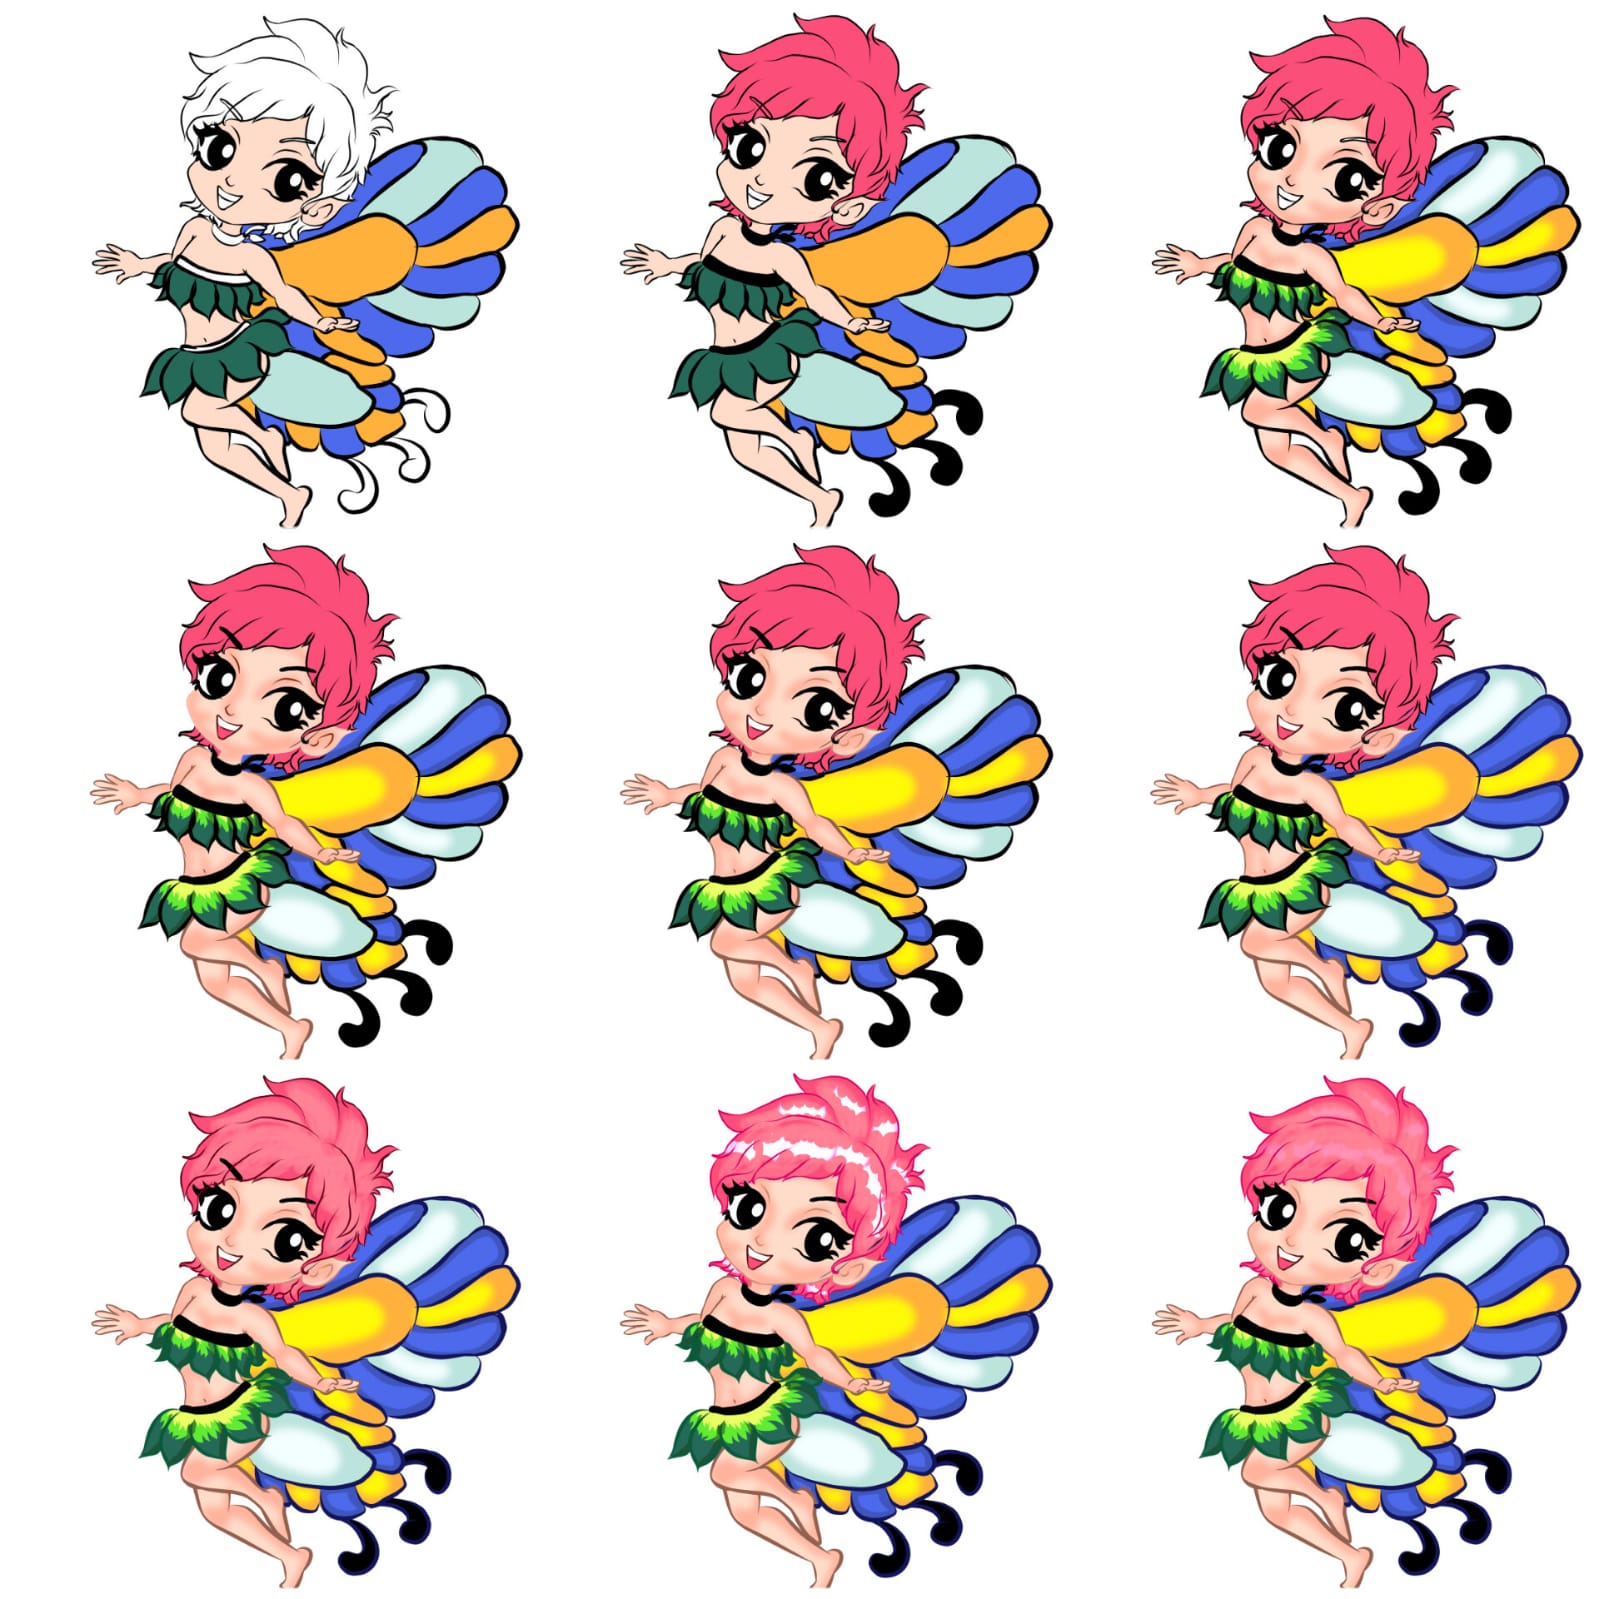
So firstly I drew the sketch roughly by seeing how the wings are formed the ratio of face and body proportions the pixie hair cut . I took tried drawing a chibi version . I sketched her skirt and top too with leaves .
Now I imported this sketch into a digital drawing app called medibang paint pro. With Pen sharp brush I started tracing each element on a different layers . Like the dress ,skin , wings and hair were all on different layers and here is our Lineart ready
Now I filled in the flat colors on different layers just like the lineart after this I clipped a layer on top of the skin layer and shaded the skin with a darker color and guassian blurred it so it looks real . Then I shaded the leaves with green and yellow added some shading too . Same for the wings I added some soft highlights and shading for the shading layers I use multiply blending mode and for highlights I either use add or hard light blending mode.
Now I colored the lineart and added more shading to the mouth and for the hair I used a dry brush and used a pale pink color to make this fluffy texture and with a light brush I added highlights on top of the hair and set it to add lowered the opacity a bit so the hair look shiny
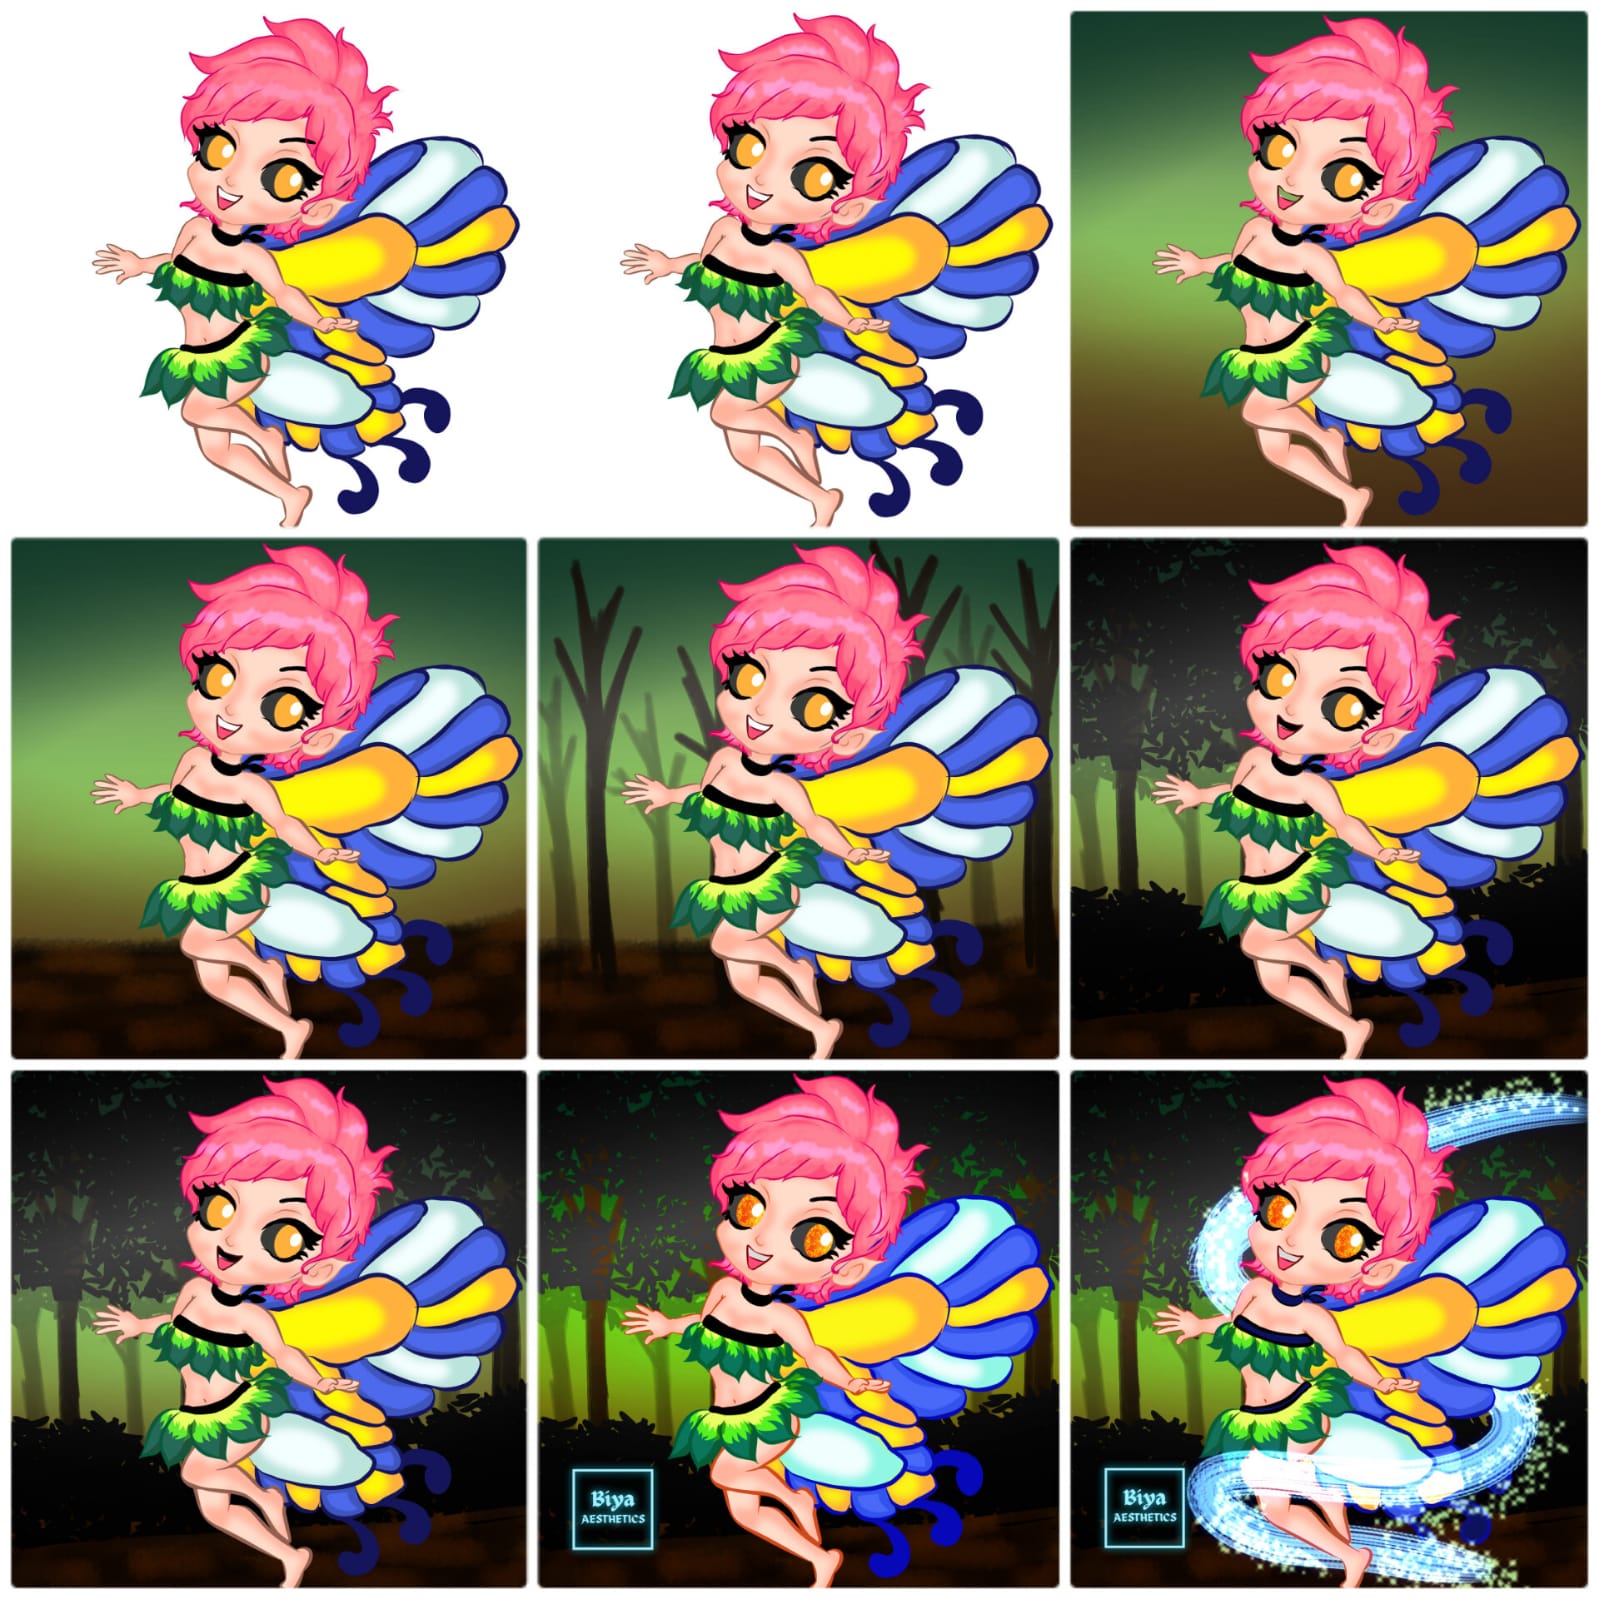
For the scelera I did gray and the eye lens I made it yellow just like the original character . Now before I add more details to eyes I went and made a gradient green to brown background .
Now I made a horizon and colored it in Brown color so it looks like ground and added some tree trunks in back with a rough brush and I added some leaves to the back and added some trees Infront the back ones were a little lighter . So you can see how with some simple steps we made a forest background for our pixie .
Now for the eyes I added some gradient by air brushing red over yellow and added some pale yellow sparkles with a sparkle brush and set the layer to add . This makes the eyes look glittery and glowy .
Finally I made some light adjustments by putting a blue layer on top and setting it to saturation then I added some swirly light and glitter around our pixie. Added my water mark and here is the final result ❤️
Hope you like it . That's all for today Thank you for your precious time and support ❤️
Things that make me The Happiest
Every person in this world has Something That just brings them pure joy. Maybe a hobby , sometimes it's materialistic or quality time with family . For me something that can cheer me up and make my day Alot joyful are these 3 things.
Good tasty Food :
I don't know if you can relate but when ever I'm sad one thing that cheers me up is food. I just love my moms handmade simple daal chawal . Tbh i can be sick not okay dealing with hardships but my moms cooking always cheers me up and makes my worst day the best.
Art :
So if not food another thing that calms my anxious heart is art i love Sketching and that's something that just takes my burdens away . I just love expressing emotions on a piece of paper. I either paint or draw sketches of how I want my life to be . I think visualizing is the key that manifests everything so I either paint nature or calm sunsets and that just makes me extra happy.
Music :
Sometimes when everything is going bad a good playlist also cheers my mood up . I just love music sometimes i blast phone songs on my earphones some times its some sad songs and i just let the 3am me drift away into these songs imagine my self in scenarios like a movie . This also works like therapy .
What's the three things that can just cheer you up in a bad mood? Comment down below 👇
Thank you for your precious time and support ❤️
Happy New year guysss
May this year bring success ,joy and happiness in your life ❤️
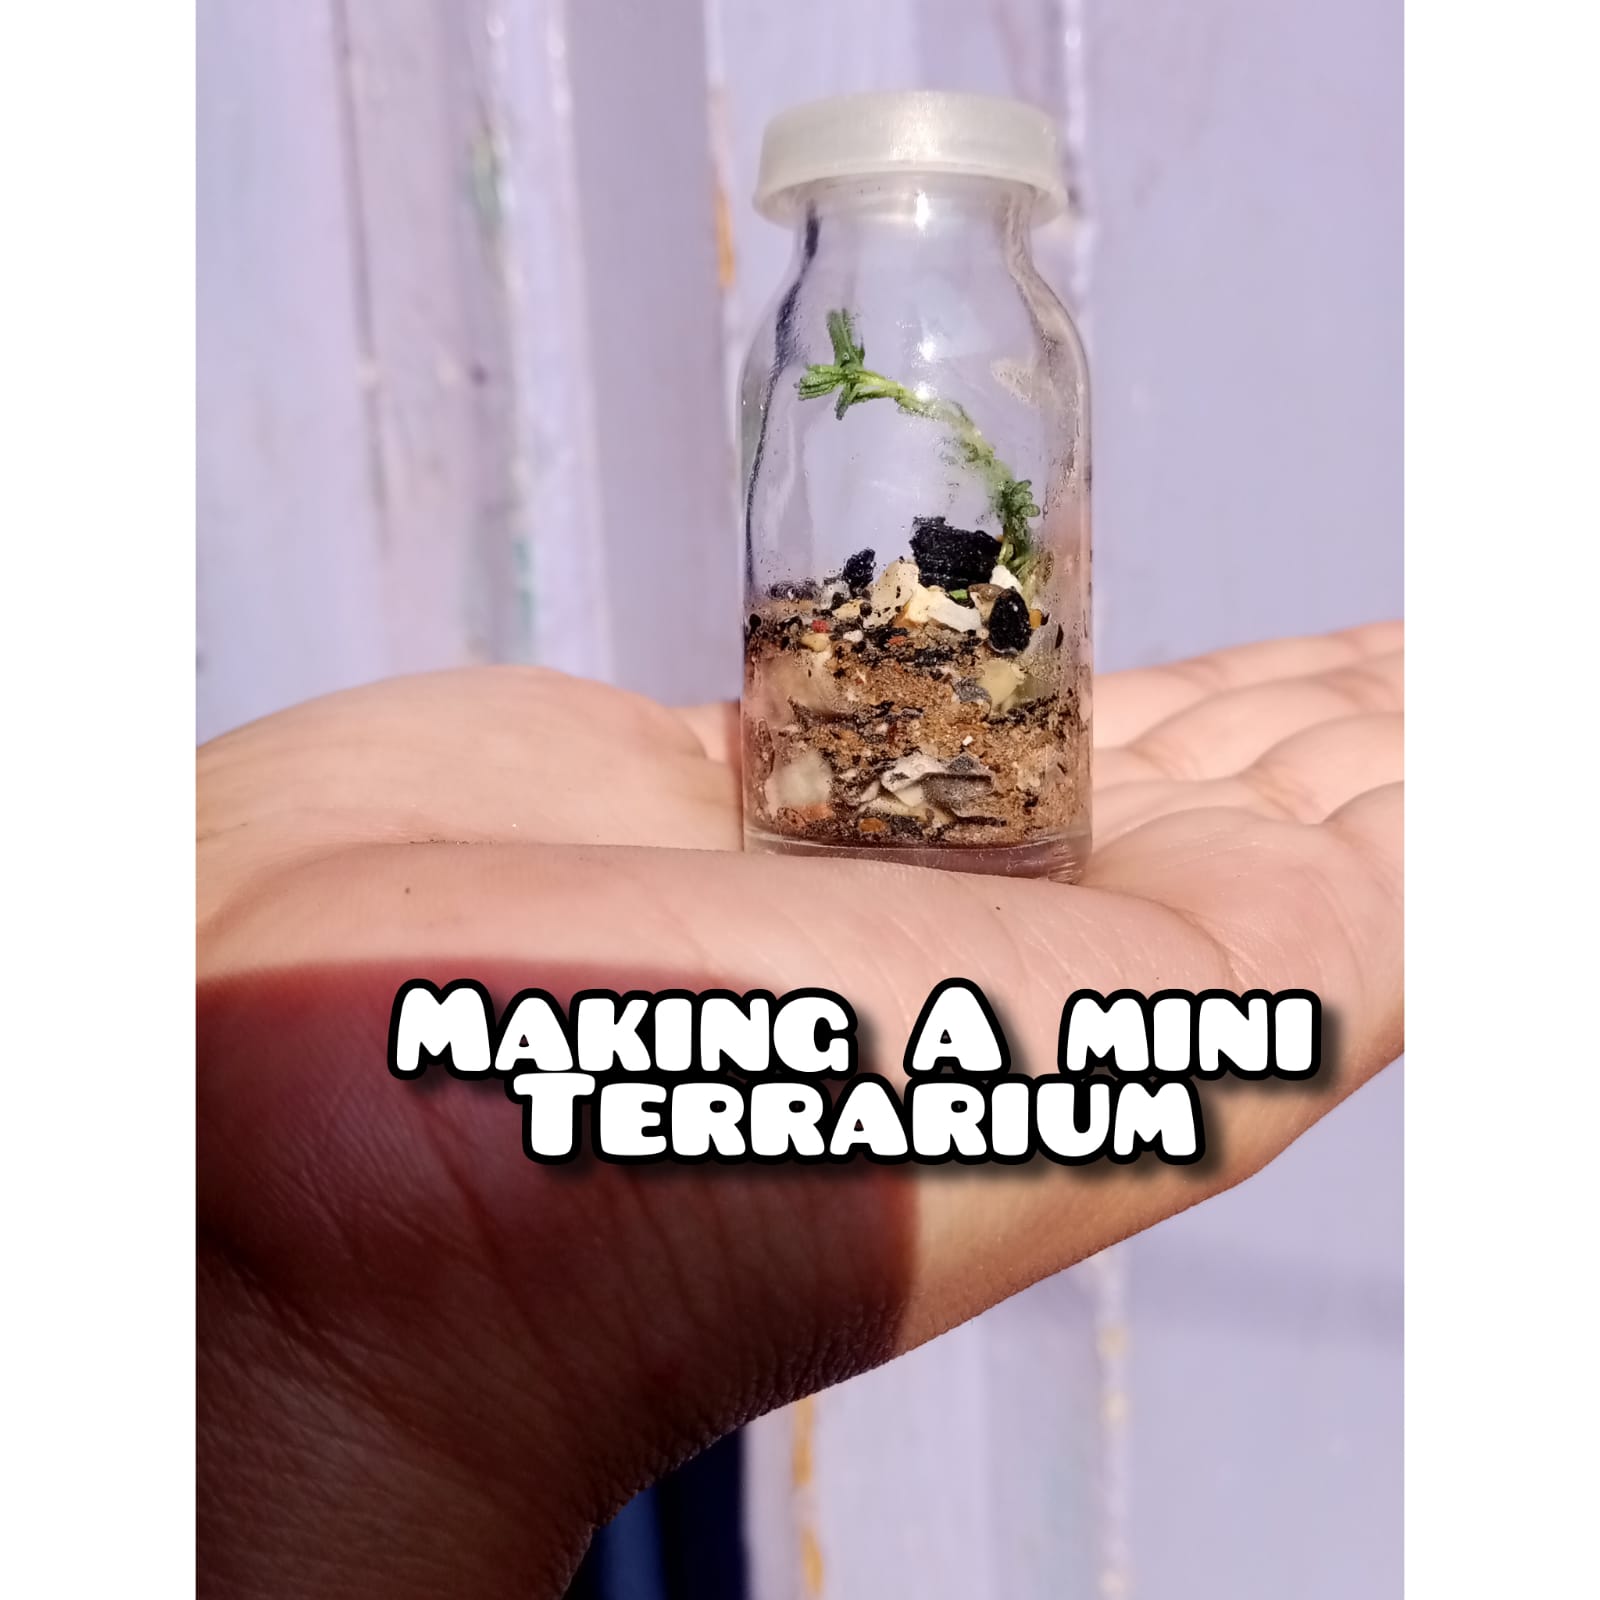
Making a Terrarium
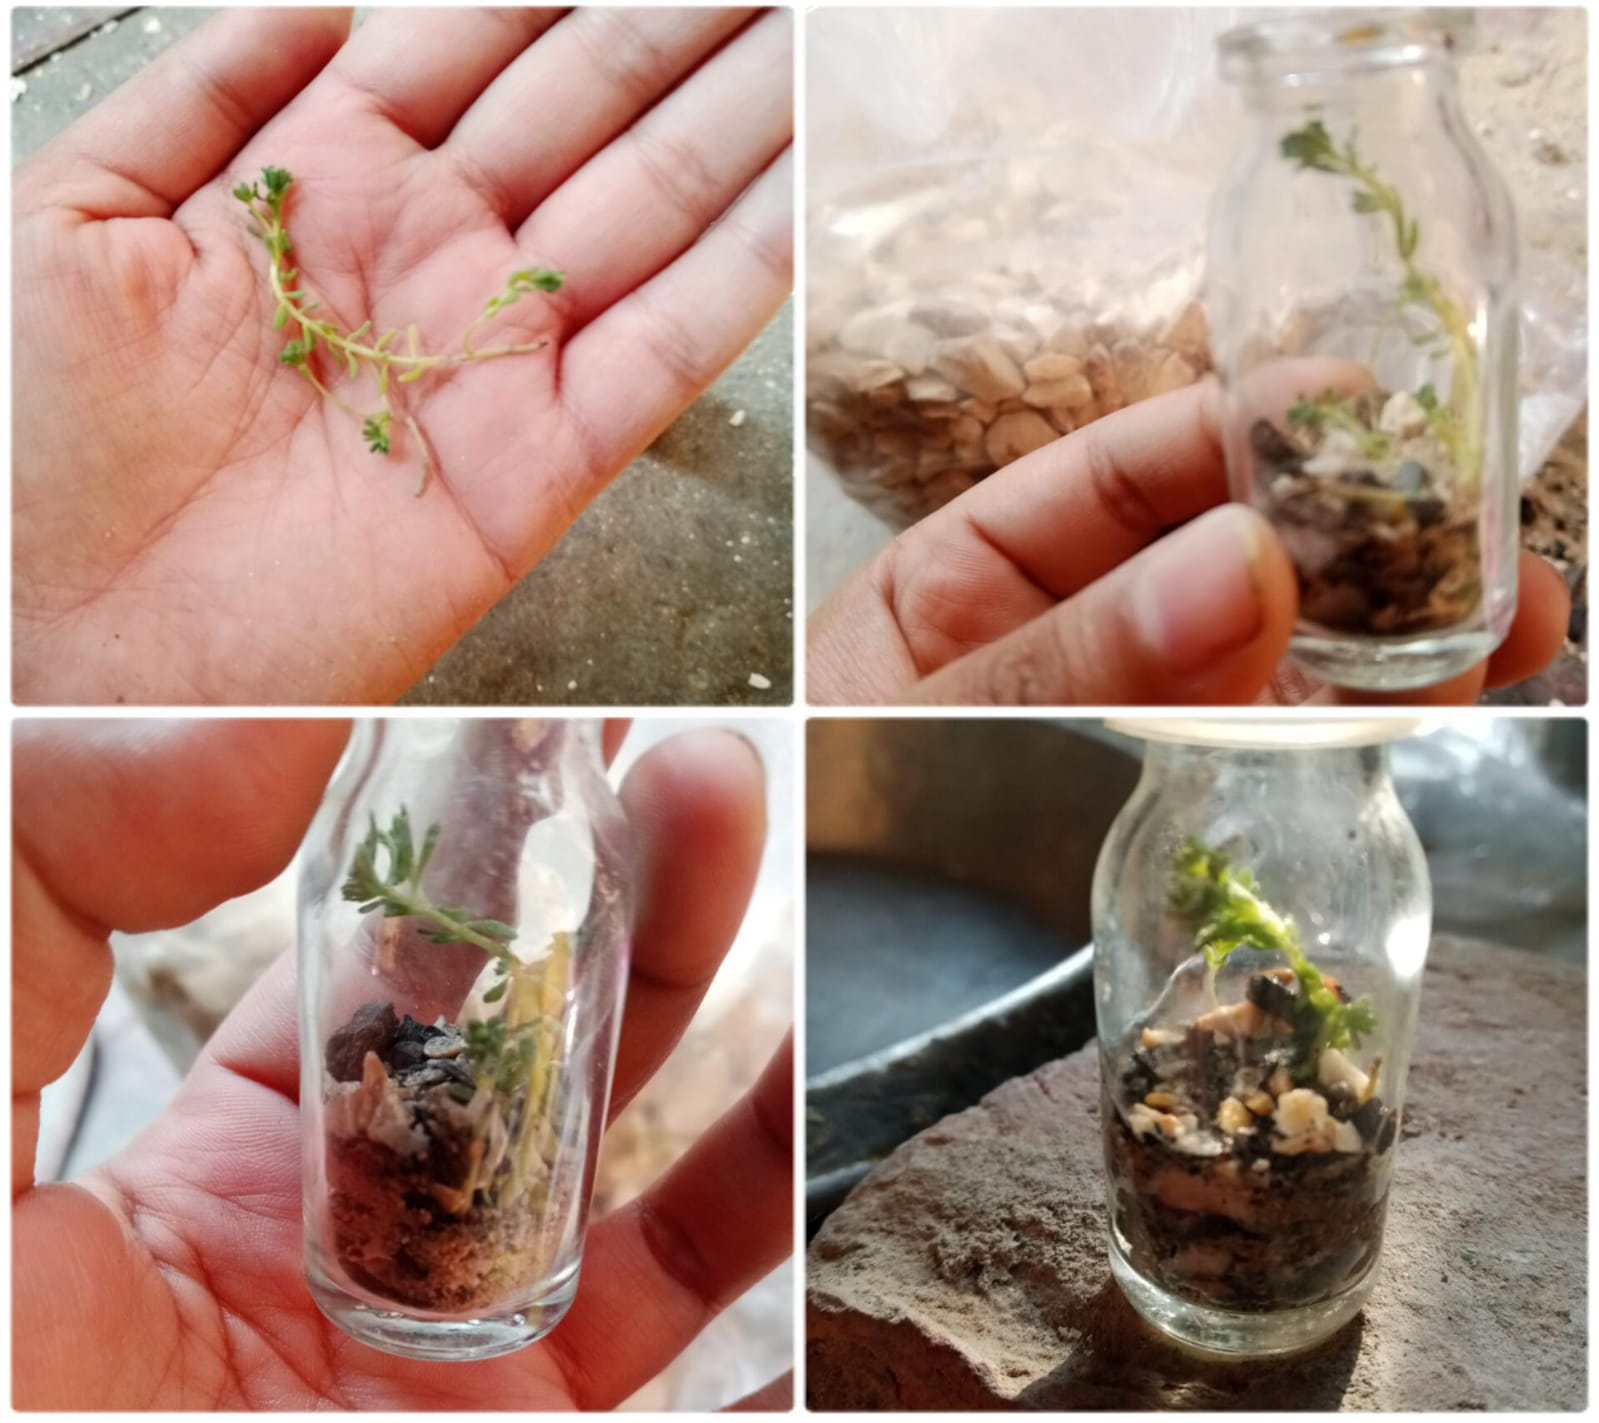
Some weeks ago I made a mini terrarium in a Glass bottle and here is how I made it.
For the people who don't know what a terrarium is . A terrarium is a self sustainable ecosystem that just like our Planet Earth . It's basically like a bubble where you have all the necessary nutrients and environment that makes you self sustainable.
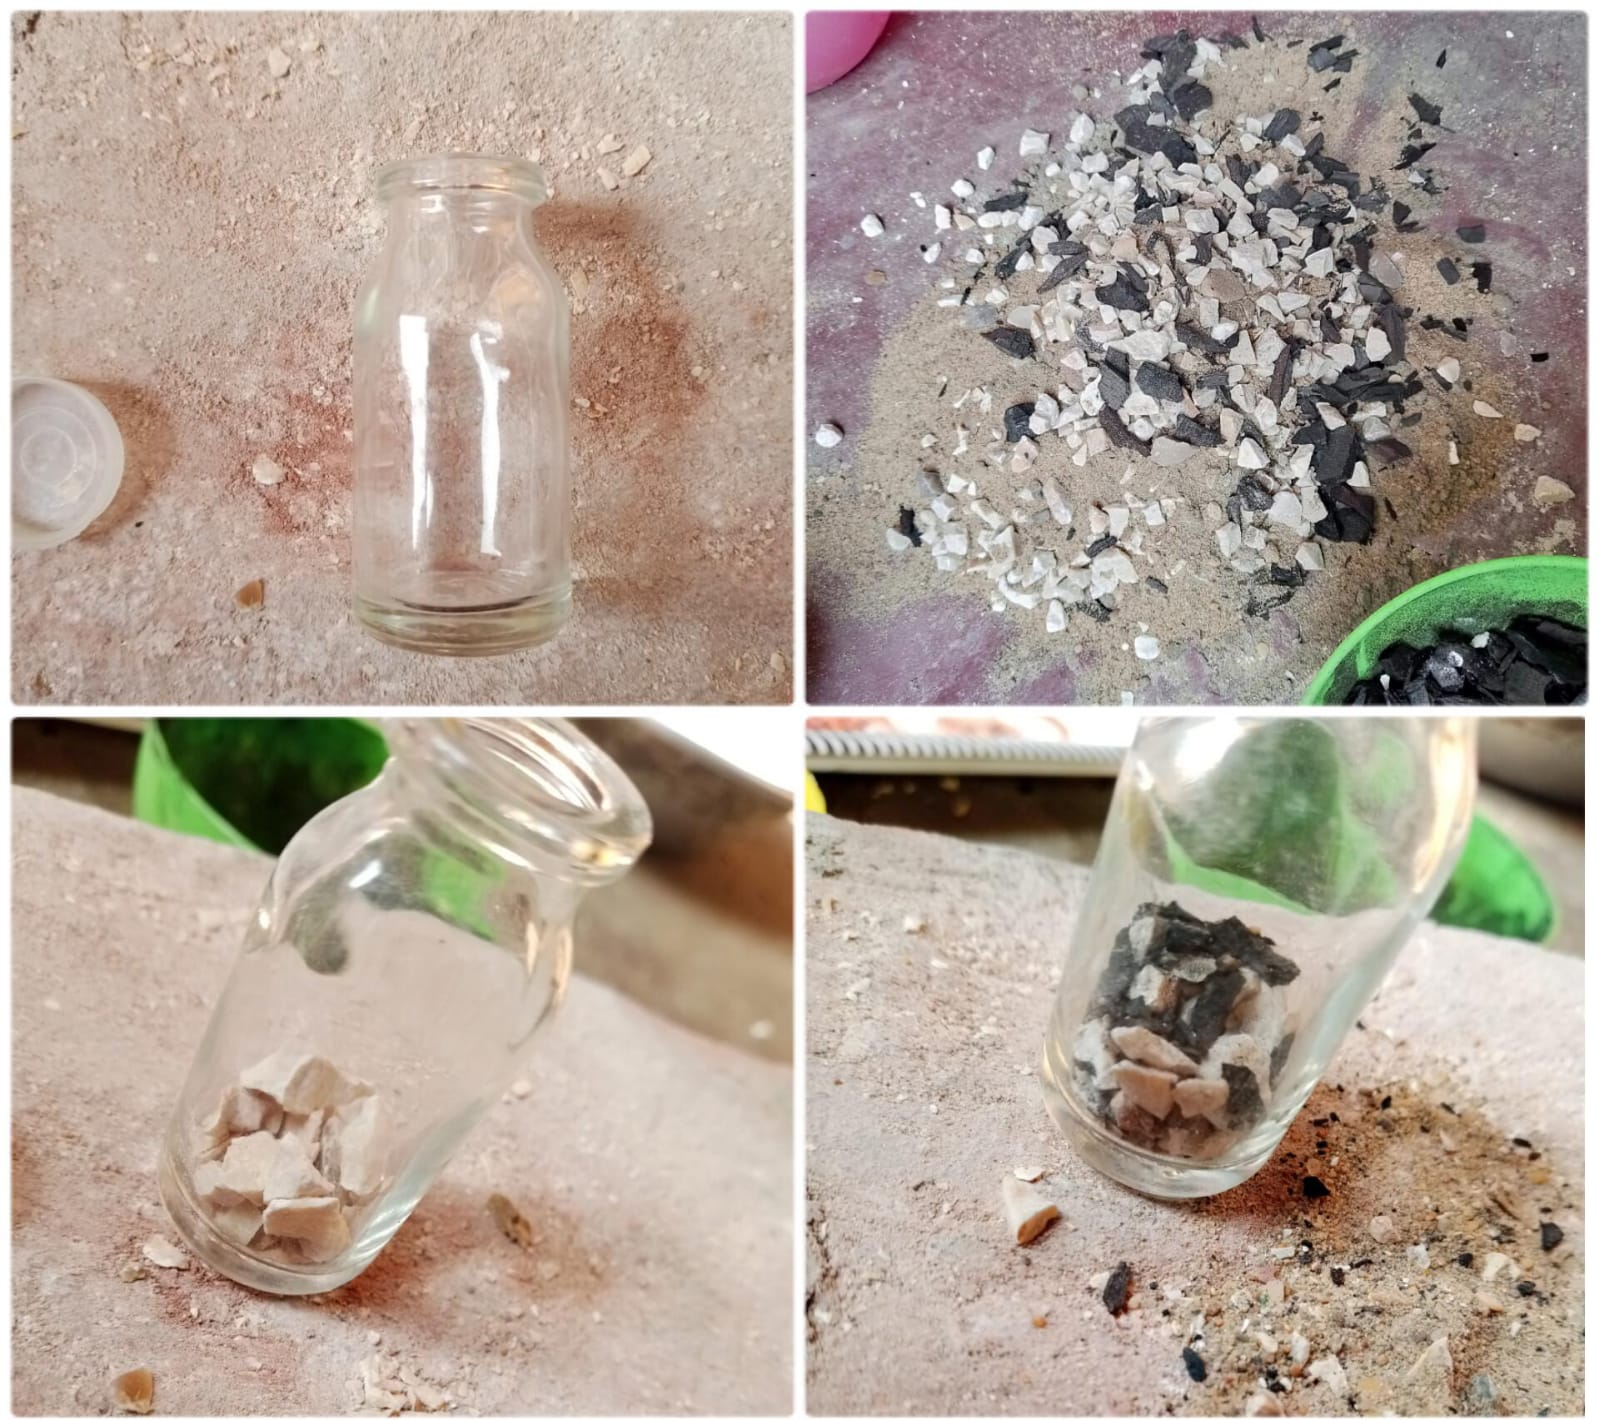
Now how do we make a terrarium? We need a solid bubble that doesn't let the moisture escape for that Glass Bottles are the best so here I had a tiny Glass bottle with me .
Then we need a layer of minerals so the water is recycled and re poured for this I added calcite and pyrite here I have the potting soil I made for my succulents I just picked the white small calcite and pyrite bits and added them to the bottom of the glass bottle .
The second layer will be something that acts as compost and soaks extra moisture also filters the water so the glass doesn't get foggy that's why here I added small pieces of charcoal .
Next I had a mini succulent plant and I just stuck it with a tweezer on the coal layer and added some sandy gritty soil on top .
Now I sprayed water inside just enough to damp the soil and let it soak the sun for just a while .
That's all now I cover it with a lid and that's it this terrarium was a success and I made a bigger one after this . U can add moss and small plants . Even snails so your ecosystem has your own life also .
Terrariums can survive in indoor light too so I have kept this indoor and this just looked so cute .
That's all for today Thank you for your precious time and support ❤️
A week of Succulent Shopping.
It's the perfect weather to get Succulents as the second monsoon approaches so here I bought some succulents and this week was all about making some cute pots with them for my room .
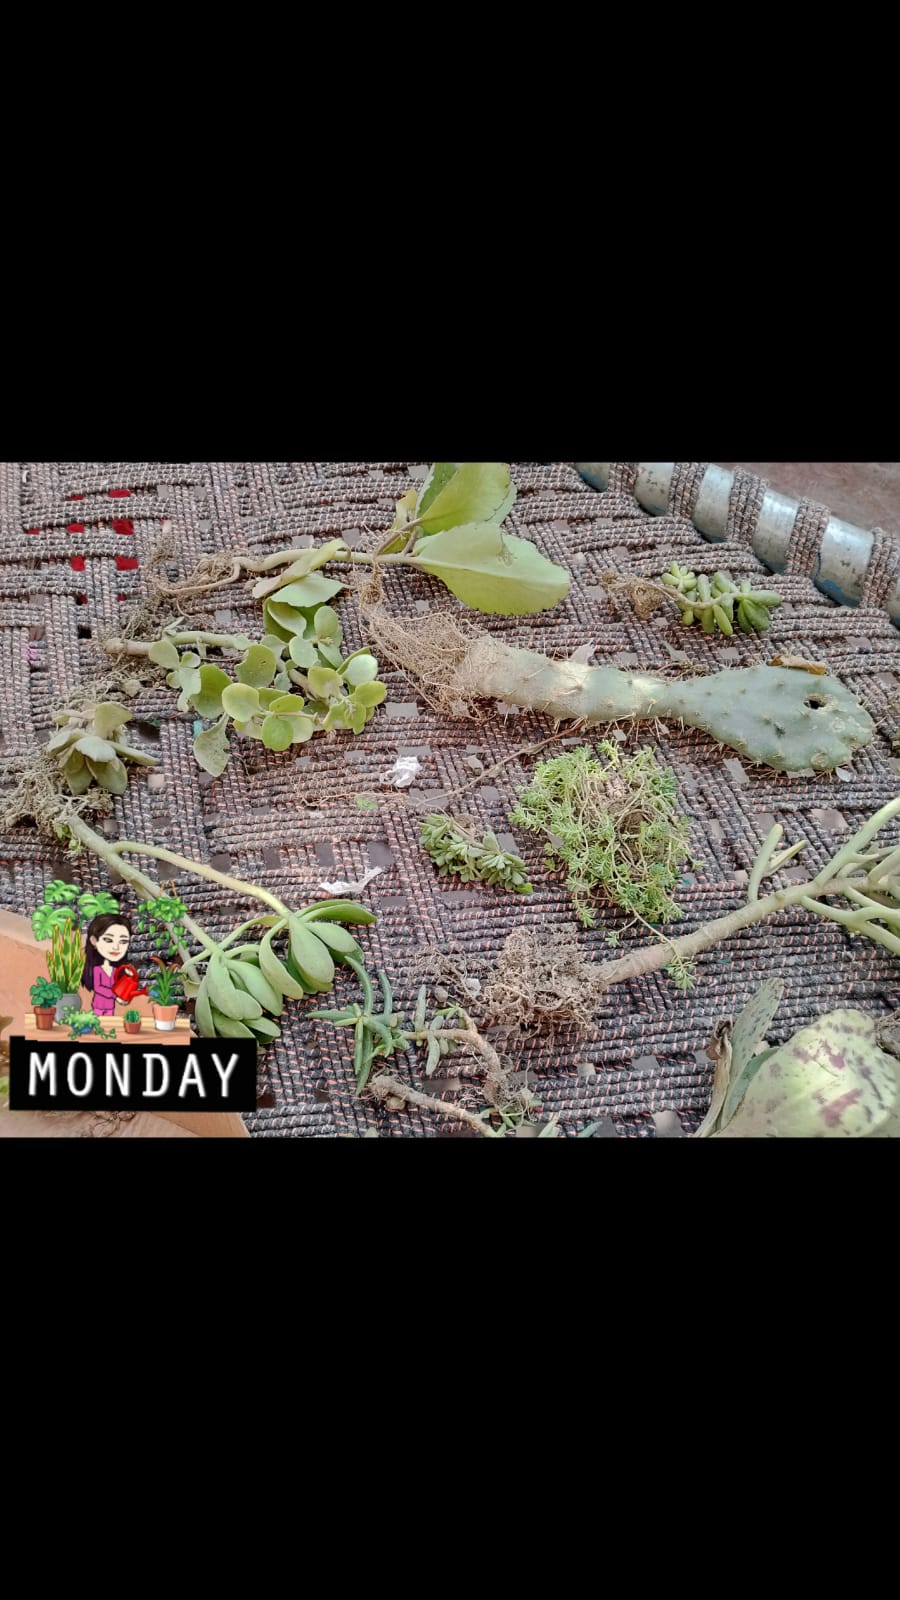
On Monday I got delivered this package that had 12 succulents in it some ghost plants , 3 types of cactus , a jade plant and 2 types of aloe vera . I also got some succulents that I didn't know the names of .
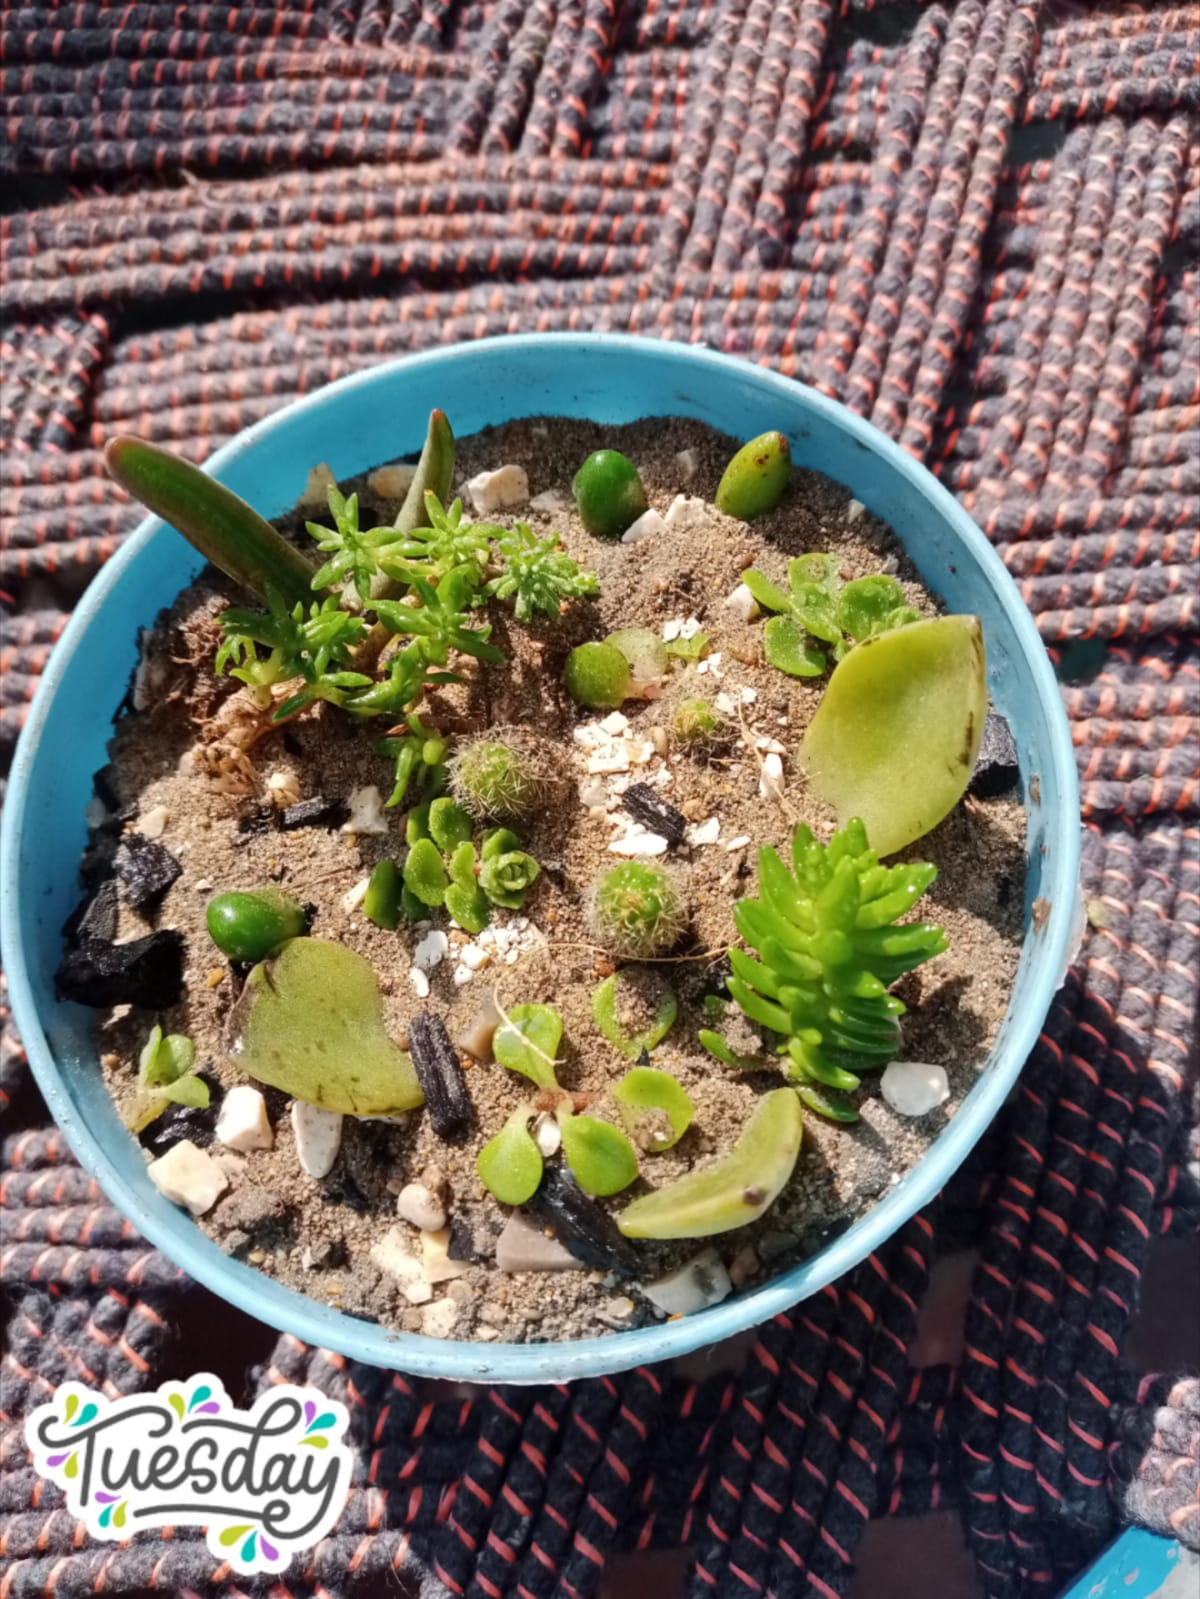
So On Tuesday I got myself up early went to get pots and soil for my succulents after letting their roots dry from the wet pakage for a day . One thing I learnt was that you shouldn't get your succulents moist or it gets infected . So I was gone I got some materials to make my cactus soil I will tell you all about in another blog but here we are I made a little pot with all the mini succulent cuttings I found and I planted this little group of cactus they were so so mini .
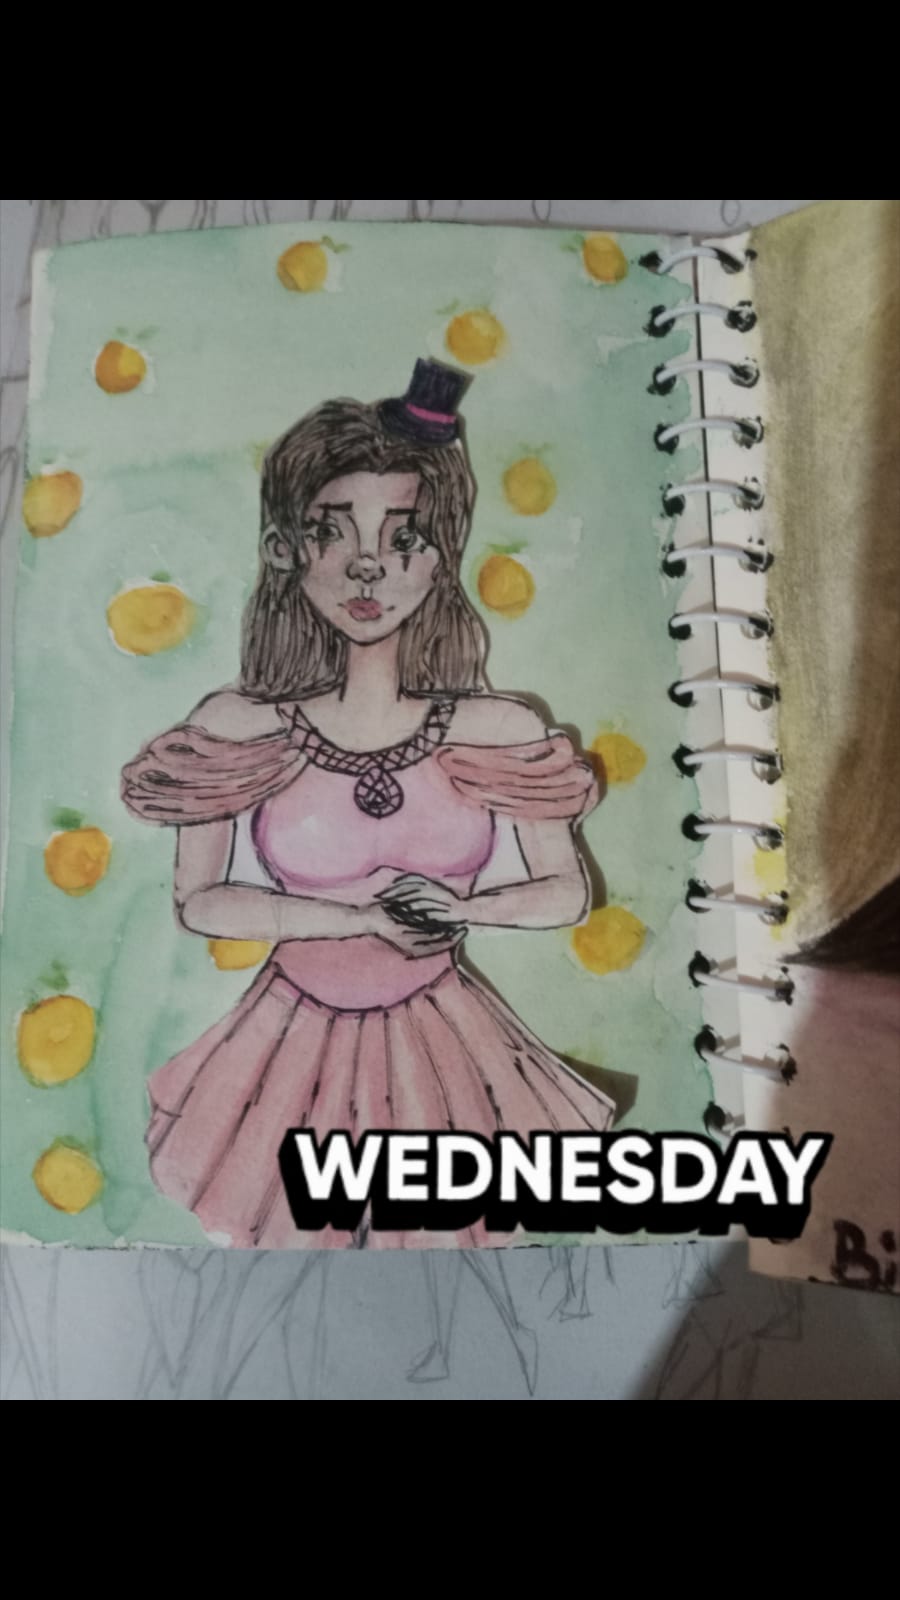
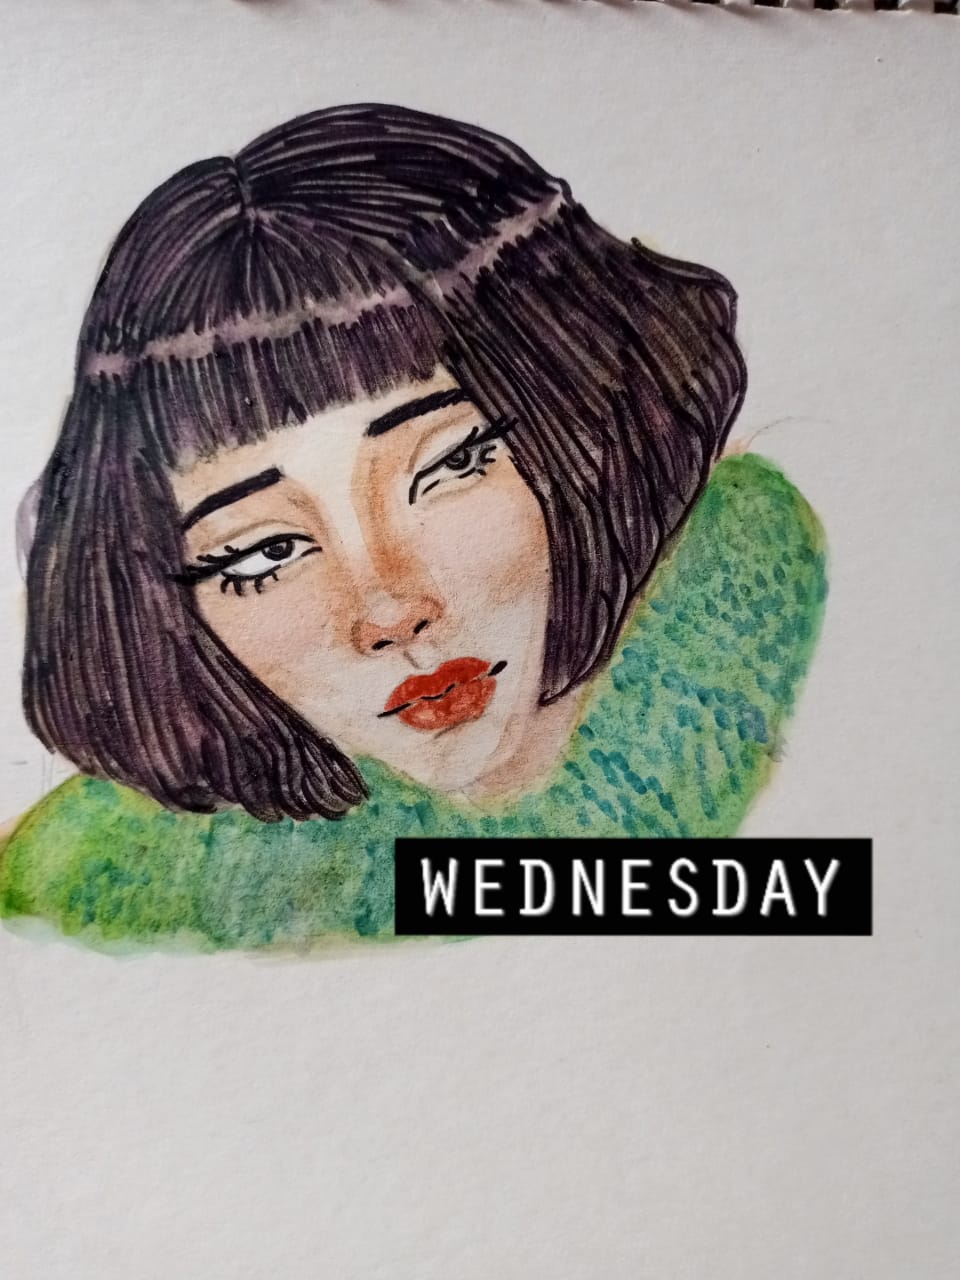
After the whole potting thing I was left with a bad hand ache and on Wednesday I wanted to fill my sketchbook so I made this little cut out of my old sketch and painted it with a background it's like a female clown character . I loved how I rendered it .
On Thursday I saw some more mini cuttings lying around and because I don't waste I got an idea and made a mini terrarium out of them I will write a blog maybe about this too soon this was a great project . It was successful too.
On Friday I got a bit active and I sketched a mini thumb sized portrait from some references this was just so cute I finally see a big difference in my art style .Drawing consistently does make a big difference.
On Saturday I made a Fabulous fish with Mark Kristlers guidance . He is a great artist and I took a course by him it's an amazing course to learn about art fundamentals and basics in a fun interactive way so this was my version of his fish I also water colored it . Not my art style but definitely I understand how shapes can be used to make terrific imaginary things with just a little creativity.
On Sunday I was again just up doing some 3 minute gesture drawing practice because that's all I need to do to get perfect with figure drawing and gesture drawing .
So my week was spent really nicely . I got bunch of new plants and I learnt new artistic things also the terrarium was a success so I loved my week .
Tell me about your week . That's all for today Thank you for your precious time and support ❤️
Painting a little landscape Sunset with clouds
Every week I do a Painting that's miniature and Easy to make . I also explain every little step involved so Let's get into it.
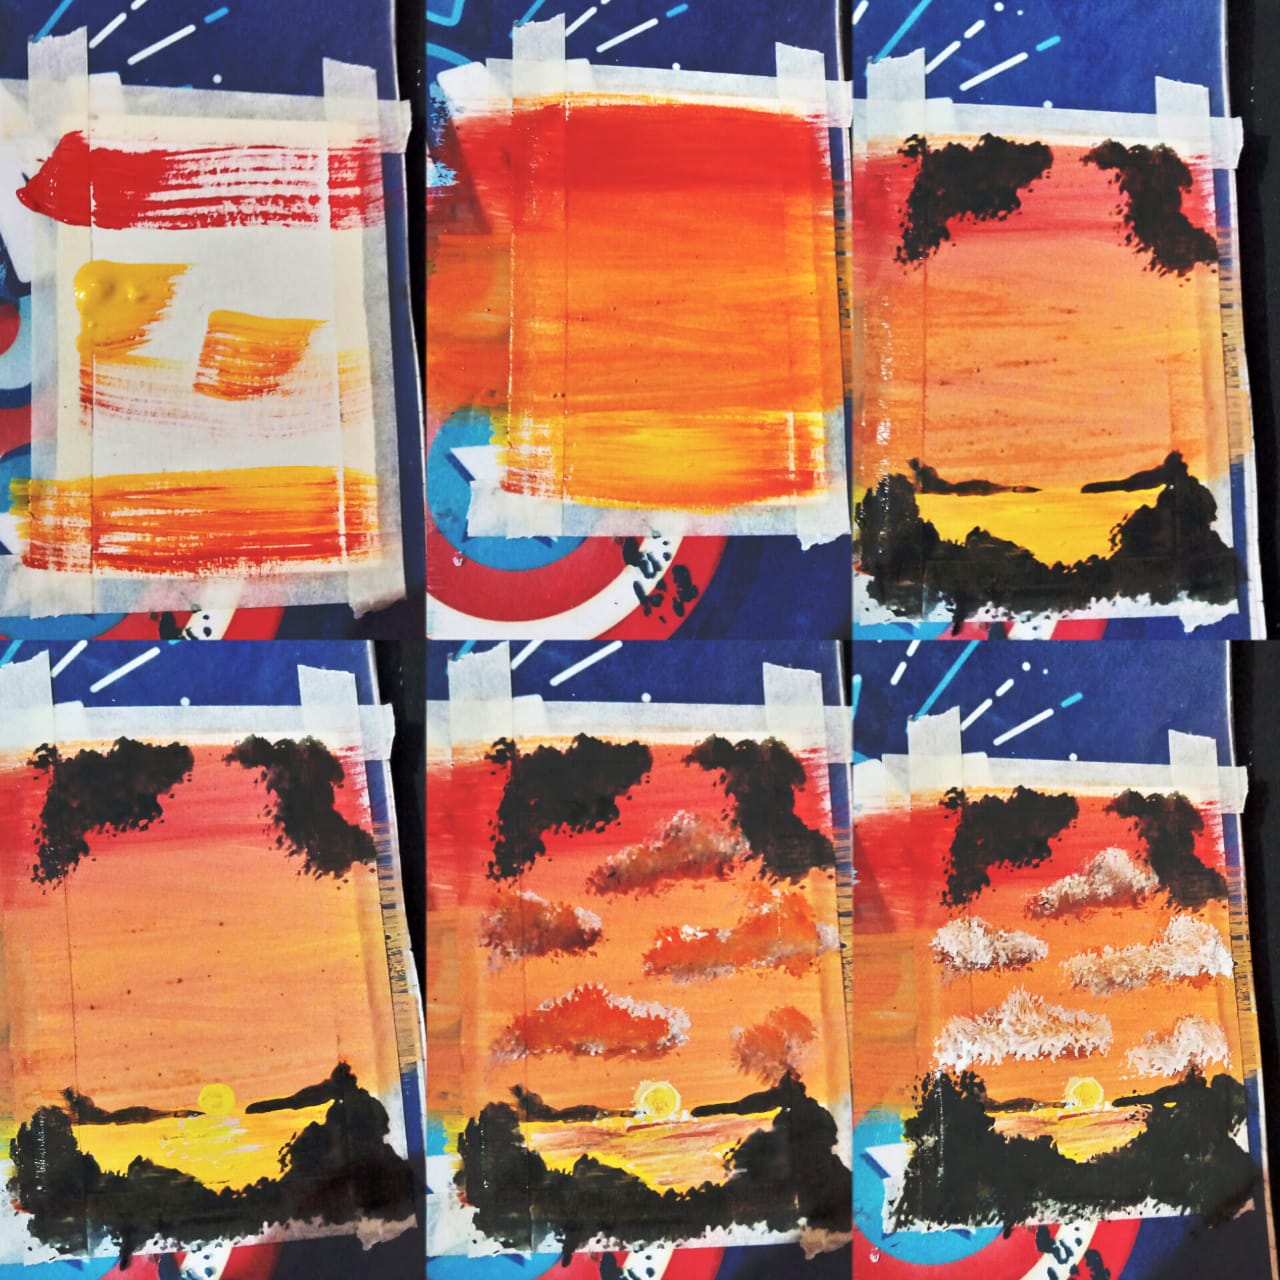
For this one I'm using acrylic paints , two brushes a wide half inch brush and a fine liner 000 brush . The paper I'm using is 4×6 cartridge sheet piece .
Firstly I put some blobs of paint on the canvas yellow in middle , red on top and orange in bottom . I used the wide brush to blend them into a sky gradient and the bottom looks like sea so I decided to paint a sunset beach . Now I added silhouette of Bushes and islands left little space in middle .
Next I added sun in middle and some highlights to the sea with a fine liner and white color
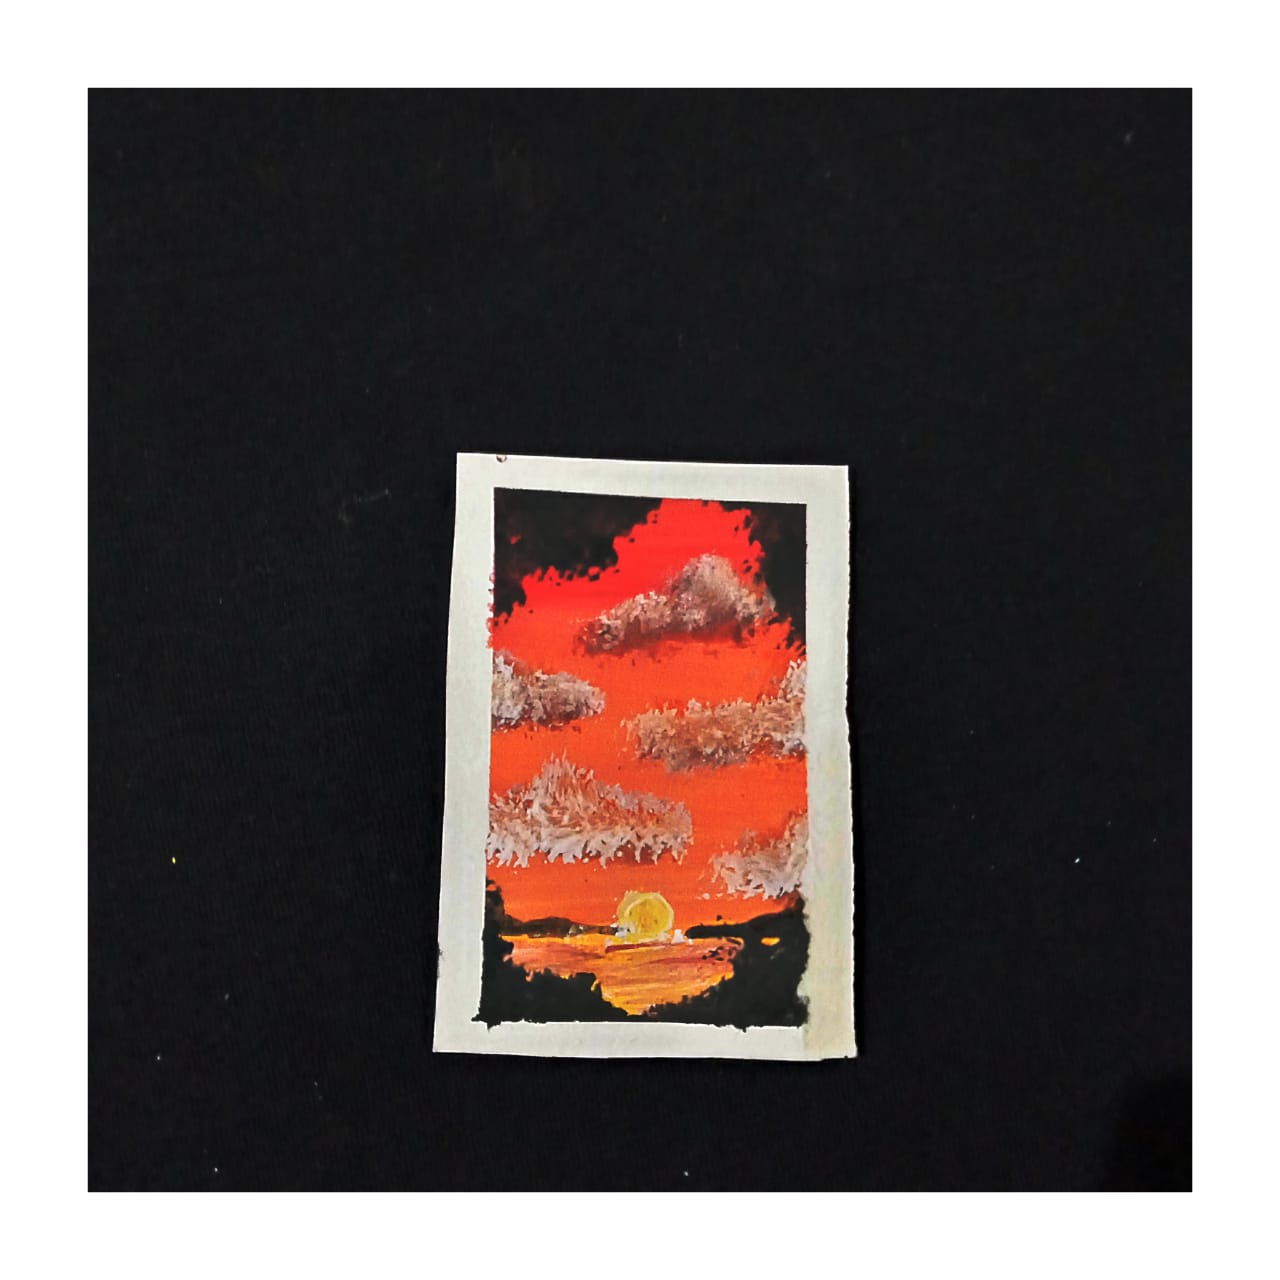
. Next I mixed red and blue and made some dark clouds with a Dry brush by dabbing them around . I also added some dark green to the bushes by dabbling them with a dry brush this gives them a foliage leafy texture . Lastly I added white to the clouds with dry brush technique and more green to the bushes . Added some highlights to the sun and here is the Final result.
The clouds could have been more refined I mean I should have made them smaller but other than that this looked pretty . I might make it again with another color combo maybe a night scene . Miniature paintings are great for practice as you know it's like thumbnails version of your vision you can definitely make it on a bigger canvas and add more stuff to the background like birds add tiny details .
that's all for today Thank you for your precious time and support ❤️
Sketch Study ( Girl With Hair Like a Cloud )
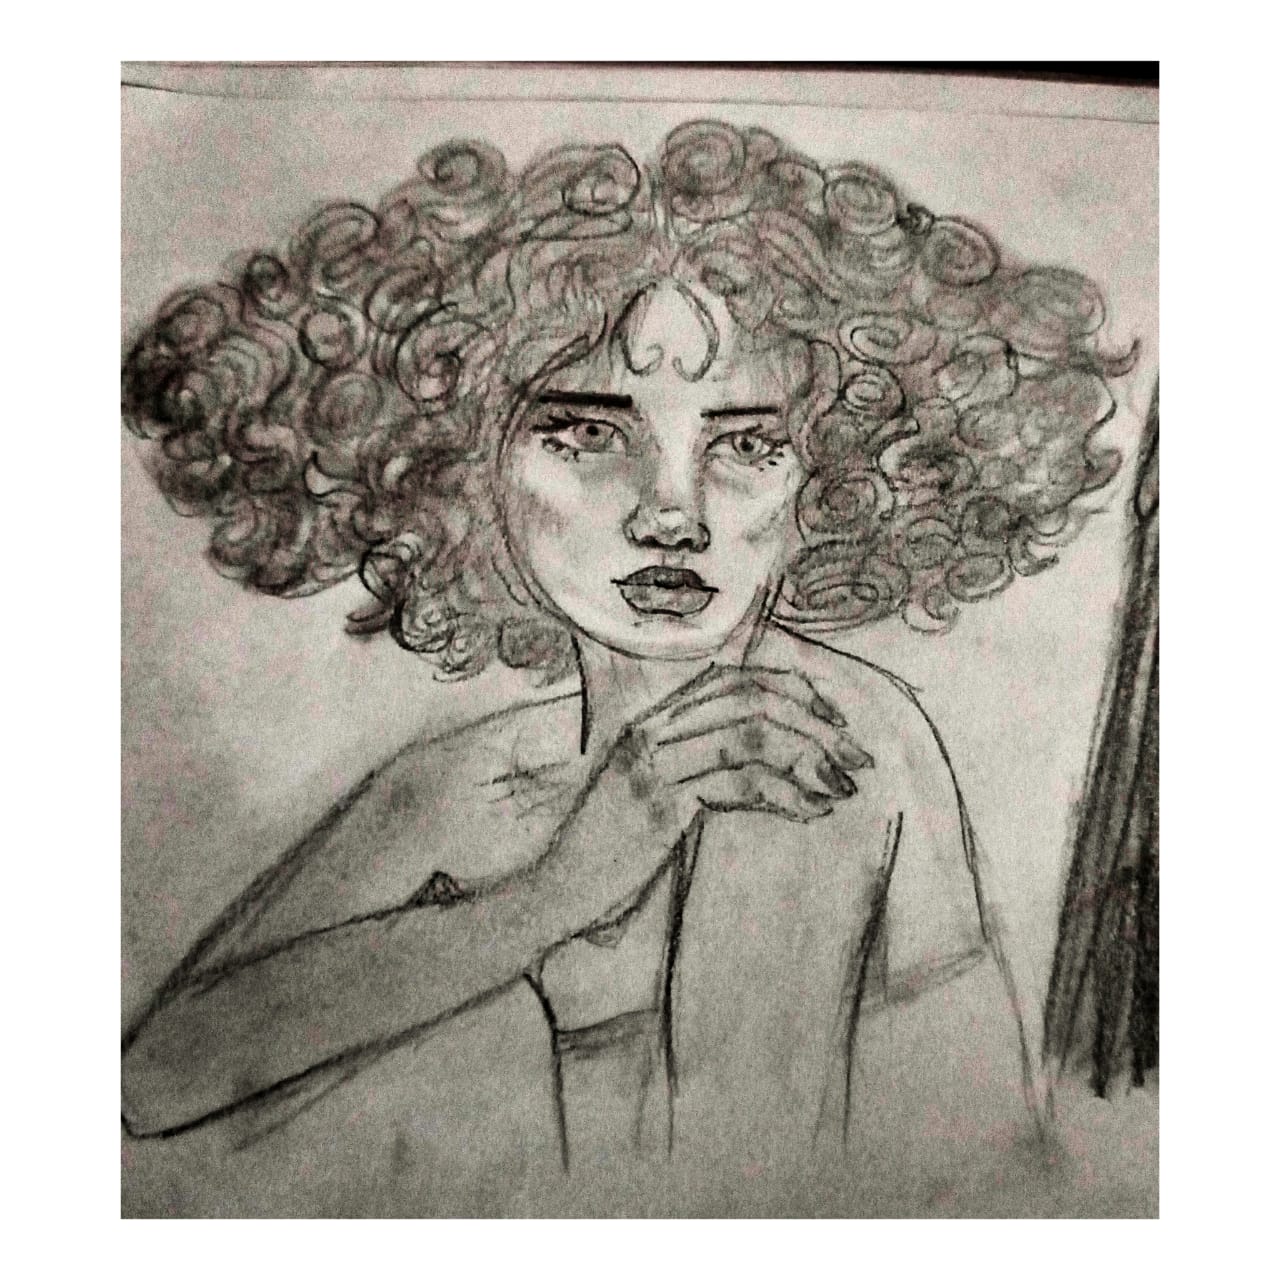
Back with my Sketching every Week Series . This week's Sketch study was really a fun one because I love find cool references for practice and I found this one girl with her hair like the mad hatter . The hair also Resembled clouds so here I'm trying to sketch it out .
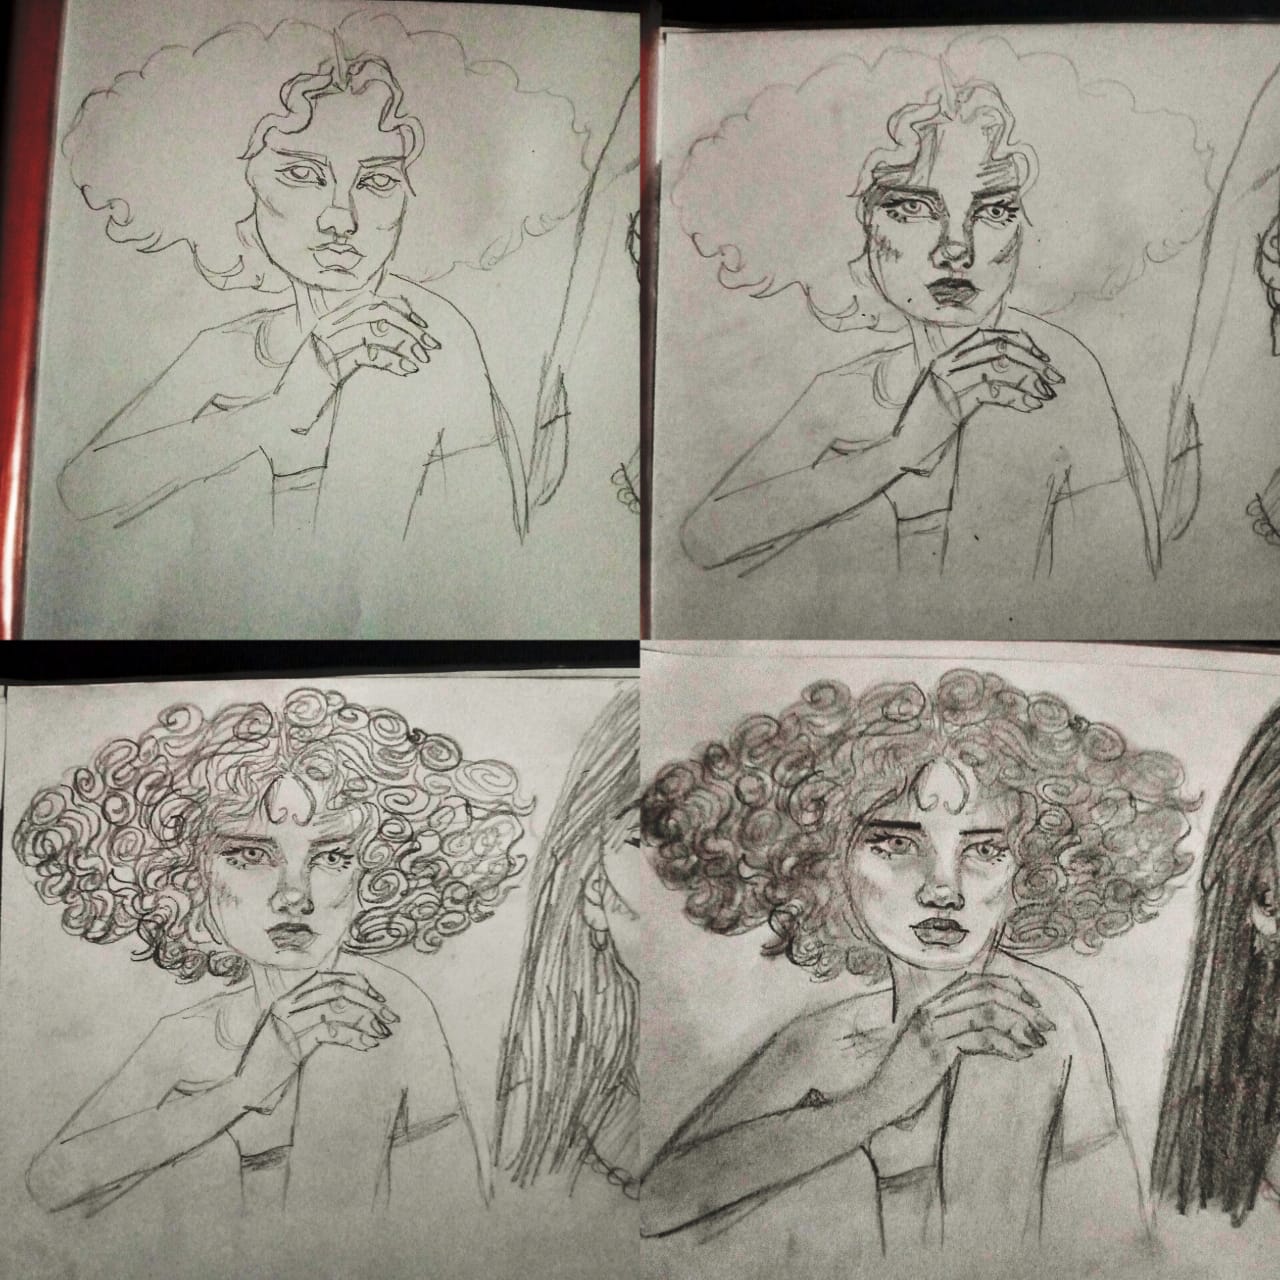
So mostly I do Andrew Loomis method or the following shapes method. For this I actually did both like I looked at shapes to sketch out the hair and hand but for the face I did some Andrew Loomis method that makes my sketch really muddy and gray so I use a Kneadable erasure and just use a 2h Pencil to sketch the lines that I want to keep .
After the sketch was a bit refined it was the time to shade so I grabbed my 3b pencil . Make sure your pencils are always sharpened I used the hatching technique near the nose and to form the cheek bones give a lil cast shadow to the hair that were on the face , I also defined the eyebrows and lips at this point . This time I went with a very subtle shading less is more so I only did t the points with most shadow adding some values . Next I shade the hair too doing some spiral and curls in her hair and I really loved the hairstyle then I blended it all with a blending stump . After blending I defined the negative spaces by outlining tbh the hands look a bit wider but . That's the whole point you keep drawing and get better and better with time .
I changed the bangs to more of a heart like bangs and This is the final Result .
I see growth and my artworks getting better and better each day .
Tell me how you feel about this sketch .
Thank you for your precious time and support ❤️
How to Handle failure as a pro
Have you ever failed at something so bad that now life seems worthless and the world seems cruel for your innocent self ?
well if you have know that you're not alone .me including others go through it too at some part off our lives whether its failed at a relationship ,job or a dream . I have the best mantra for you to succeed at life and utilizing these failures as an opportunity . Here are three pro ways to handle a failure as a pro.
Learn from your failures: after failure instead of regretting over it try learning from it . first analyze the situation . what went wrong ?how it went wrong ? what were the reasons and now you improve . Learn from your mistakes and utilize it as a lesson for self improvement . Wise people say failure is a teacher that teaches you what not to do next time .
Be resilient : Don't let failure shake you from your ground .Be resilient people who improve and learn from their failures can bounce back on there feet and start working again for a better result next time . This way you let your failures train you for harsh times and this way your don't get pressure and depressed mentally . Instead you take it as a challenge to win.
Use Failure to progress: Now obviously if you are planning to be rich by next month that won't work unless you have an strategy for it . Use your failure to make your strategy more better to achieve your goals. take certain measure to ensure that you will win . progress in your goals one by one by focusing on what's better for your plan and by avoiding the mistakes you did befog . This step makes sure that failure leads you to success and every time you are more and more progressive and better.
Conclusion . dont't let failure make you depressed ,hopeless and exhausted .instead Adapt,improve and focus and failure will lead you to success
thank you for your precious time and support
LOH#165 If I had a paid vacation to spend My Christmas Alone
Christmas is a time that usually people wanna spend around their own family. Its that time of the year where we want to start our new year and gather in Resolutions to be Better next year. Christmas eve holds a lot of significance and importance to many people . But since I'm a Muslim we don't have a celebration much for it around here in Pakistan . But I have always been curious about how it is celebrated around the globe .
If I was to spend Christmas and new year alone I would usually spend it at my home but like the LOH#165 topic states if I was allotted a paid vacation to spend my holidays alone what location I will choose?
For me I have always been a huge fan of Japan and it's Festivals as an anime fan . So that would be my Holiday Destination . As per my research I know There is a train called Rail pass Japan that's a great affordable way to travel all around Japan . Japan has its own sort of. Valentine day on 24 DEC when people who like each other or are close friends exchange chocolates and gifts . Christmas in Japan also means a lot of decoration and festive deals like there KFC has a Campaign. to serve party bucket of Fried Chicken and I would surely want to experience Japanese Cuisine other than that I would lover to visit Ghibli park and Tokyo Disney land At Christmas time . But that also if I ever had a chance hopefully One day Japan is on my wish list for travel destinations .
That is all for today Thank you for you precious time and support

Splinterlands art contest #272 (Septic Slime )
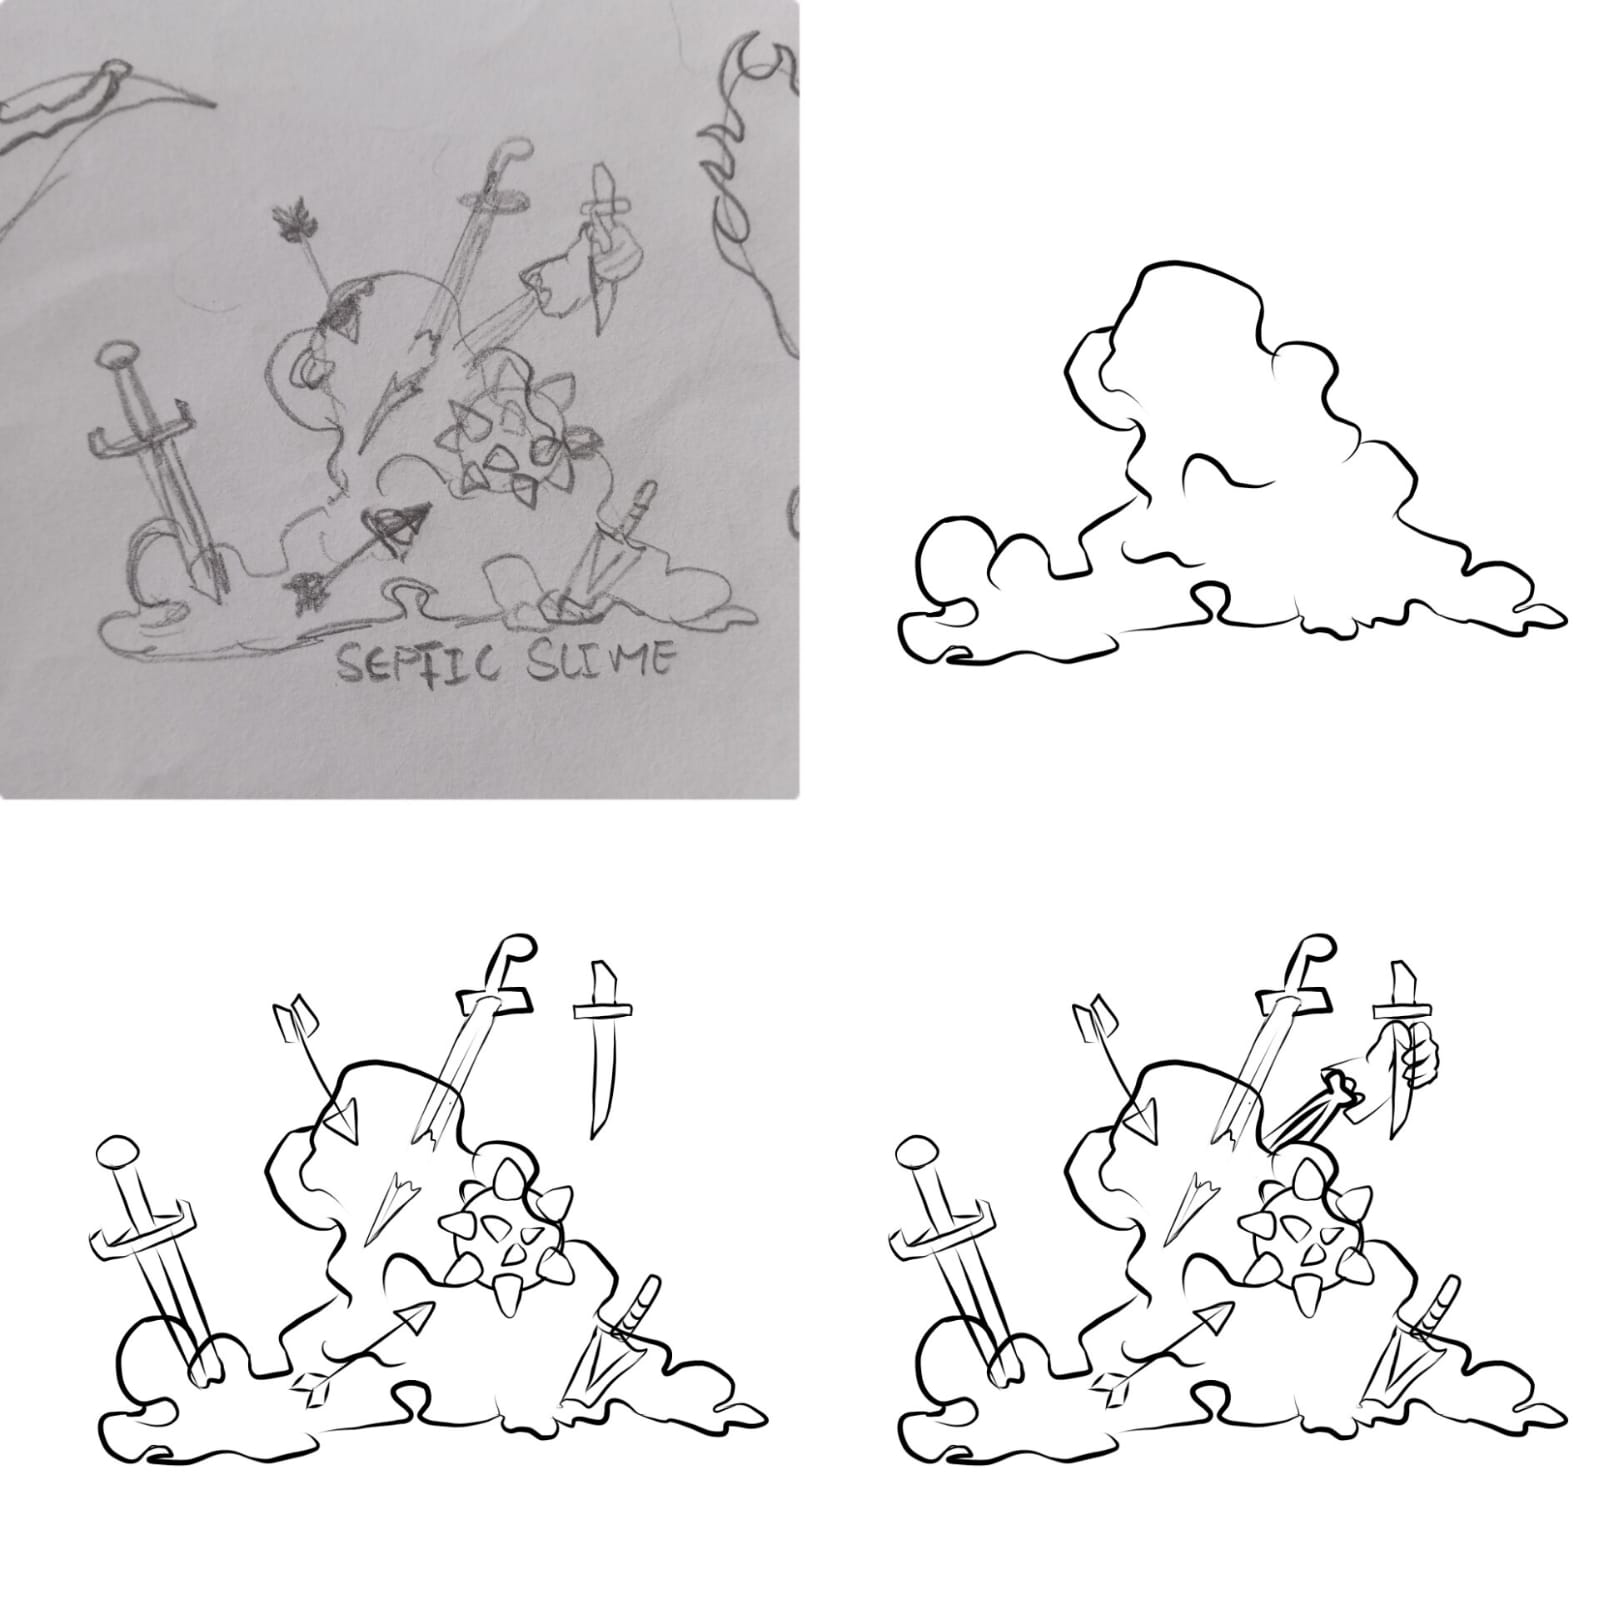
For my Splinterlands art contest entry this week I'm drawing a Card from Splinterlandscards.com .This cards Called Septic Slime .
The Character is a Bloody Red Slime With bones and Weapons From the defeated dead bodies are sticking out of it . That was all I had to draw. Three things I had to keep in mind were Slime is like a plasma substance so it has to be translucent .
I started by doing a rough Sketch I made a wobbly shape First then I made lots of Broken Daggers swords and blades all sorts of weapons in it and a bone hand hanging out this is our base sketch after it. I just imported my image in a digital drawing app called Medibang paint pro.
Now I converted the sketch into a line art . I made three different layers for lineart so it's easier to color them.
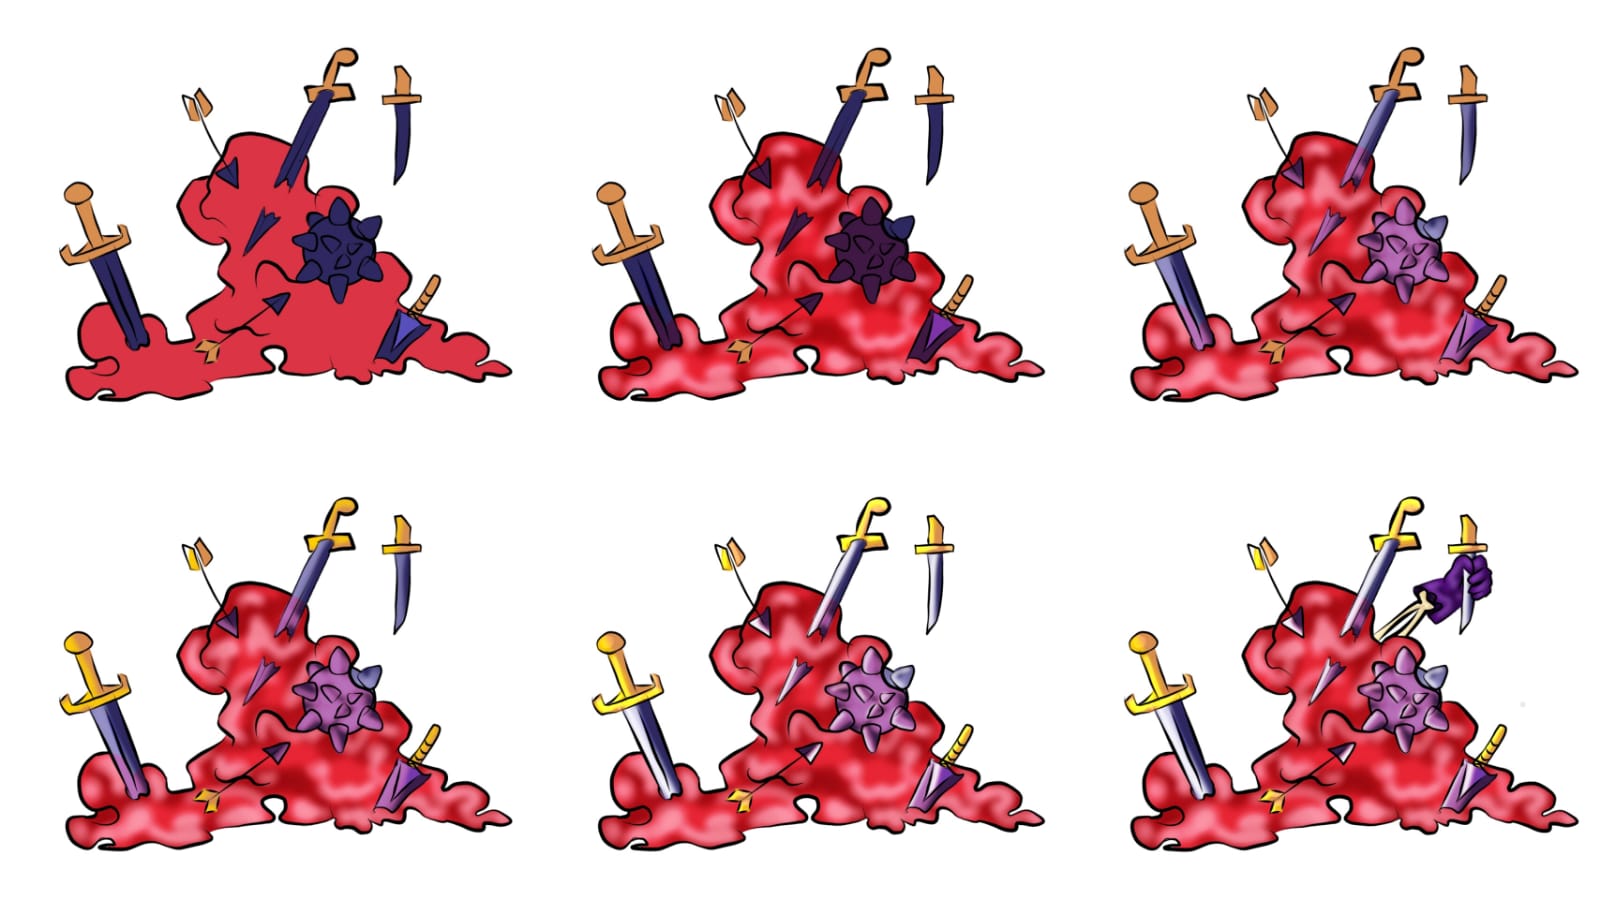
Since our Lineart is ready I started filling in Flat colors in our Character . I Duplicated the slime base color layer on to and set it's opacity a bit low so it looks like a translucent substance .
Now I started shading with water color wet brush first the slime I used a darker red shade to add shadows then I added some highlights too . I Shaded the weapons and their handles too and put some highlights on them according to the light source.
After this I also colored the lineart too .
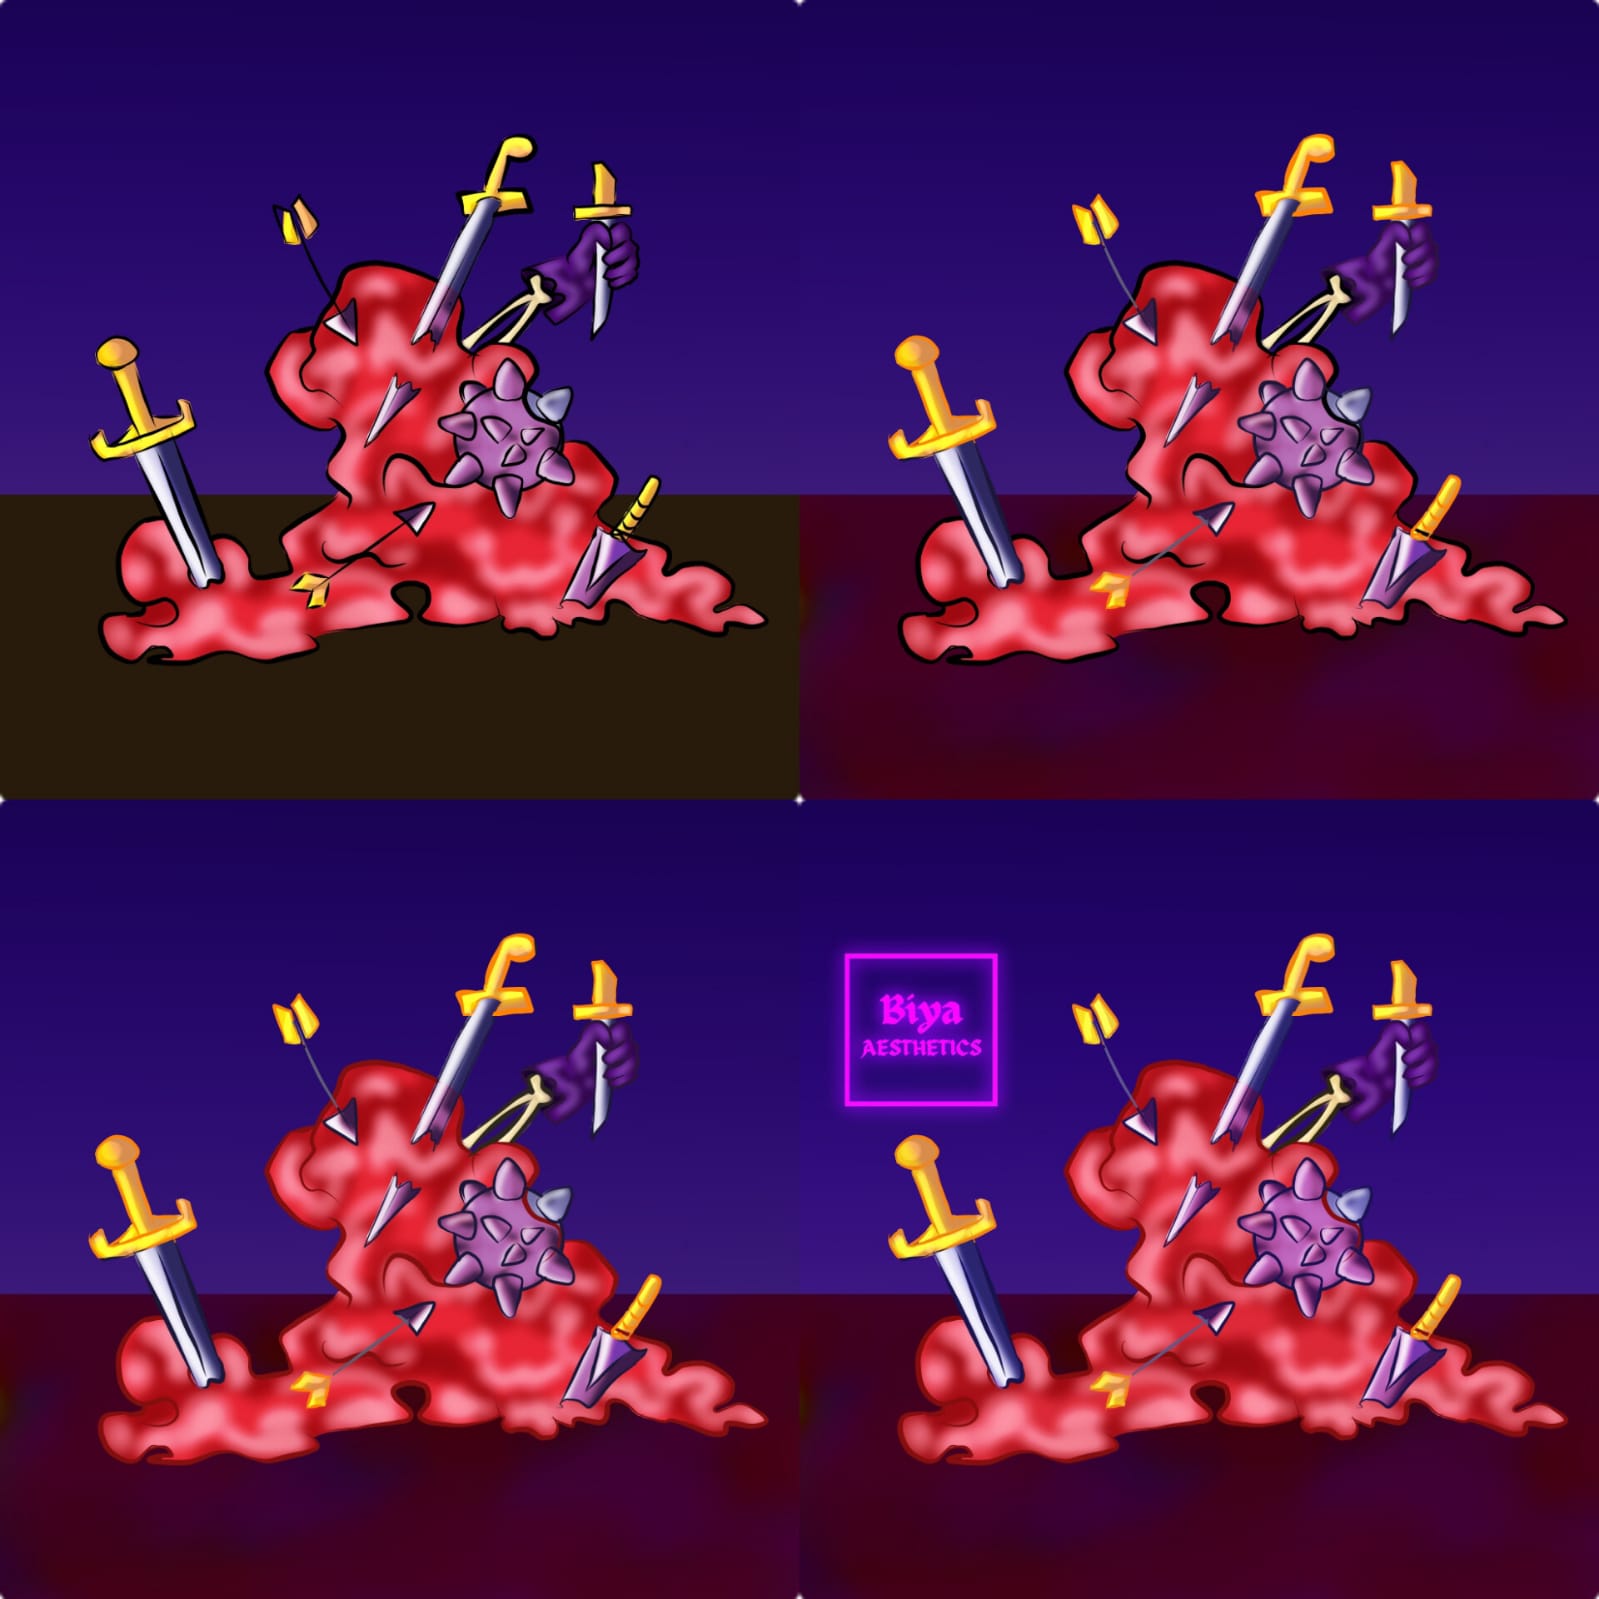
I then added a background with gradient blue sky and a muddy. Brown horizon added some more shading.
After some more Color correction and Light adjustment here is the final result.
TBH I love participating in this contest I haven't won yet but it just makes me practice and do things out of my comfort zone also This Contest has provided me so much knowledge about character designs so I really had to say that .
that's all for today Thank you for your precious time and support ❤️
Drawing a ginger bread man
Every week I draw a simple cute Digital artwork that's beginner friendly and explain in detail about how you can draw it too .
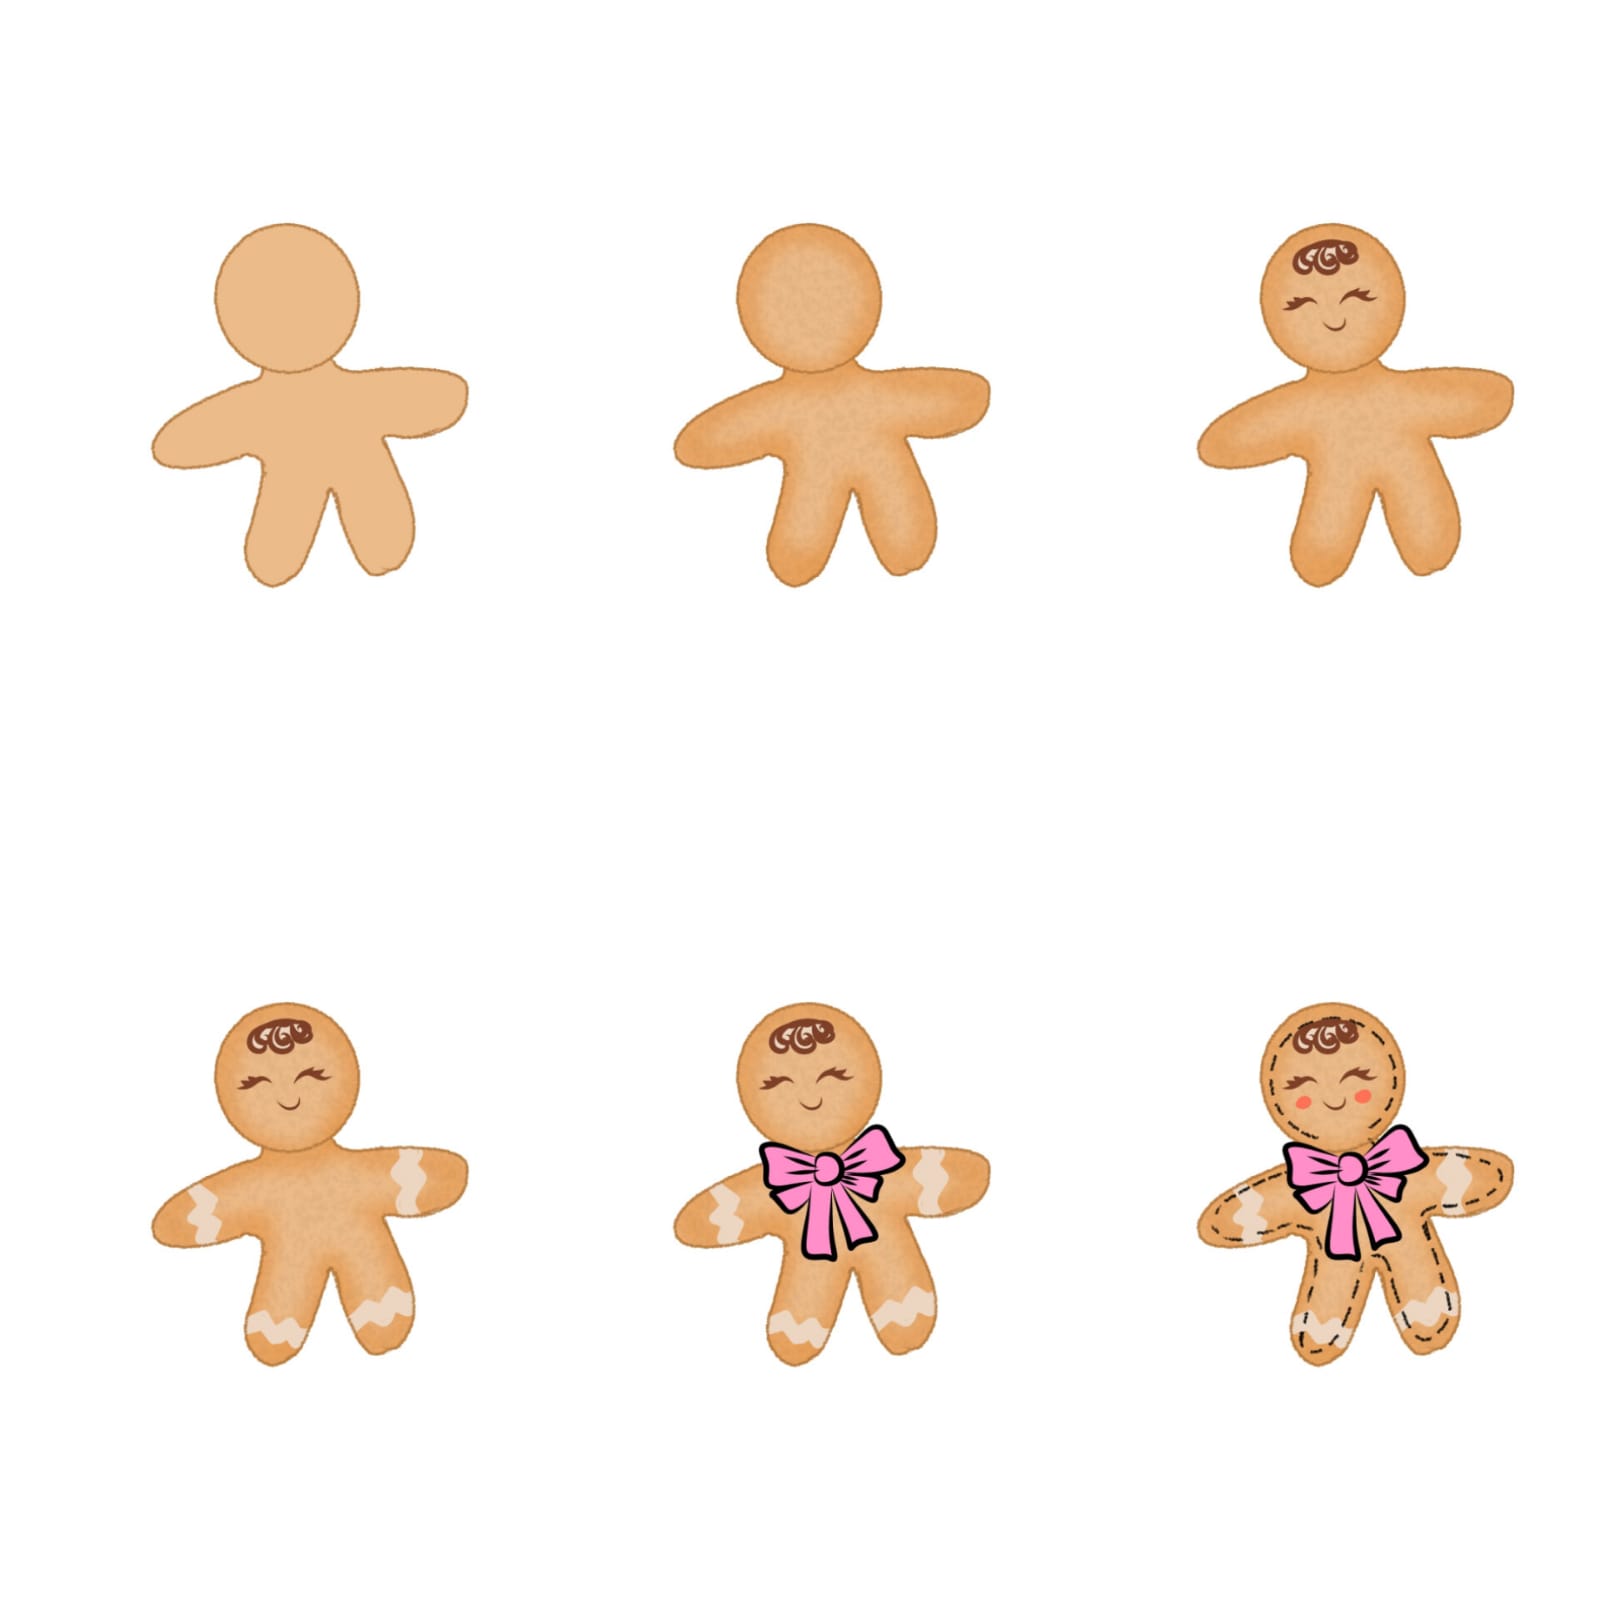
Because it's the Christmas month I thought of drawing a cute little Ginger bread man and here is the whole step by step tutorial on how I did it.
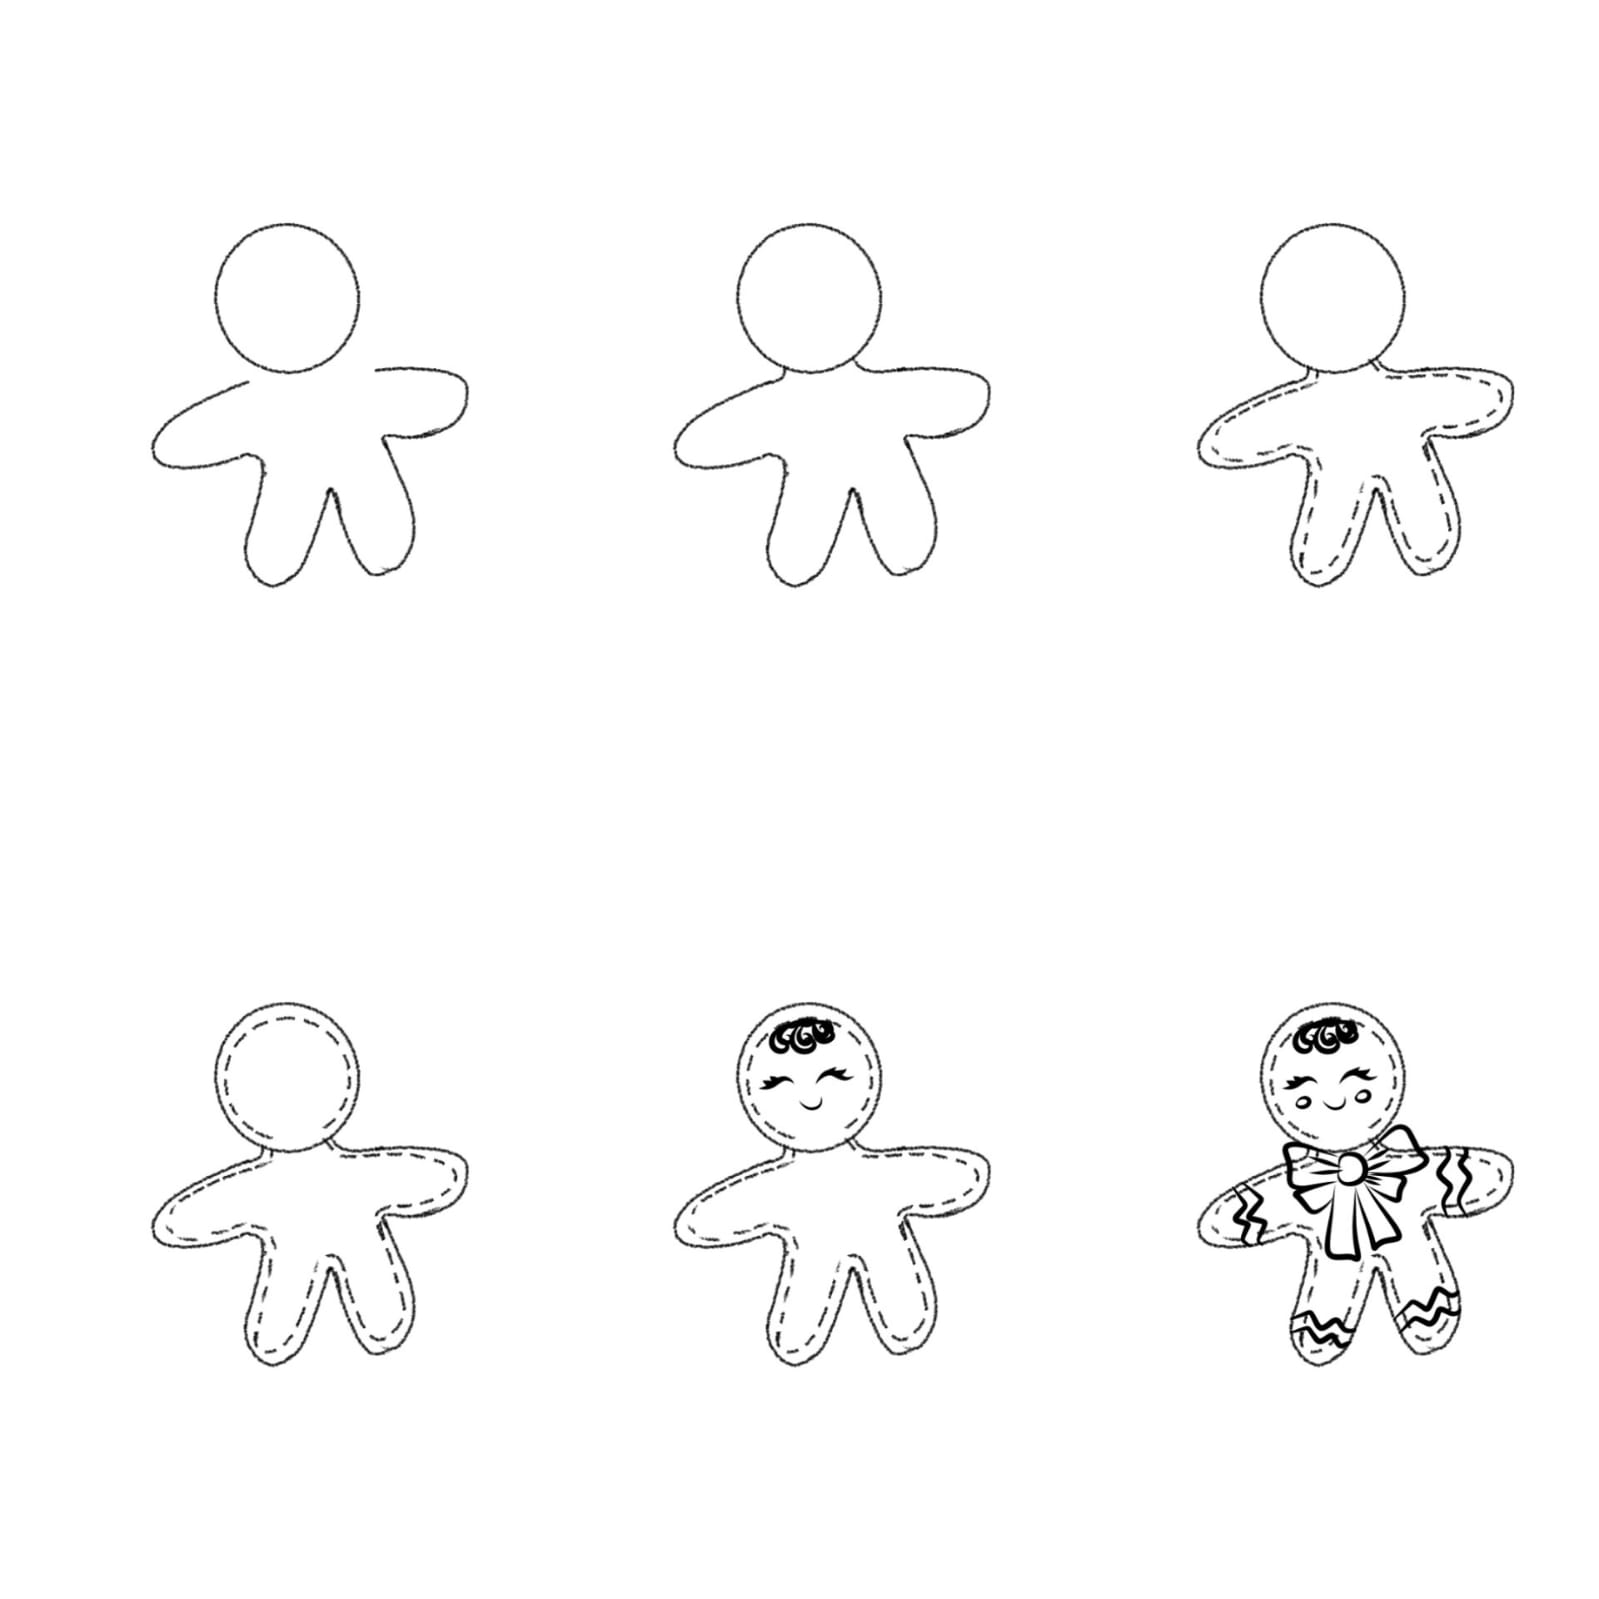
First of all the basic shapes were just a circle and 4 elongated "U" shapes for the limbs that's the base of our Ginger bread man next I made some dotted stitch like lines just for some texture detail and also made cute eyes for him .
Did some cute hair and accessories like the bow and the icing and it's all done for the basic lineart.
Now I fill in the flat color I'm using a cookie brown here and I just filled it pink for the box and white for the icing I also colored the stich lines .
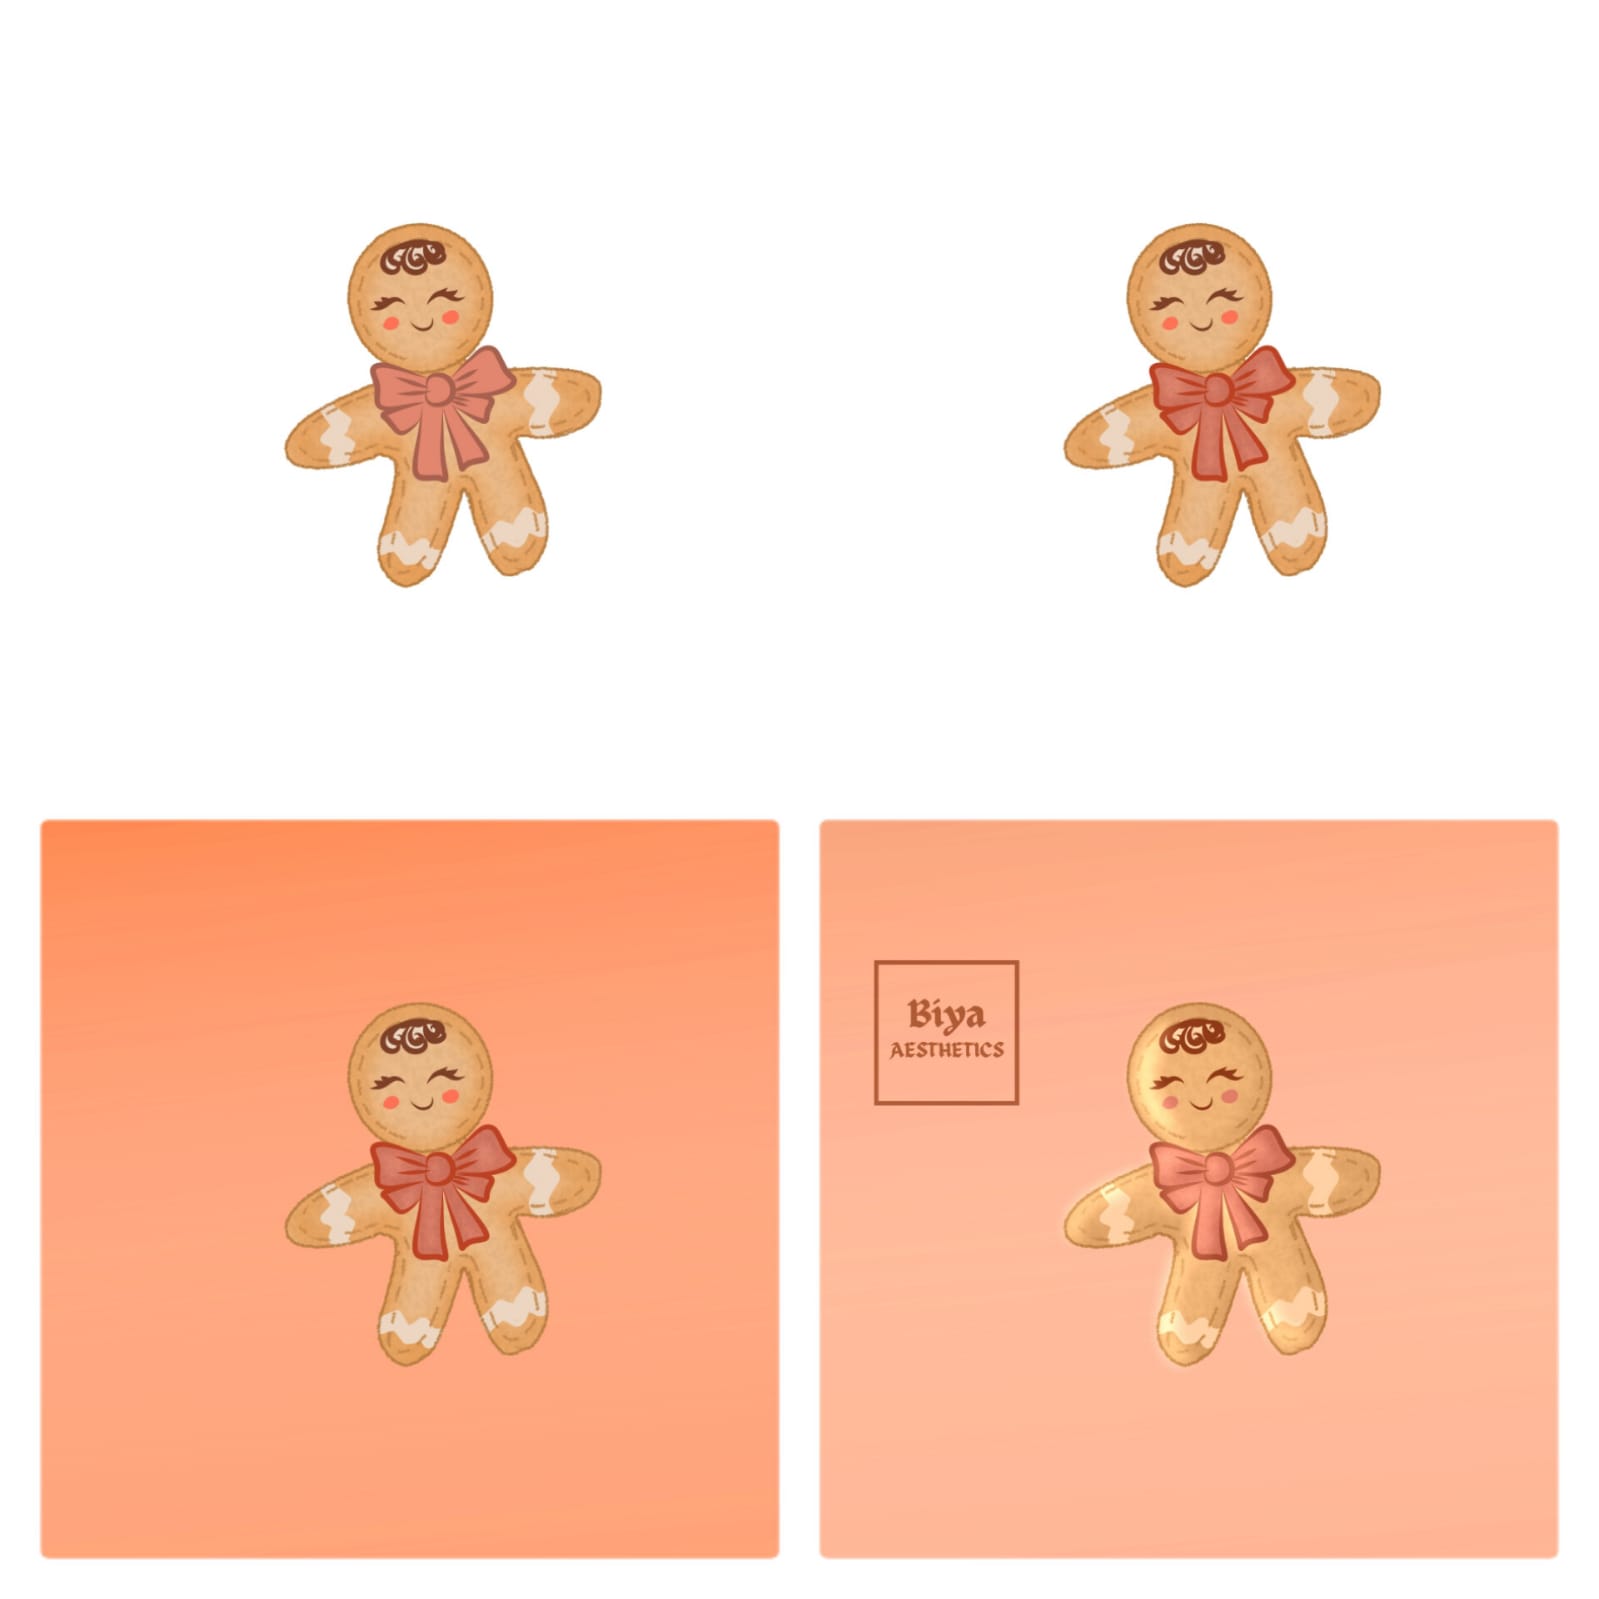
Next I added some texture to the cookie by clipping a layer on top and using a charcoal brush to add more biscuit like texture . After this I also colored the lineart . Added a background too and some highlights
and there you have our own Mini Illustrated Gingerbread man.
I will make it into a Sticker too for Cards . You can try making a different Christmas cookie and just make your own stickers get creative . These weekly blogs are like free little lessons to get drawing digitally .
That's all for today see you next week with another cute art tutorial
Thank you for your precious time and support ❤️
Sketch Study (The Guy with a Turban)
As I have written in my previous blogs I'm these days learning and practicing sketching different cultures and people . So I do a little blog about what I learn with each study . To me Charcoal is something so efficient and unique . I find it quite amusing how you can just draw anything with just a single black color and still add so much depth using just values .
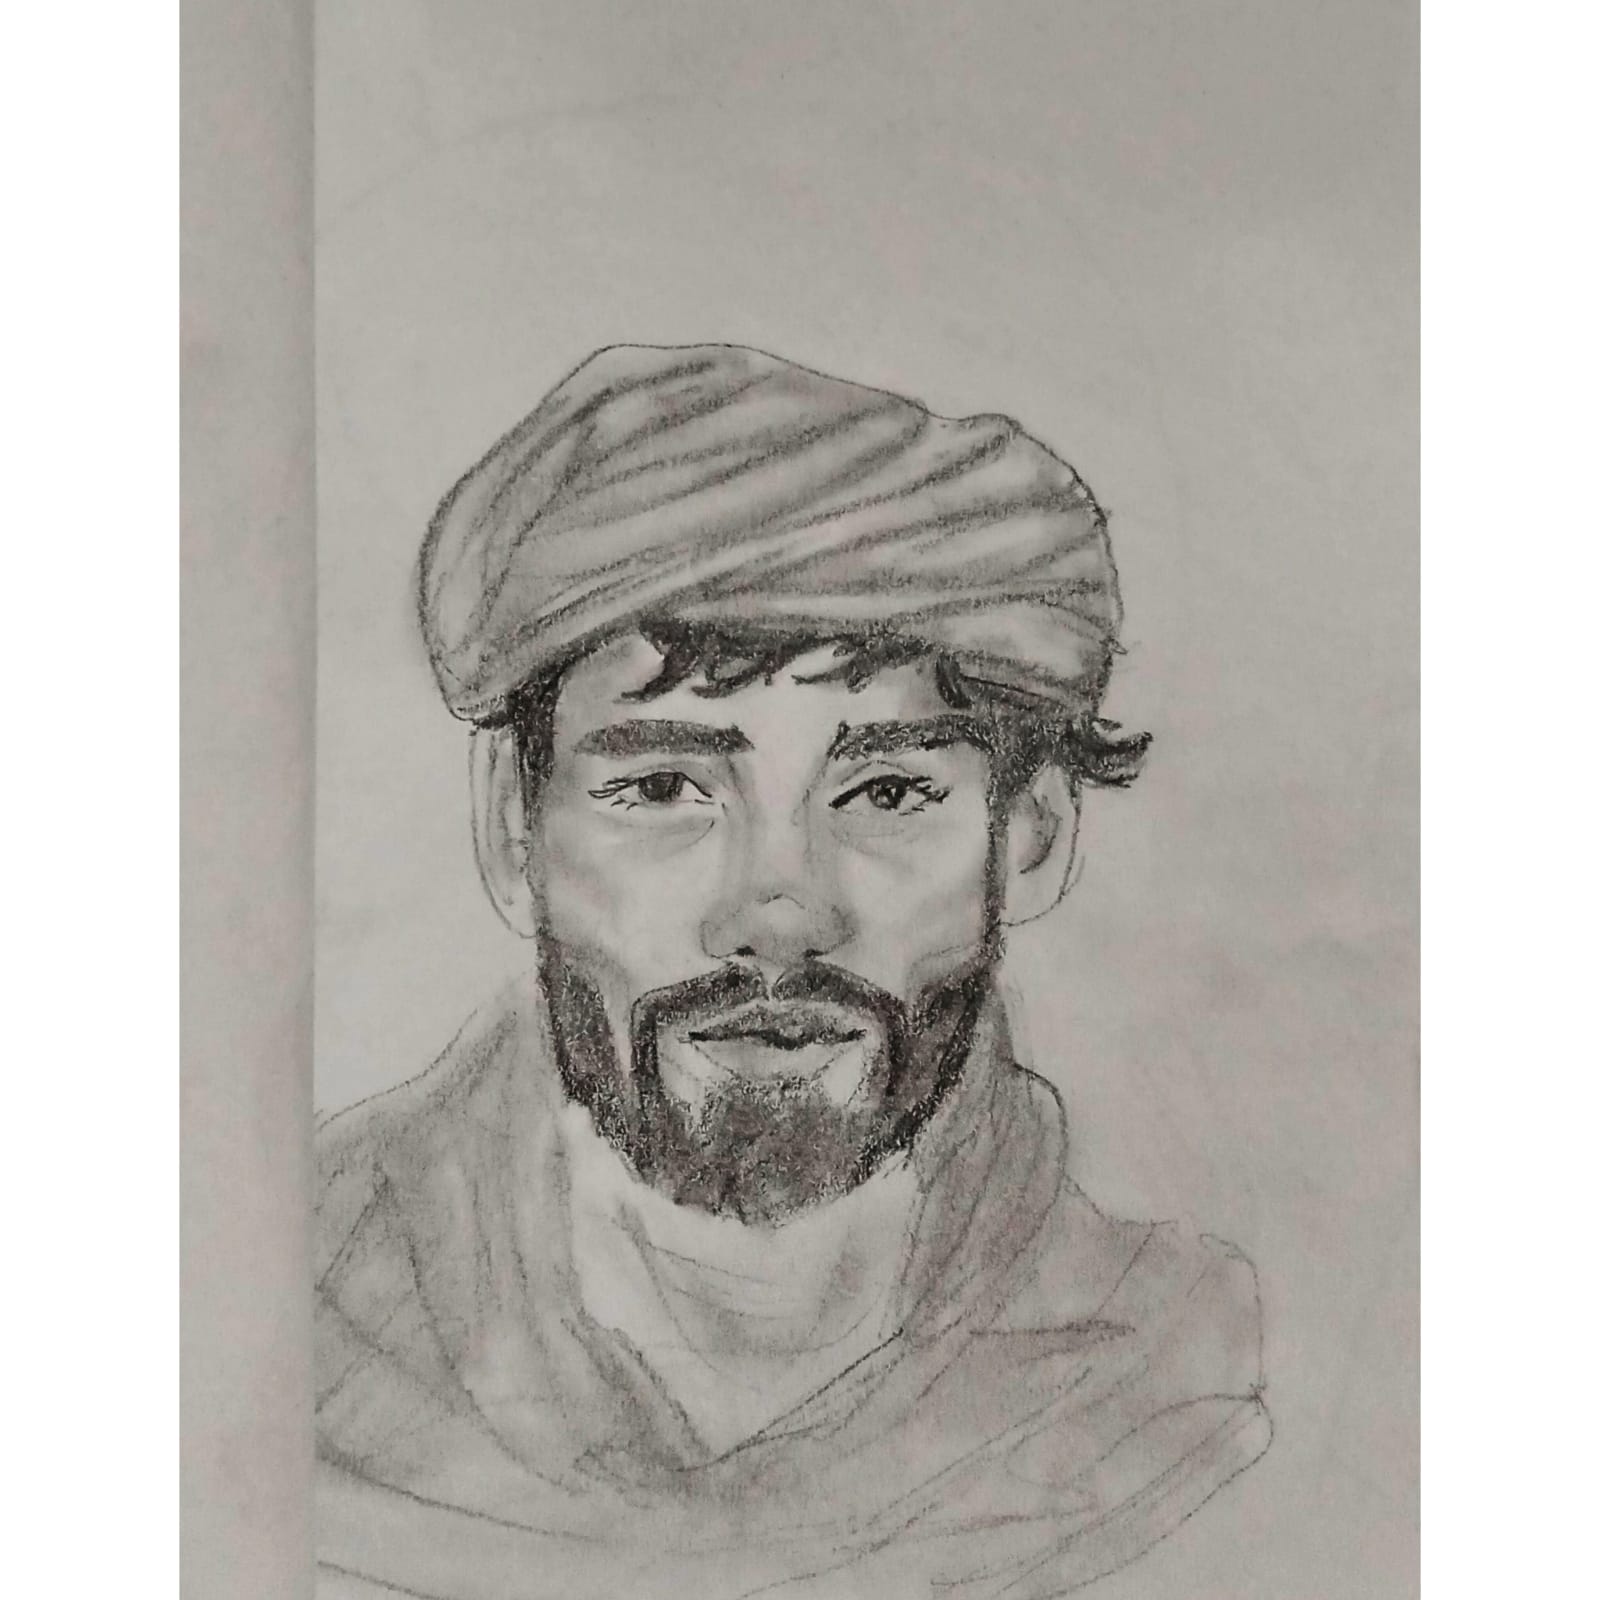
So this week for my reference I selected a guy with a Turban the picture was used from Pinterest and here is what I did .
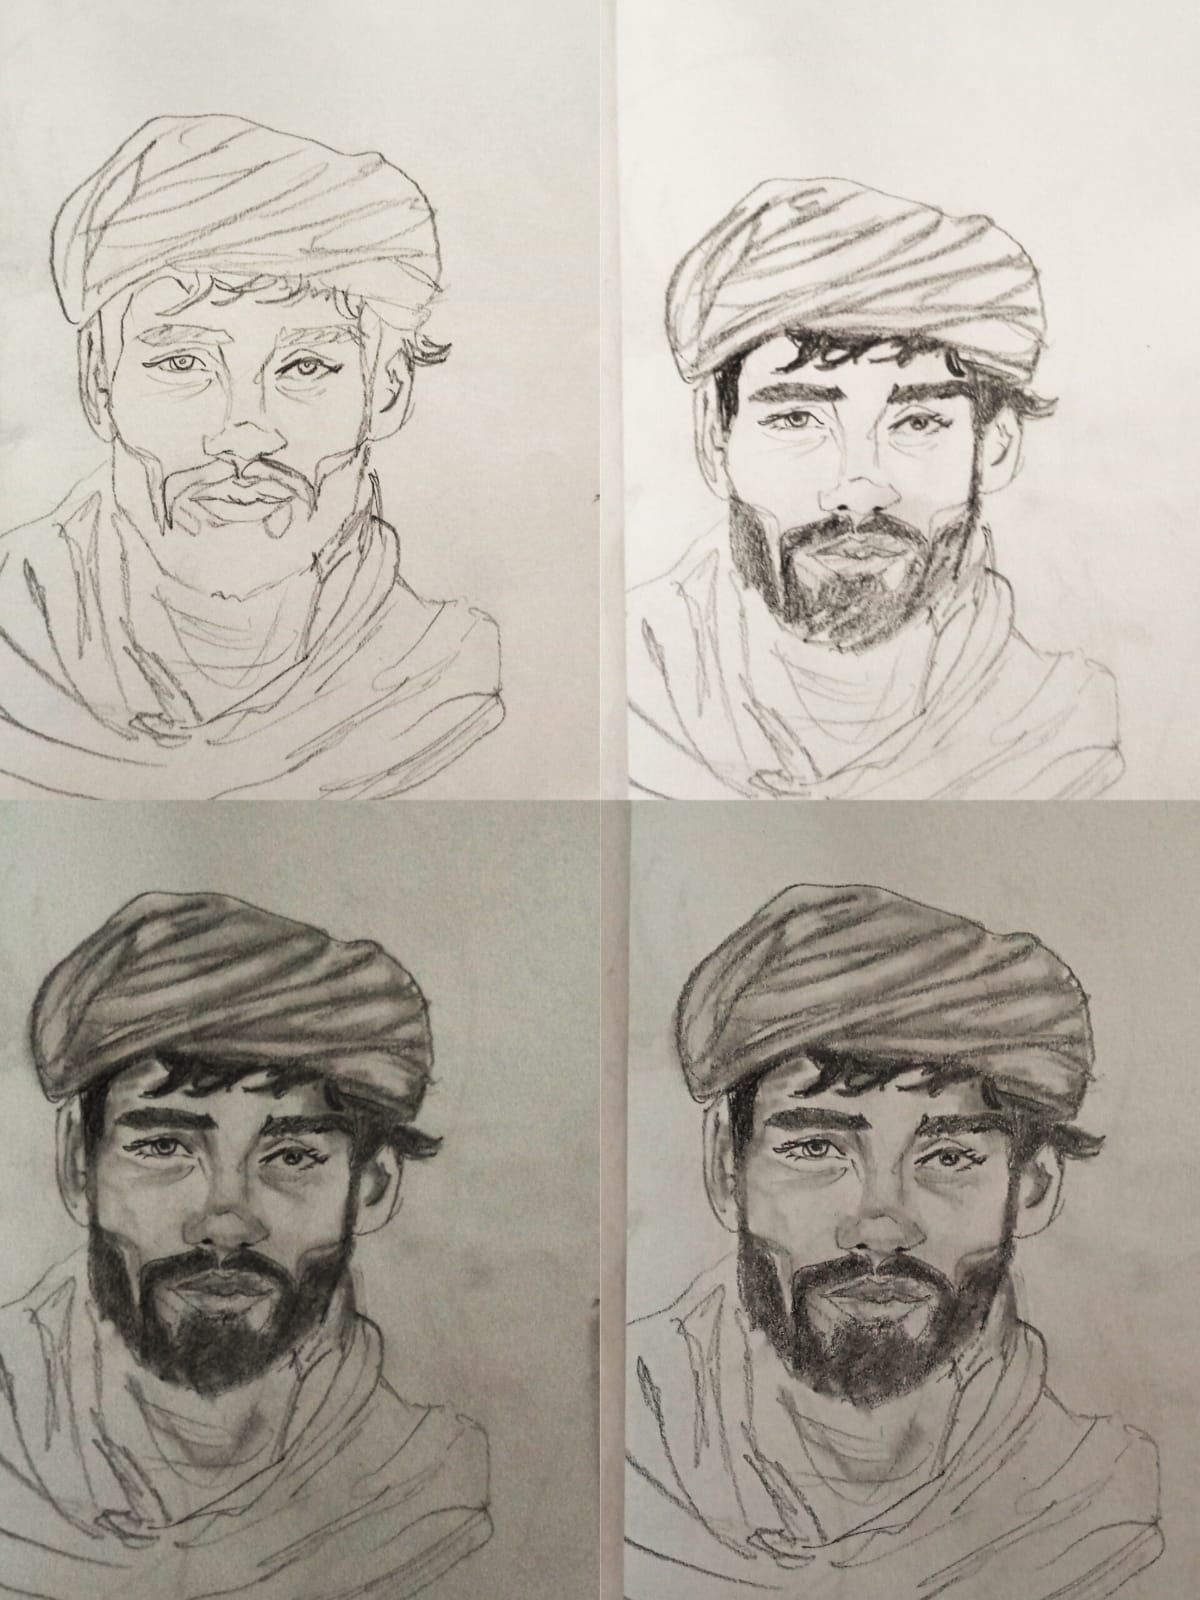
First of all I just roughly sketched out shapes with whisper lines using a 2H pencil so as you can see the first sketch is just me scribbling and making shapes and lines how I see the portrait as shapes like that nose looks like a triangle mixed with rectangle .
Next I just used a Kneadable erasure to erase any lines that were additional and made the rough sketch more dark .
Now I just use a 3b pencil to add some values . I made the most dark colored parts like the turbans wrinkles and drapes on the shawl dark also his eyebrows and beard dark.
Next I just used a blending stump #3 and blended these shadows . Then I erased the highlighted parts too like where the light was hitting on the turban , face and shawl I make them lighter by erasing . This just gives it a realistic effect.
I also shaded his Adam apple on his throat some shadows to the jaw and monolids and his shawl needed some more shading too.
I now started. Shading with a 6B pencil and just kept adding more values to define the shapes a bit more .
Here is the final result .
I learnt alot about shading clothing with this reference how drapes work and how values can make features look prominent . This was a great sketch study .
That's it for today . See you next week .
Thank you for your precious time and support ❤️
a miniature painting of a beach
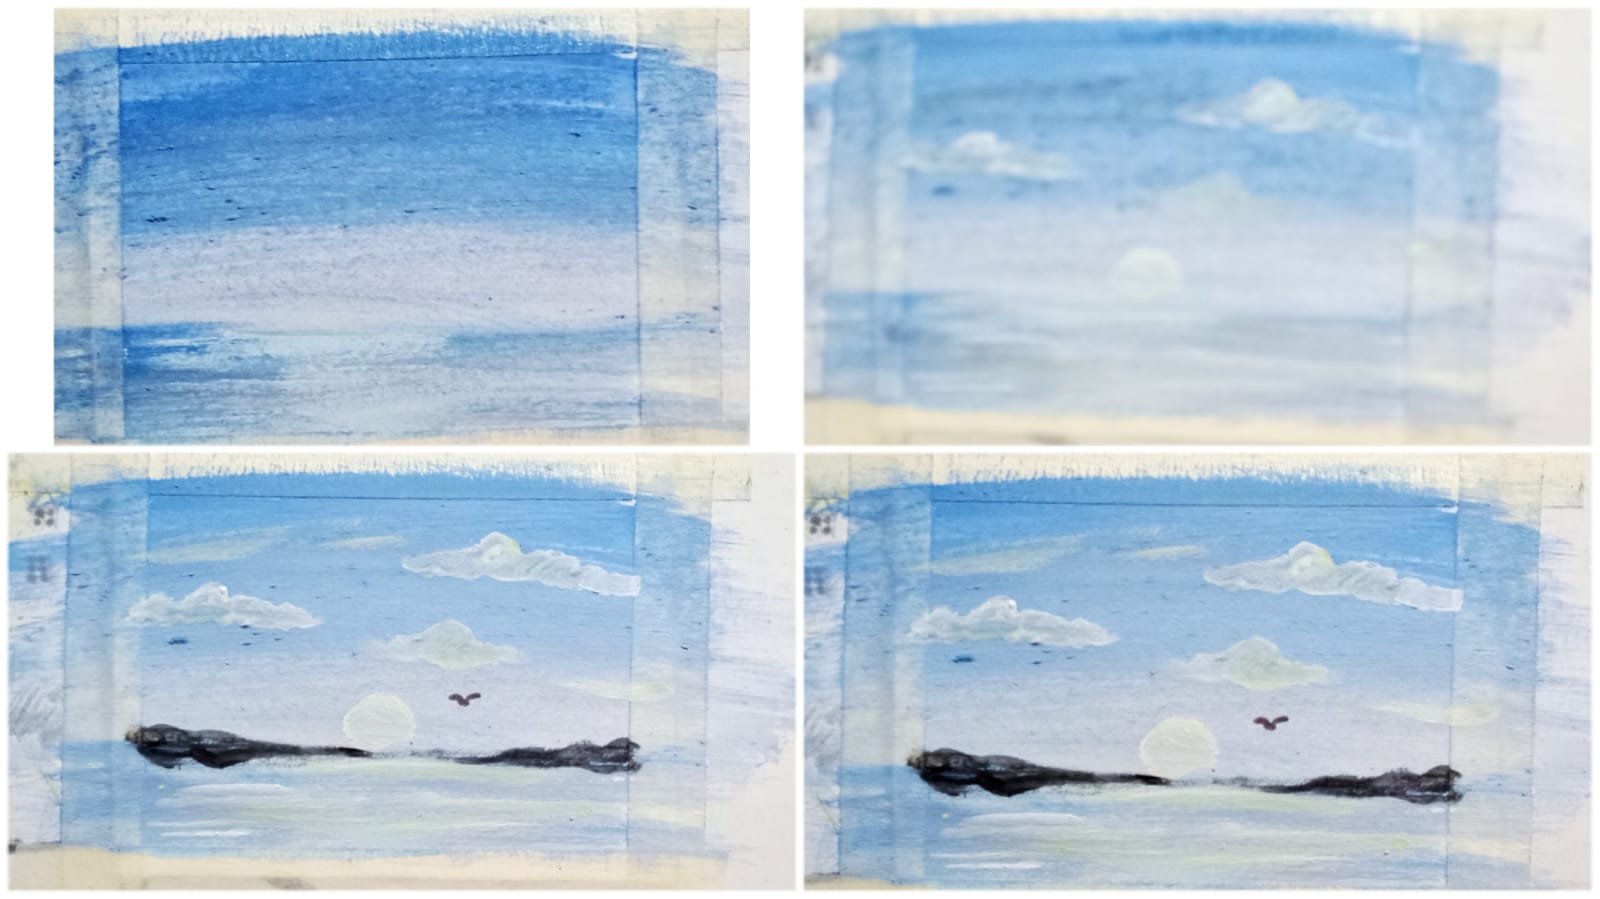
Since November i have started a series for art blogs but this time its miniature paintings and today i'm drawing a miniature painting of a beach. paints i used are from dollar store nothing fancy these are the cheapest gouache i could get my hands on, for the canvas i'm using a 4x6 piece of cartridge paper ,masking tape , one half inch wide brush and a fine liner brush .
First i put some blobs of sky blue on the top then some white in middle and a little green mixed with blue at the bottom now we take our half inch brush and just crisscross in across our canvas to have a gradient like this. so for the sea i actually did a little more white in the bottom middle of my canvas . Now we add some clouds and a sun . Thing with gouache is that i find there white color not so pigmented while it dries up to be more white so don't worry about it .
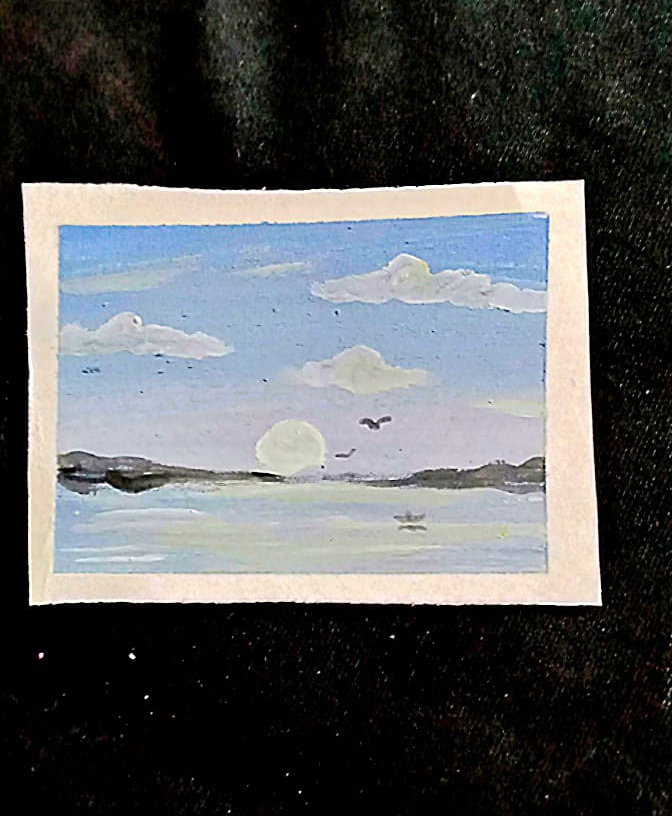
Now we add some islands with a fine liner brush in color black . This little detail also acts like a horizon for our painting giving it a more perspective . I also added some birds and made some higlights to the sea by adding some white dots .These paints got really chalky and light so i would suggest you use more darker blues . Here is the final result.
This was a fun painting so even if you have cheap material you can make these . I Mean you have to practice alot on how to mae it look more pigmented by mixing more darker colors . I personally enjoyed making this hopefully will make it again with acrylics next time .
That is all for today ,comment down below if you want me to paint some specific scenery .
Thank you for your precious time and support
LOH#164 My Christmas Plans
Loh#164 topic to talk about this week was to talk about Christmas celebrations . Christmas is a festival that's celebrated worldwide .
But in my Country there isn't much of a hype about Christmas how ever it's a national holiday because it's the Birthday of our Country's founder. Most of the Celebration is for the Christian community as they have a whole New year eve.
But for me we never have celebrated Christmas as the world does . So here is how I celebrate my Christmas week and the holidays till new year.
I tend to do Charity on Christmas Eve I bake fruit cakes or carrot cakes as they tend to last longer so I bake for 2 days and go to our local Christian orphanage . I love seeing the smiles on kids faces .
The day after Christmas is when I do the deep cleaning of our cupboards and house even the Storage room the pantry gets a good clean up this one is a annual cleaning. I do clean every month but this cleaning is like Washing every cabinet neatly .
Other than that we get snacks and cold drinks because New year is the time when the whole family gets together and we just watch award shows or movies till 12 that's when the fireworks starts and we see it from our balcony .
Tell us how you like to Celebrate Christmas and how you celebrate your New year eve . What are your plans for New year Comment it down below.
Thank you for your precious time and support ❤️

Splinterlands art contest #271 (Spark Pixies)
Every week I take part in this art contest held by Splinterlands community on Hive where I draw one of there Cards from Splinterlandscard.com into my own art style .
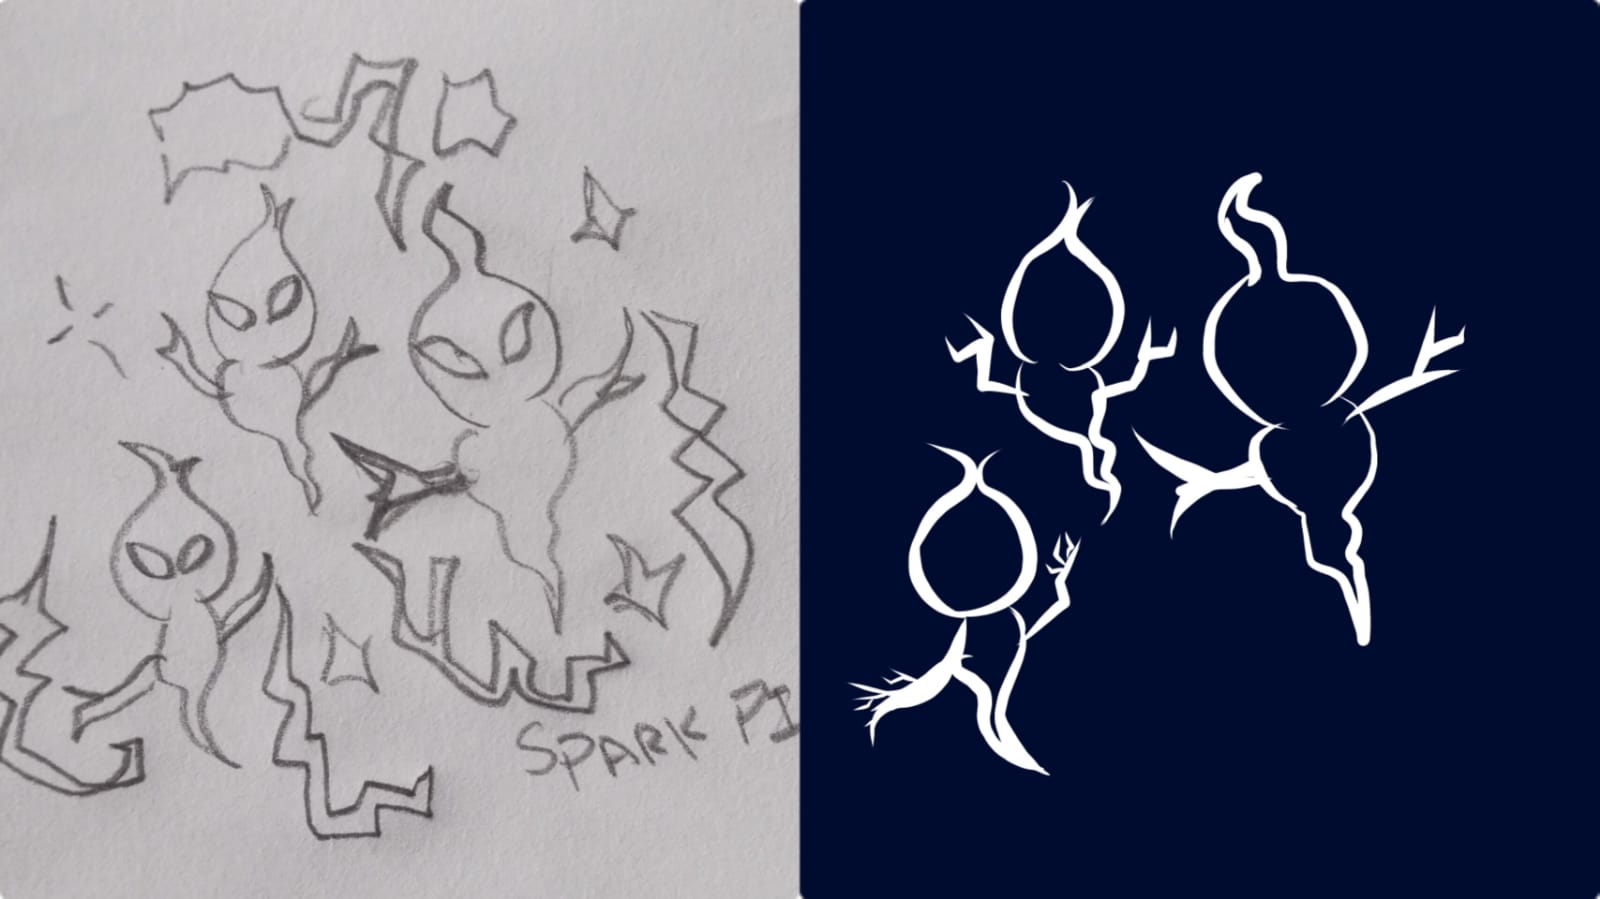
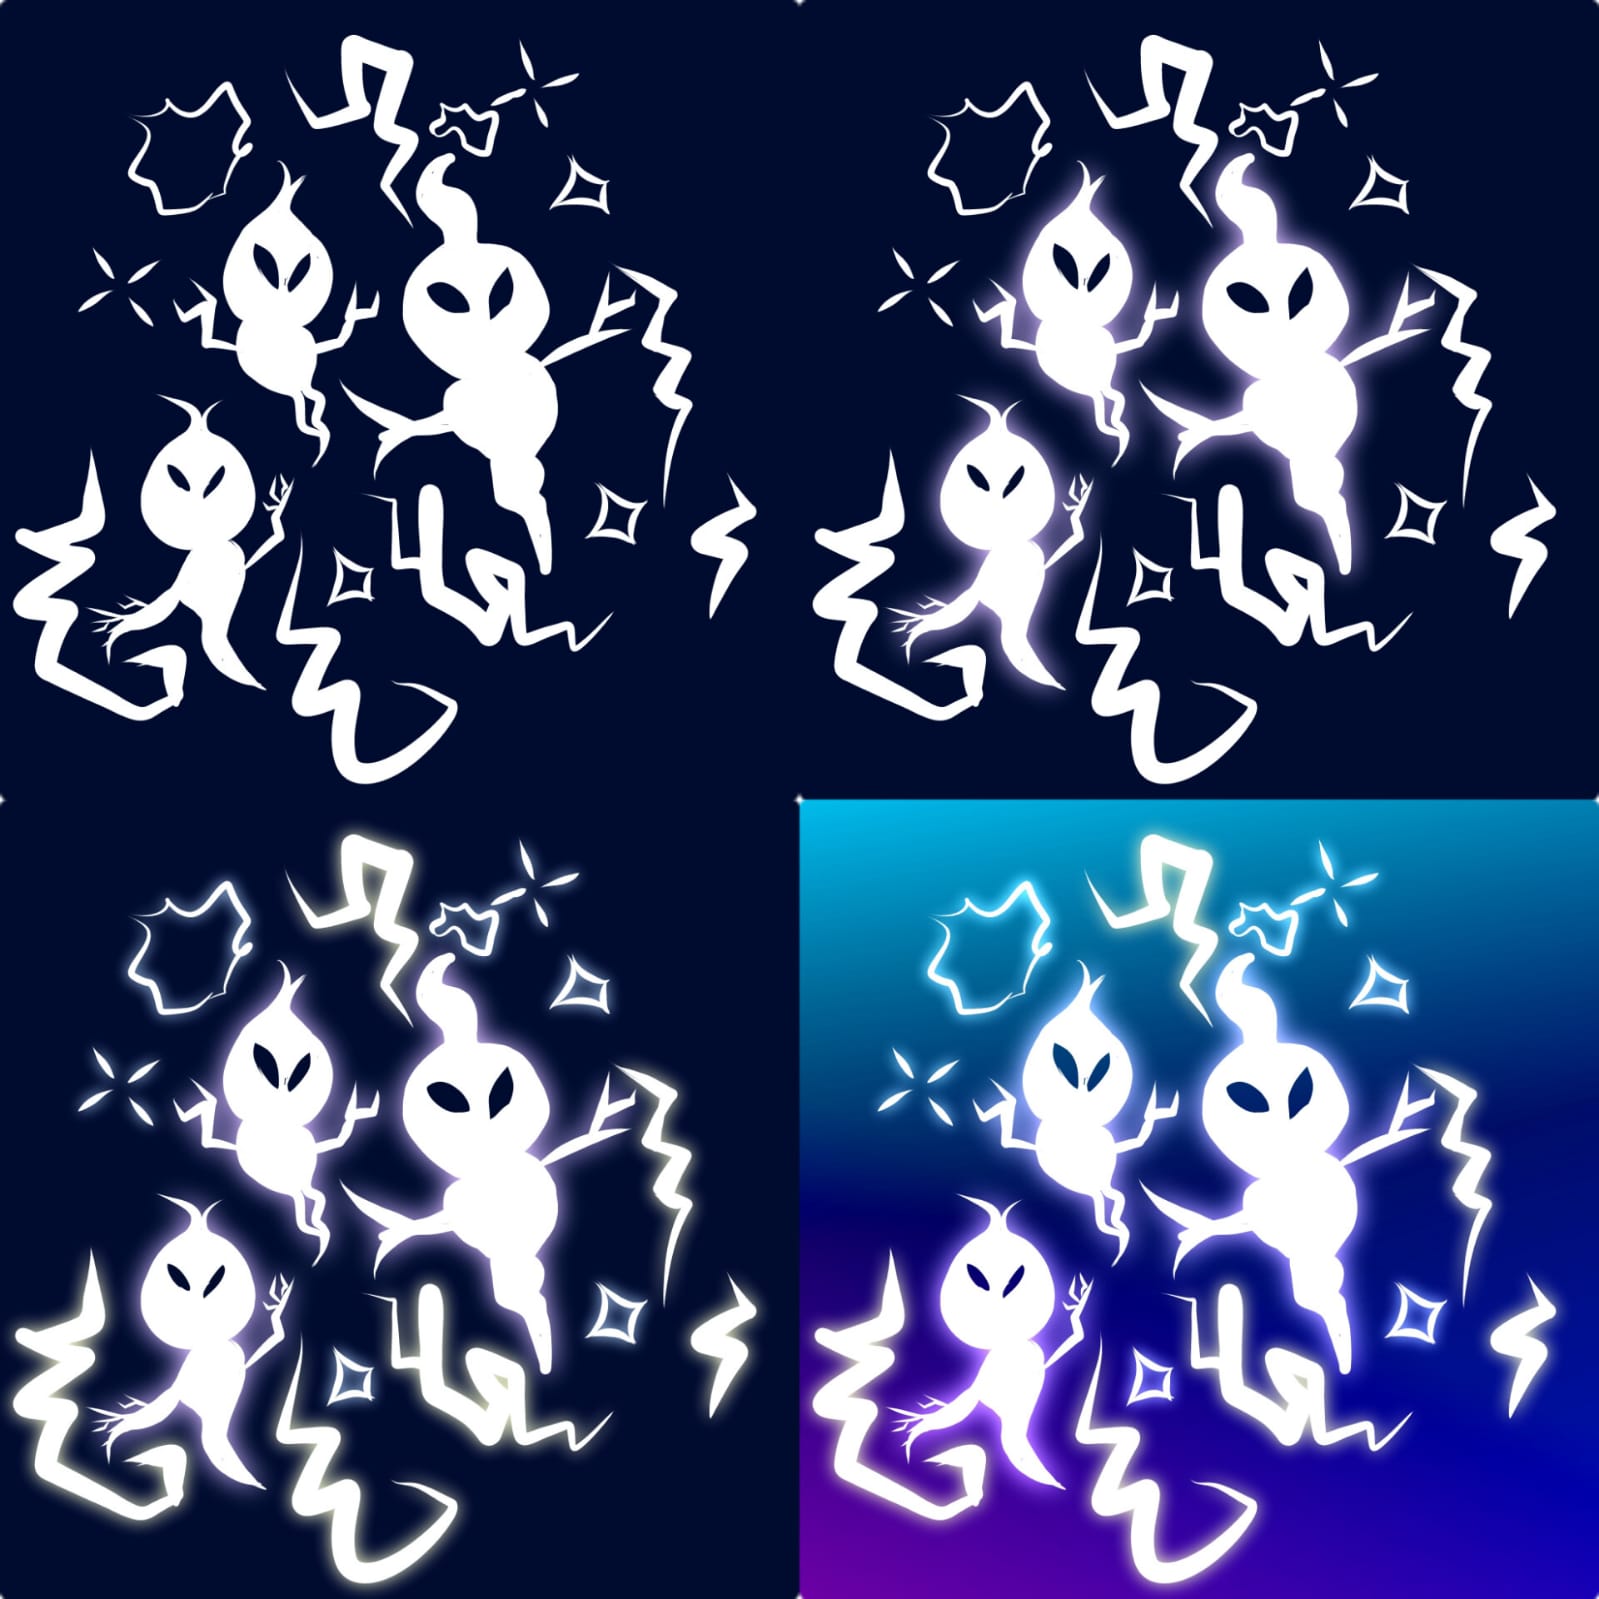
This week I drew a card called Spark Pixies . The characters on these cards are little lightning like mini ghost figures that are pixies and around them there are alot of sparkling and electric details .
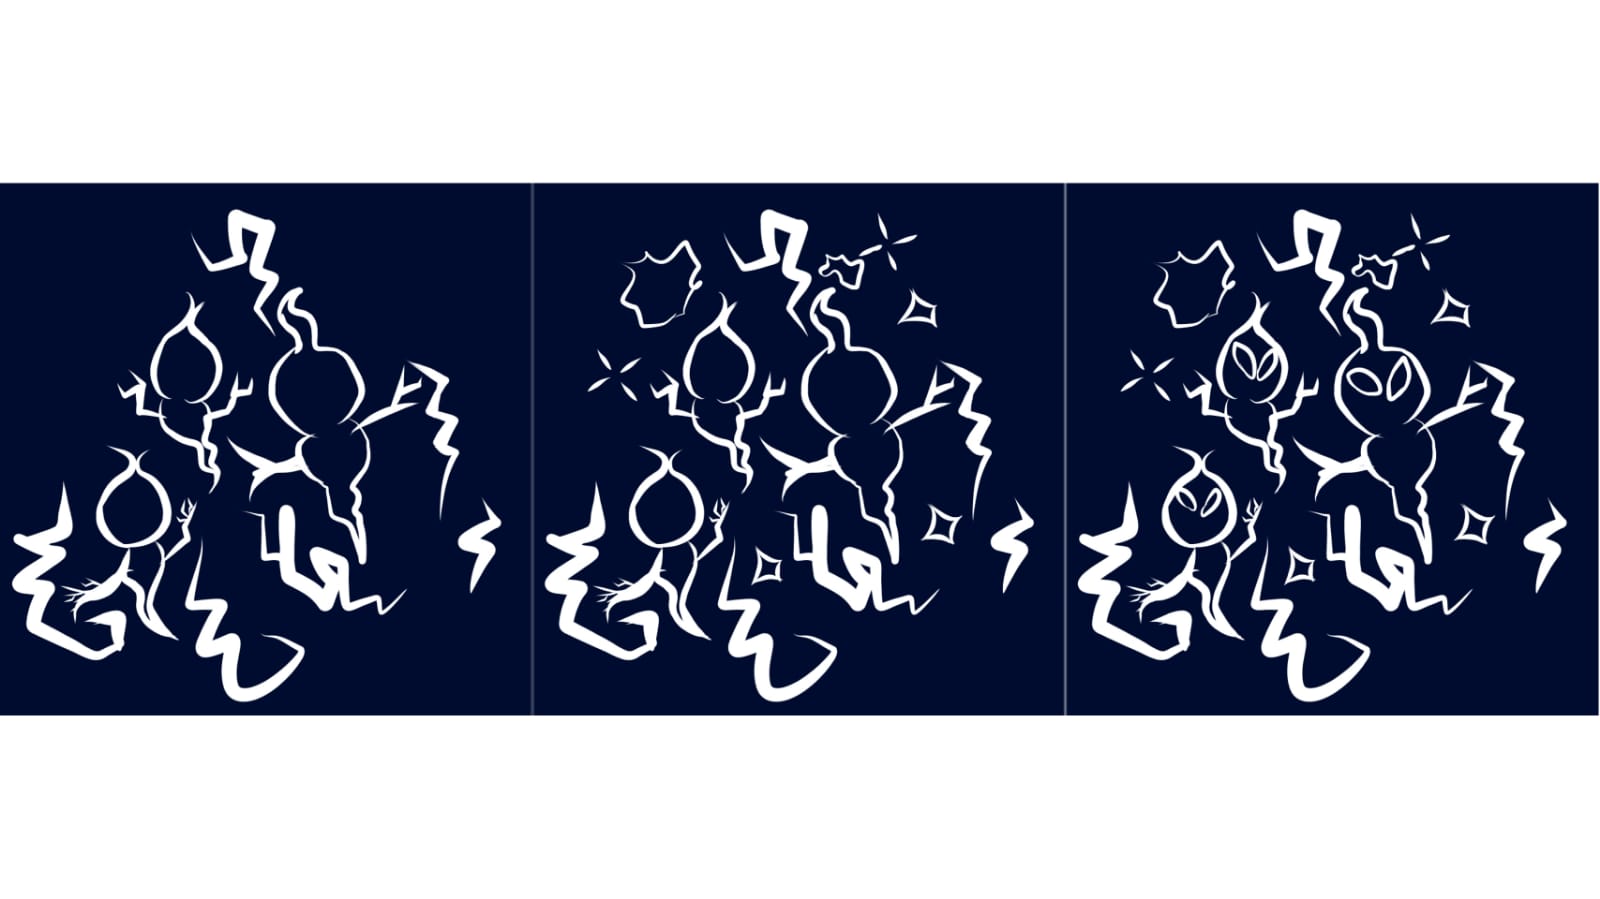
So before anything I decided to sketch them in my art style on a paper later I just imported that sketch in a digital drawing app called medibang paint pro and I just traced the outline of my pixies with a white color on one later then I made a dark background because the character I'm working with are just Light and white based characters .
On each layer I outlined and traced the sparkling details too
And now you can see the basic lineart.
Now if I just color them all white you won't get the idea so I have to color them but also somehow make them a bit different from each other . For this I'm gonna make them glow in different colors so let's do that
I started filling the pixies with white color leaving just the eye parts
Then I duplicated the layer and Alpha locked it and colored it into a pale Blue color then I removed the alpha lock and gaussian blurred it . Set that layer on add in layer blending modes and now u can see it's glowing a bit like a cool toned white
I did the same for the sparks and made the layer a pale pink so the light looked but like a peach glow .
I did one for the lightning but made the layer a light pale yellow so the glow on it looks like warm white .This way the character kind of popped and we could differentiate between the sparks and other details by just light changes .
Now for the background I made a gradient on black with some neon colors like magenta, teal and purple and here is the final result after I imported my watermark on it.
Thanks for the precious time and support ❤️
A weekly Blog (The Princess Of Cats)
Every week I do a blog that gives a little peak about how I spent the week .This week was all about me being Creative and doing things creatively .
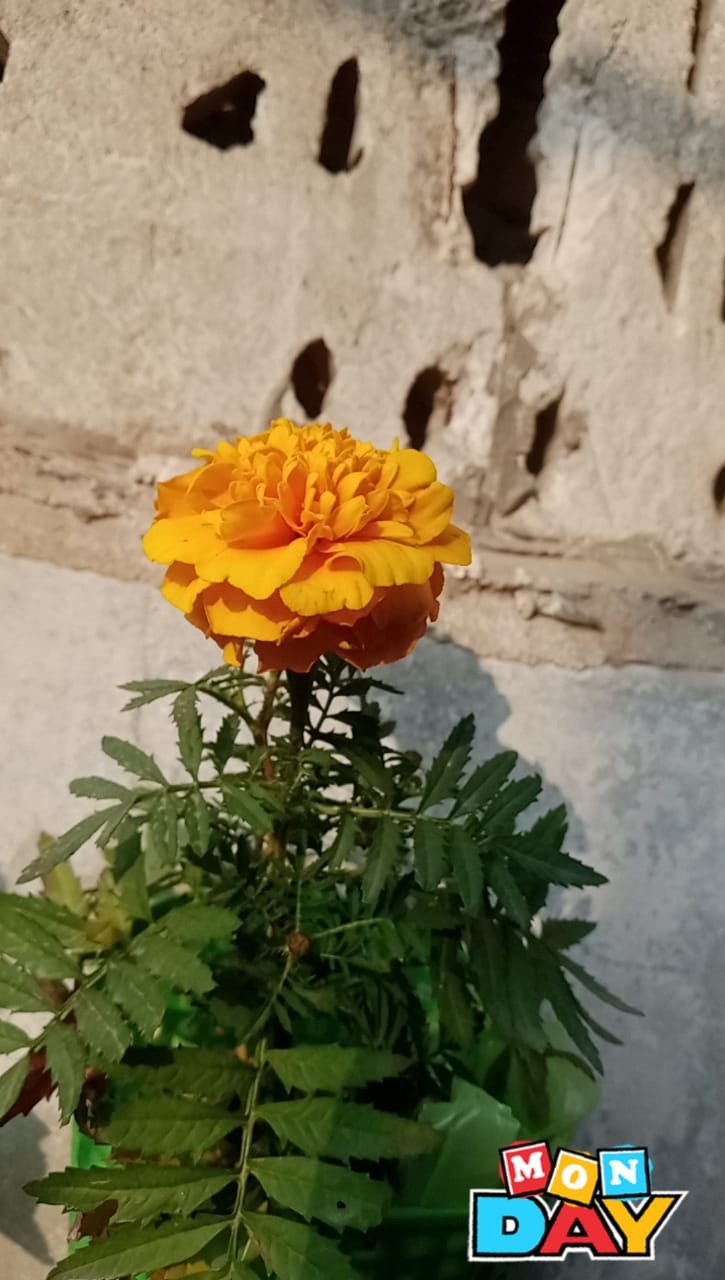
On Monday I actually had an idea to report the marigold in a basket and hang in on the wall . So that's what I did here. I was thinking to add more baskets and put herbs in them too this way I have a beautiful wall in my balcony and it's all covered in nature .
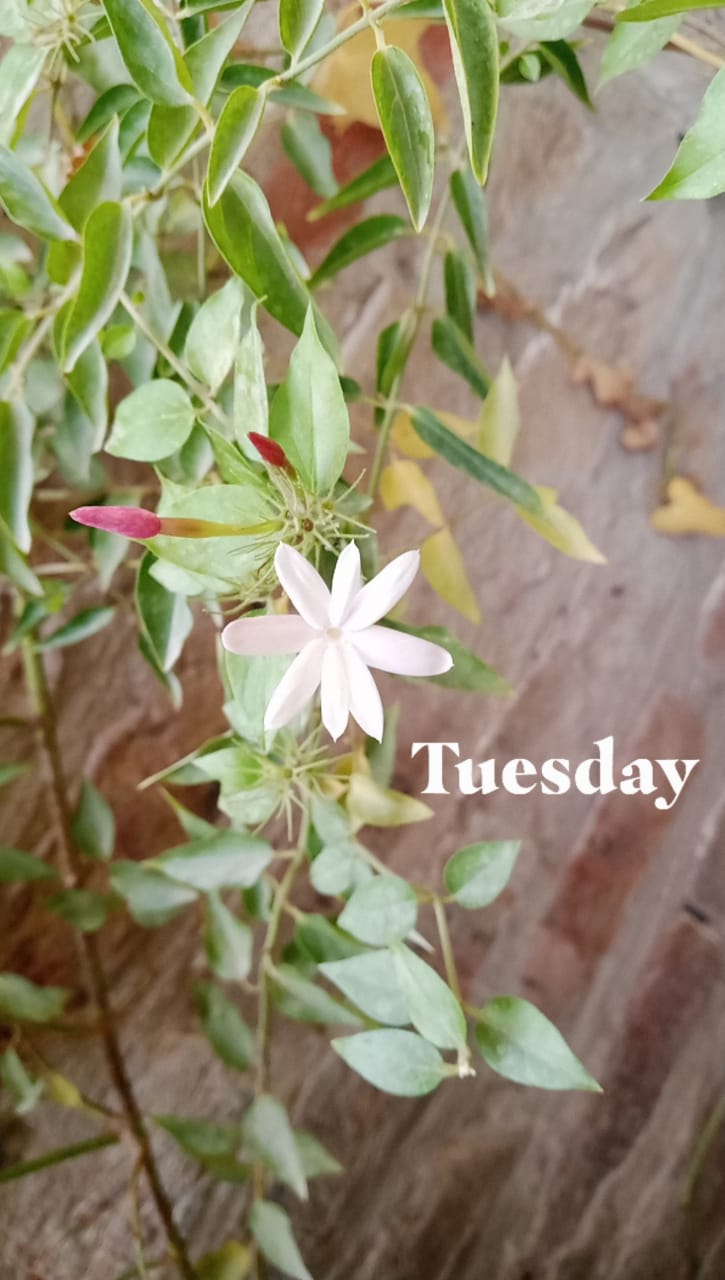
On Tuesday as always I was up early on my roof plucking some chillies and I saw these Star jasmines they looked so beautiful that I couldn't help but to capture the scene
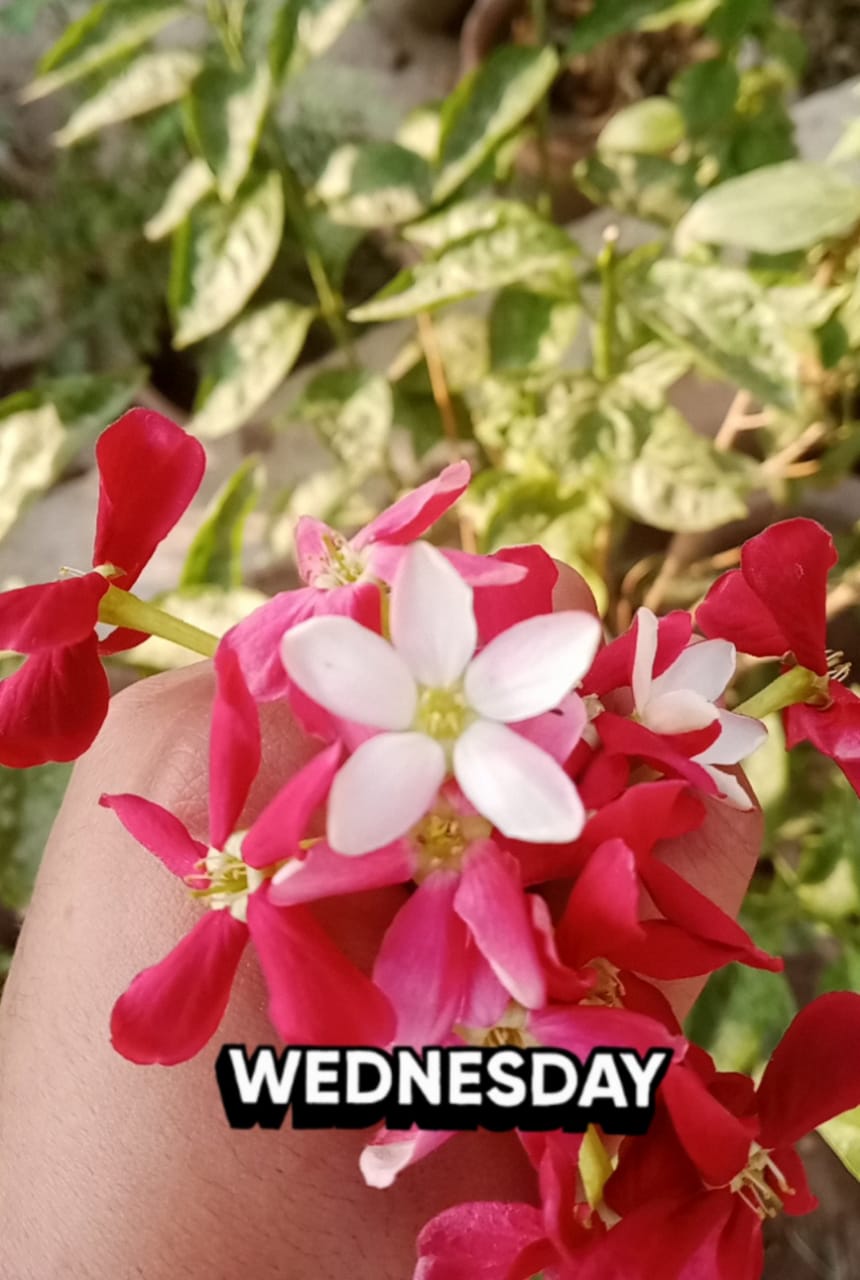
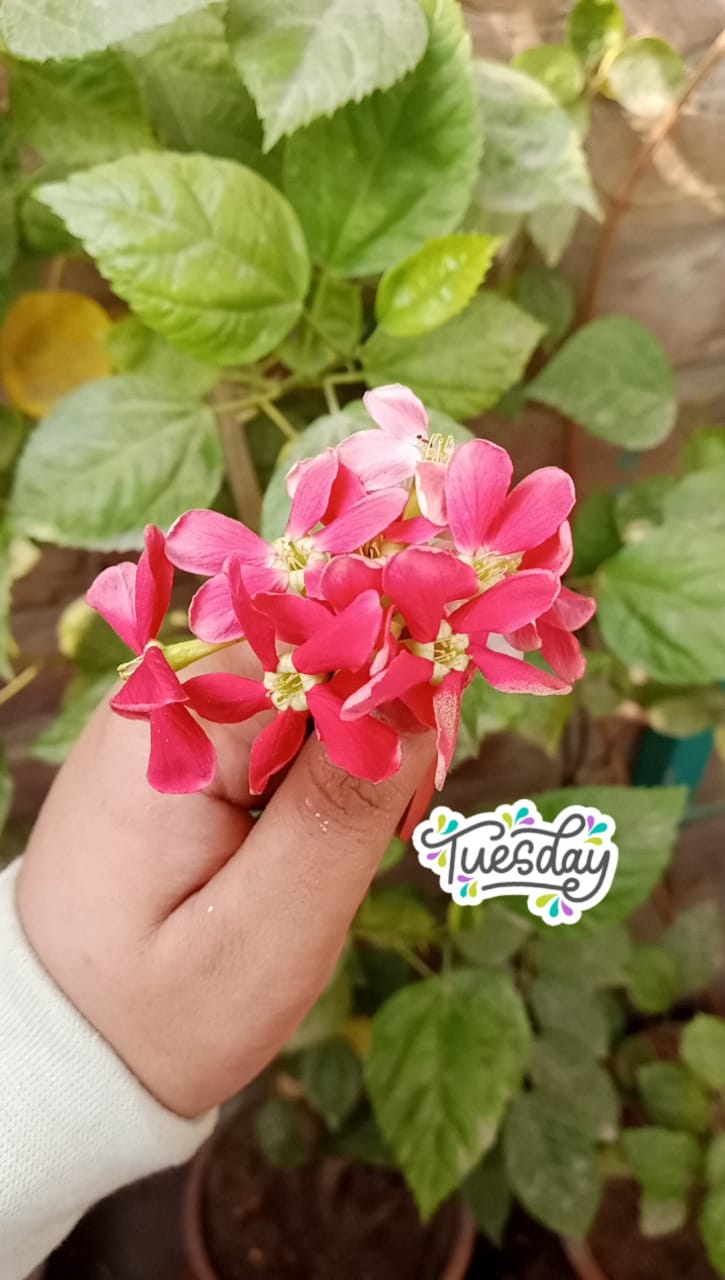
On Wednesday I collected some more 5 petal flowers from my jharna bail and these will be dried to make cute bookmarks so I will dry them for a project.
On Thursday I made a self portrait of me with a Green colored pencil this was a monochromatic art work but I'm experimenting and I was thinking about Watercoloring it with a green undertone just to see how it looks.
On Friday I actually installed more baskets with Marigolds on the wall and it just looked so Beautiful I will install more herbs and vines soon
So Saturday was really good and I found this little Kitty princess . Well my kitten loves flowers just like me I see her always sniffing so I brought these to her . She sat calmly as I put a flower crown on her and took pics of her and look how she is sniffing the flowers again . It surely was a caturday ❤️
On Sunday I turned my monochromatic sketch into a water colored self portrait and here is how it turned out .
That's all for my week do tell me about how your week has been . One lesson I learnt is inspiration lies everywhere for a creative mind to just get ideas and do things more creatively.
Thanks for your precious time and support ❤️
Sketch study (The Edgy Girl)
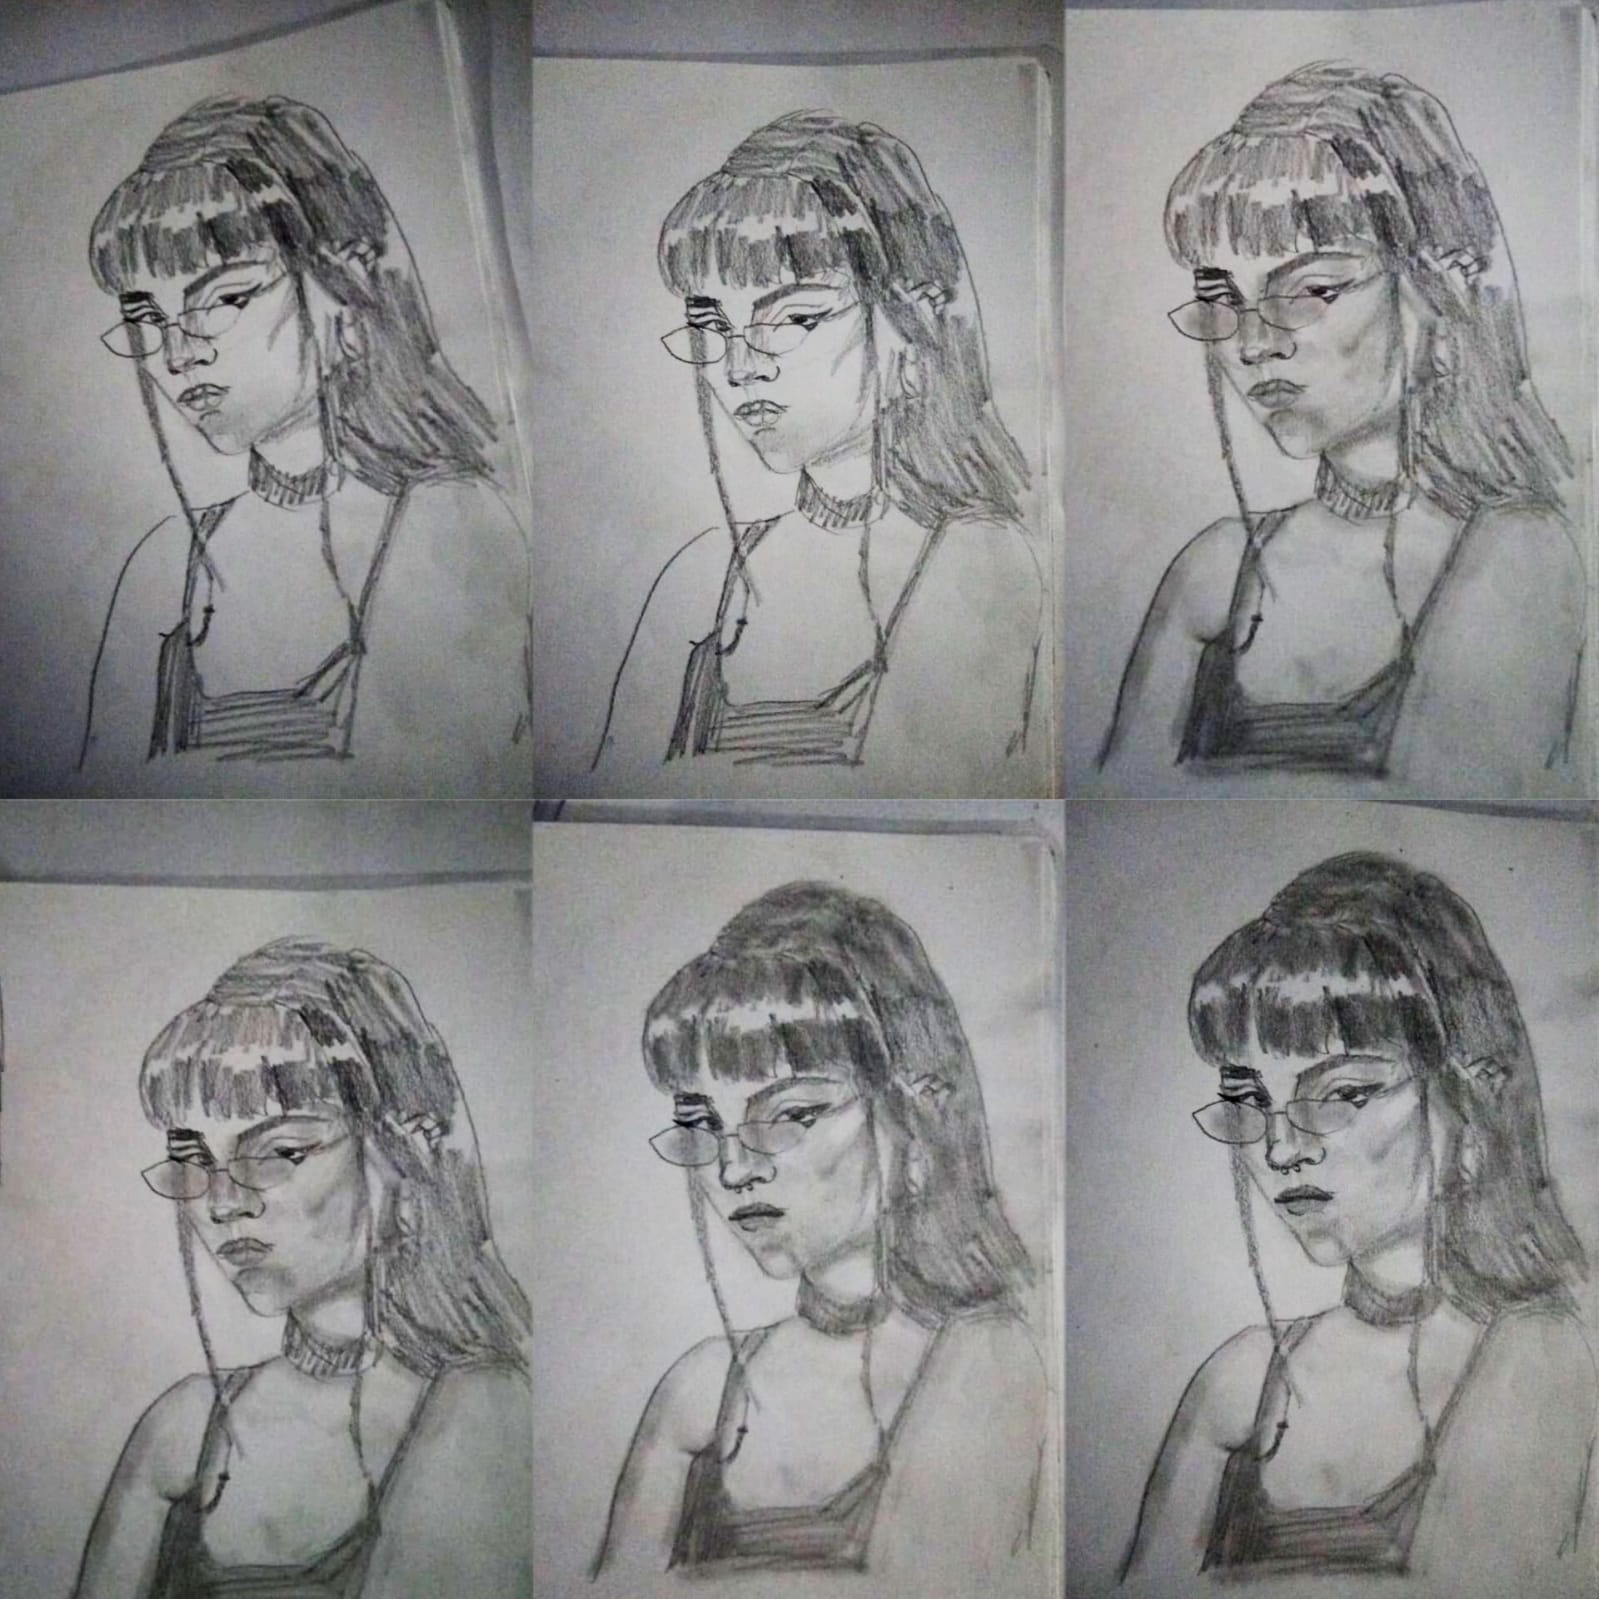
So I'm practicing sketching and each week I try to at least do one study . For this I always keep looking for interesting and unique references like this one I found on Pinterest it was a girl with glasses braids and piercings I loved her pose and everything so I felt inspire to draw her.
This one sketch is all about me shading and how I shade .
For this I went with 8b pencil and started hatching the shirt the hair. The reason why I just was experimenting with seeing positive and negative spaces so for that I wanted to just color it first and then erased the highlighted parts .
After that I just picked my blending stump #4 and started blending the charcoal on the paper then I just used the same stump to shade her nose and jawline with her glasses too.
I then took a 3b pencil and stump to shade her septum piercing , I took the kneadable erasure to erase the hair highlights and the chin . I did the eyebrows darker and just blended the eye hood with the stump.
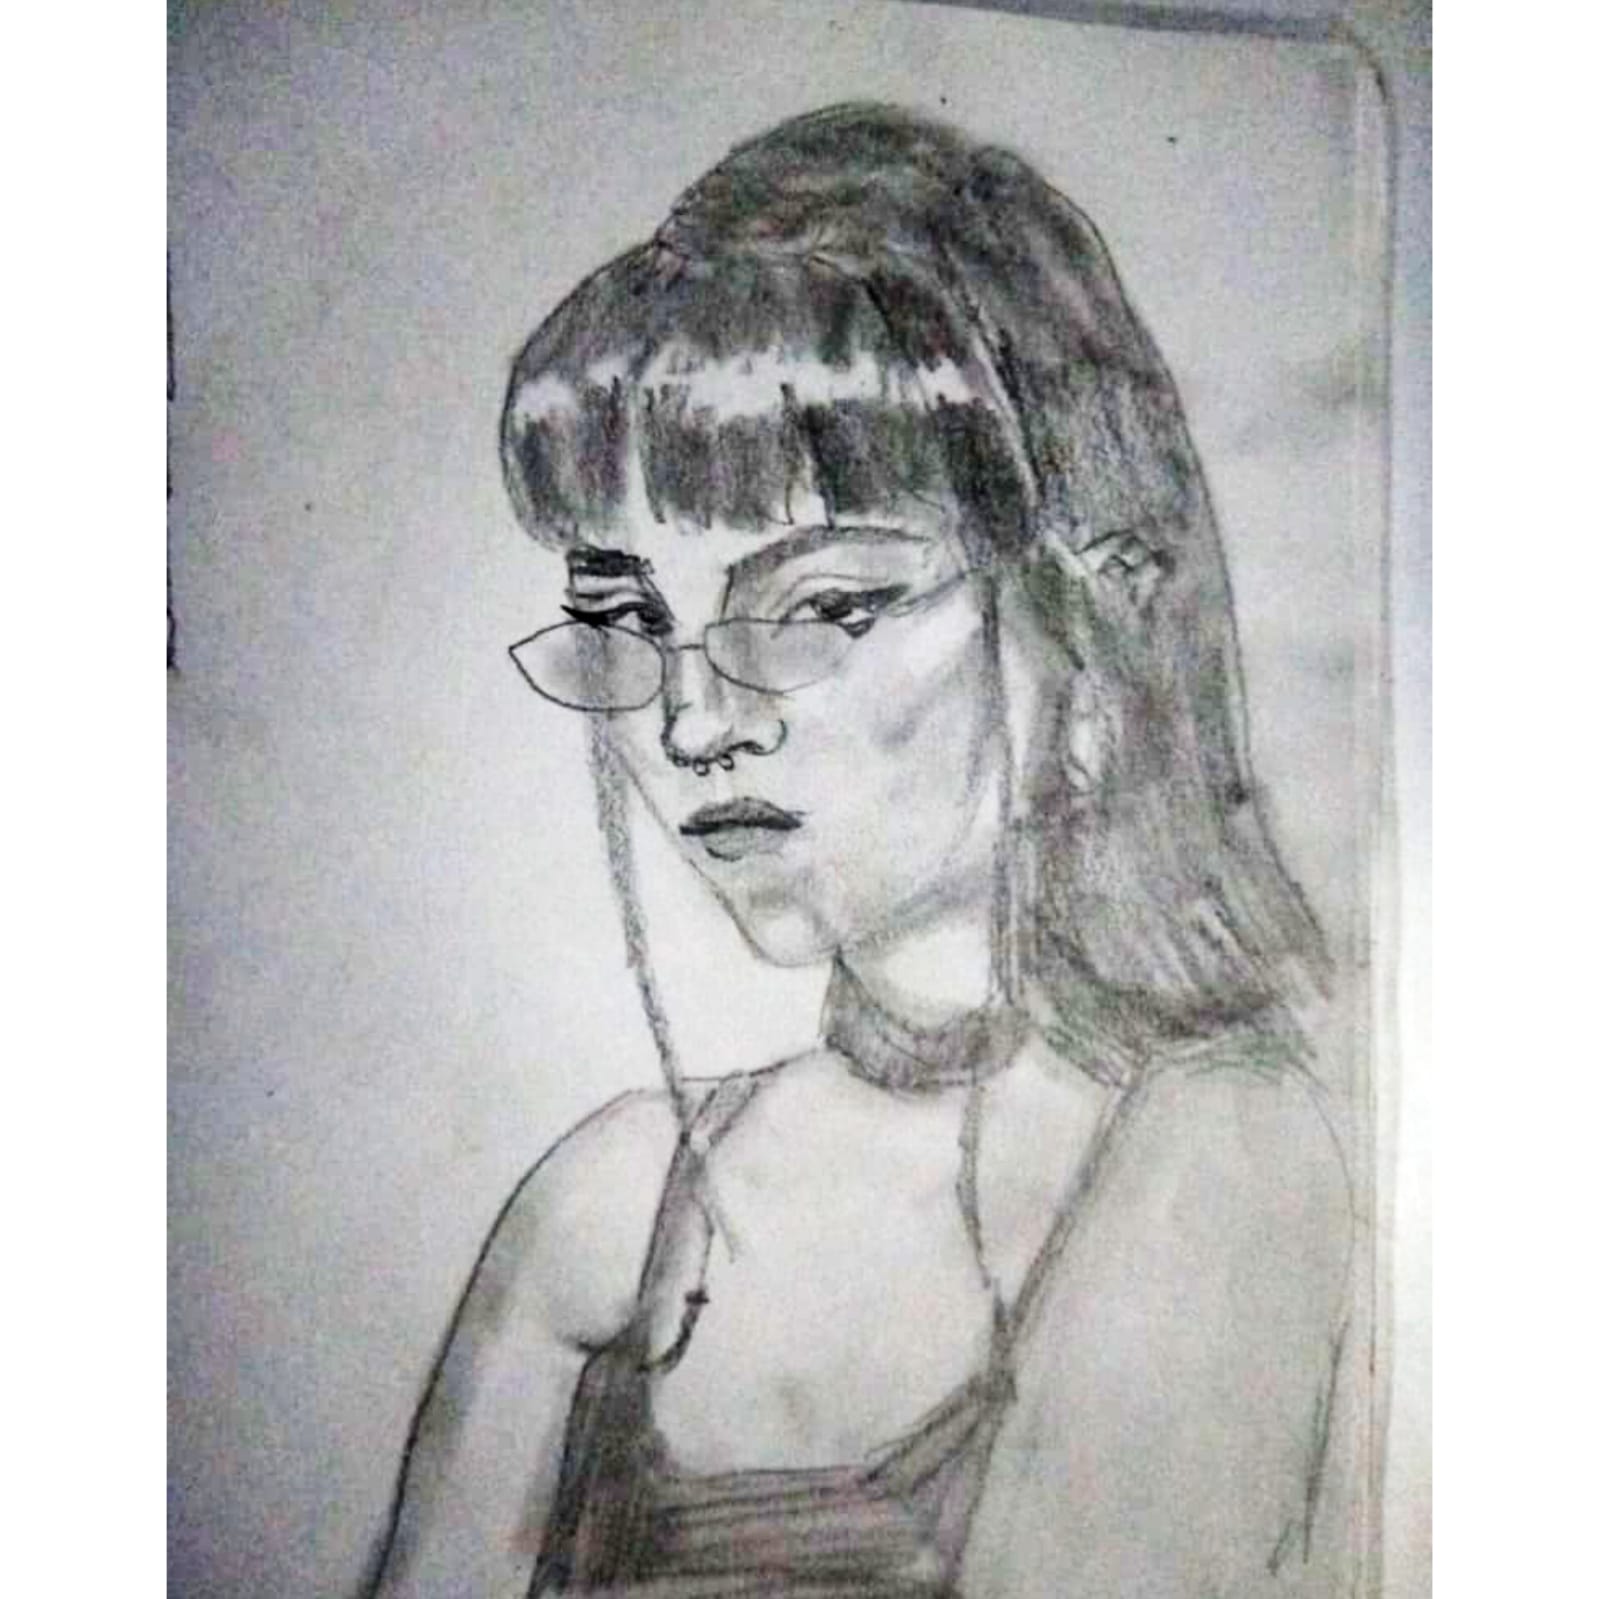
It was looking like a mushy muddy mess so I outlined all again with a 2hb pencil and here is the final look .
The girl looks really like a fun , edgy ,bold and adventures person so that is what I wrote in title . I kinda always like going for more funky and different references just so I can learn more about facial anatomy and how different things work . Although now I see some mistakes in this even but I also can see how much I learnt by practicing and how much I have improved.
That's all for today Thank you for your precious time and support ❤️ and comment down below what you think about this sketch .
City Sunset (A miniature scenery painting)
Every week I draw a miniature painting and this week I'm back again with another one . This time I'm painting a city Sunset scene so let's learn a little about how I did it.
First of all the materials I'm using today are acrylic colors , a 4x6 cartridge paper , some masking tape , and. A one inch wide brush with a line art brush.
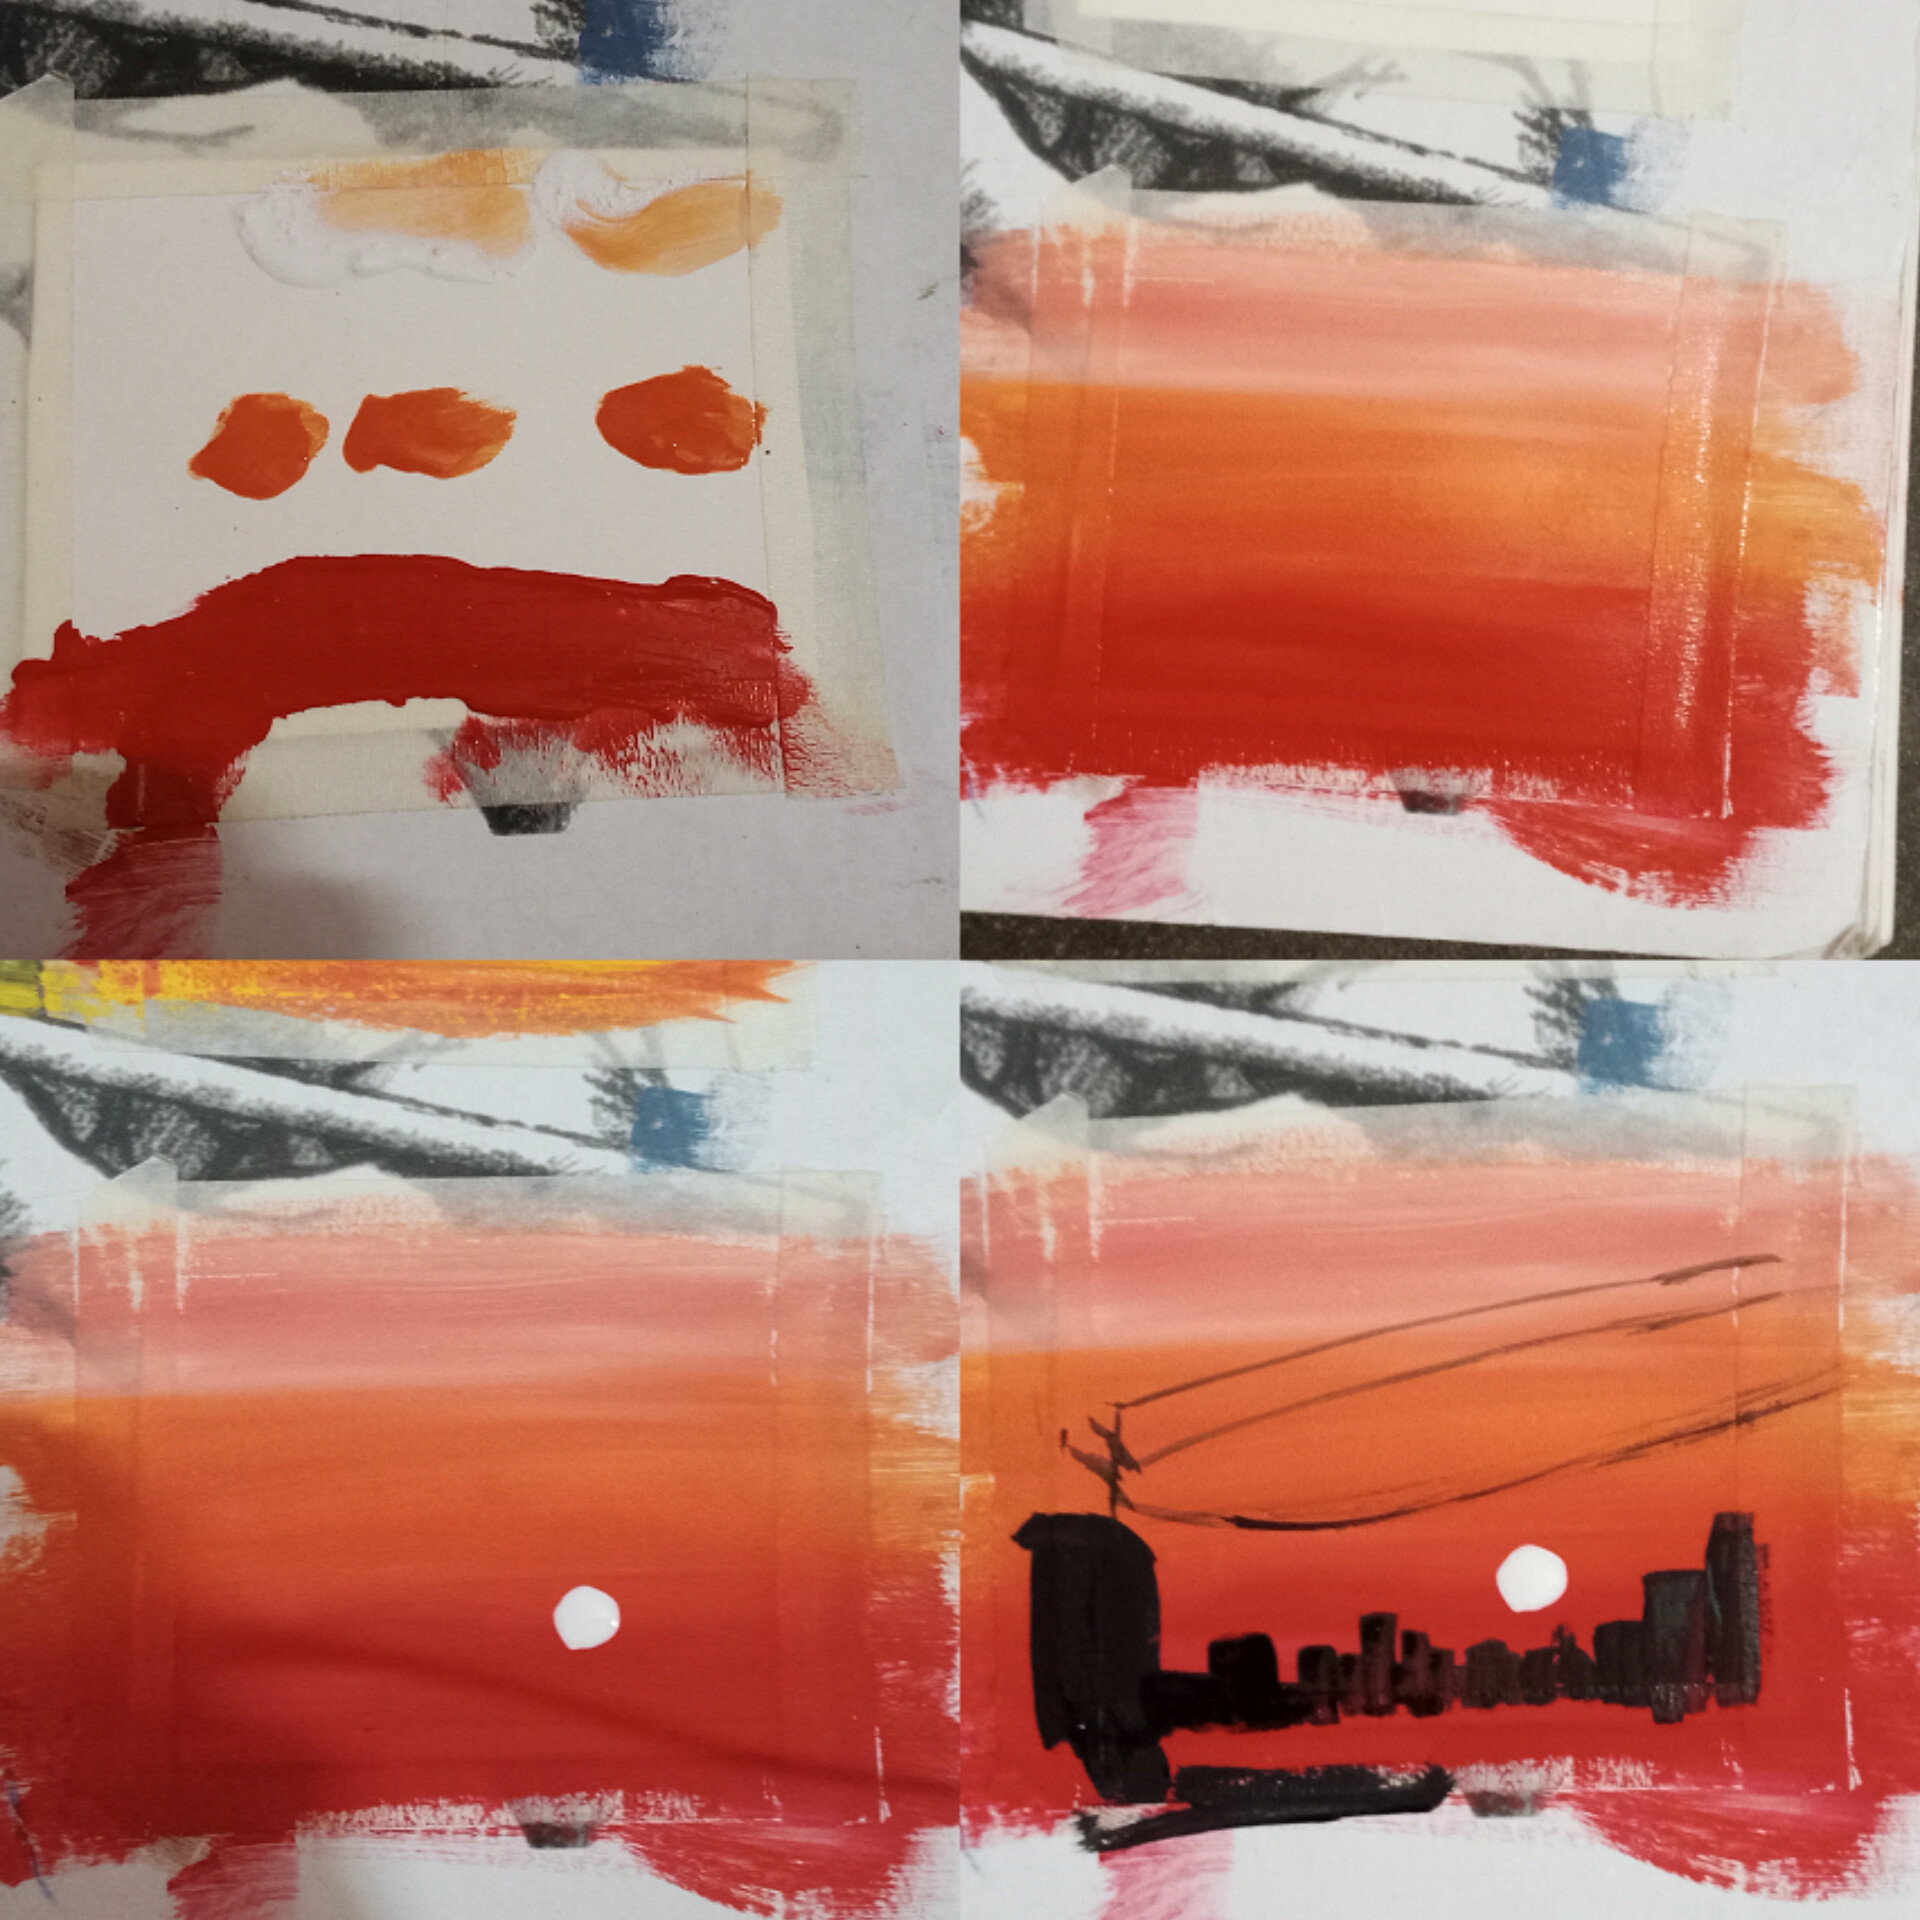
I taped the edges of my paper on my sketchbook and just dabbed my brush with some peach , orange and red color and splattered that on the paper with peach and orange being at the top .
Now I blend these colors to create a beautiful peachy red gradient Sky .
On the bottom right a added a small white dot with a lineart brush this is our sun setting and now we add some silhouette of the busy busy city.
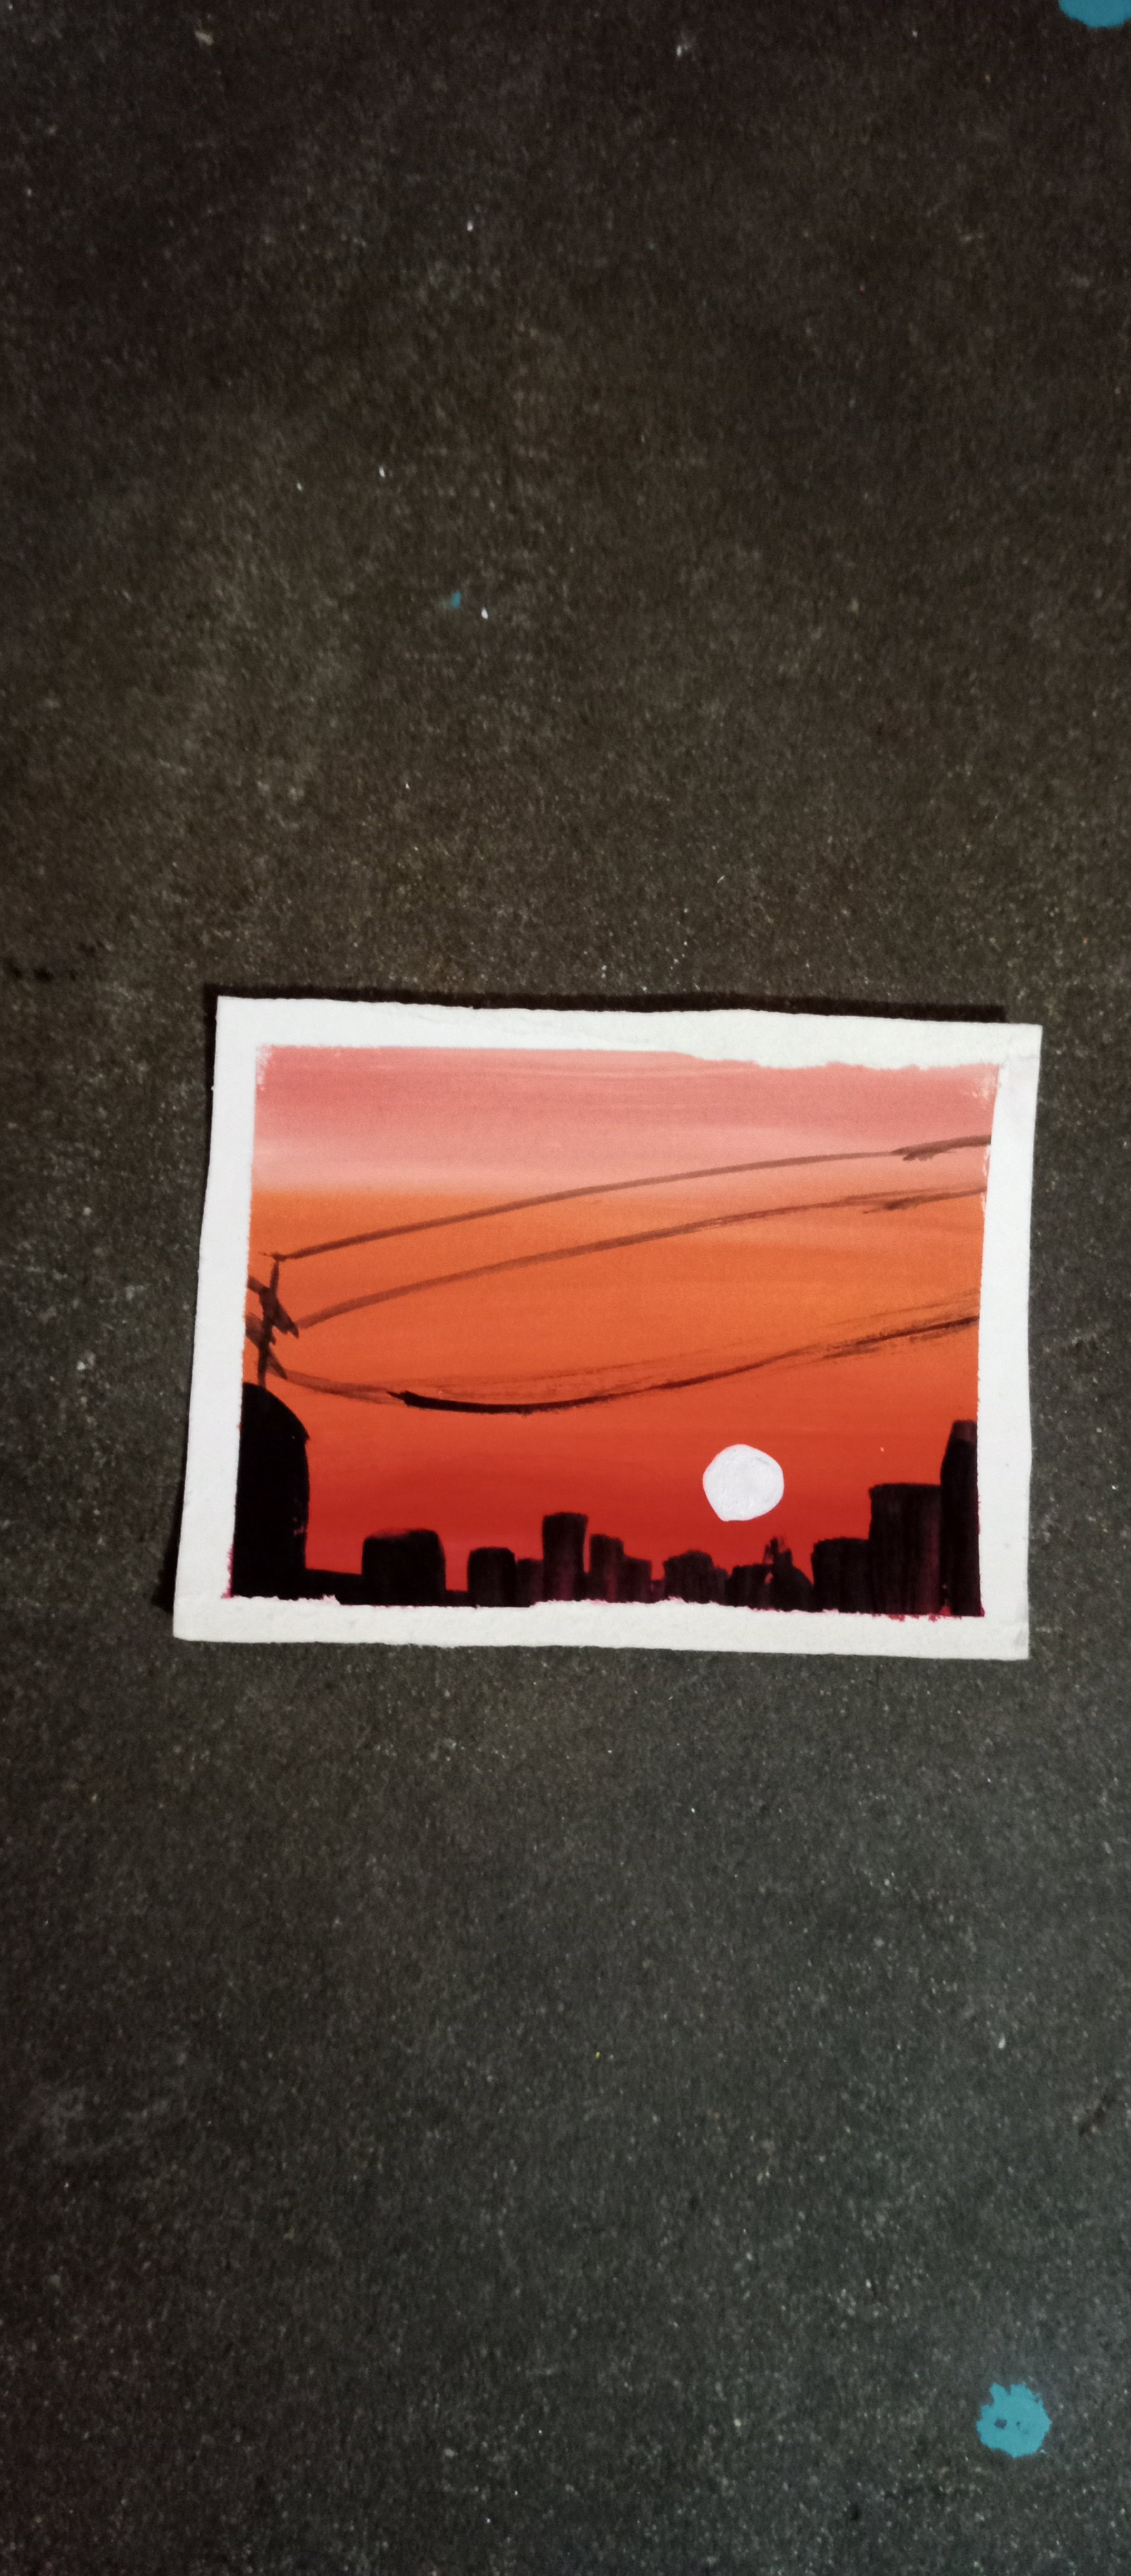
For this I let the paint dry first then I made some building silhouette with a liner brush with black color . Then I added the wires and poles too made all the building different from one another and removed the tape .Here is the final Result .
It's a palm sized painting and the thing I love is that minimal details make the scene look so realistic and real . I always have fun drawing these . The paints were fancy this time so they look more vibrant and pigmented but for beginners you can use the brands you have too . I Sealed this with Modpodge in end .
That's all for today Thank you for your precious time and support ❤️
LOH #163 Women in a unsafe world
I have always been vocal about Women safety and security . The world we live in is quite Unsafe for women even Children and yes we have to be openly vocal about these issues .About how to protect yourself , Good touch bad touch , How to recognize Shady people and how to be able to fight them .
First of all my Dad is a wonderful person he always even when I was a kid was teaching me about how I should behave if I felt unsafe , how I can identify a predator and what should I do.
So I think that's a great thing to tell your kids and teens too . Don't talk to strangers publically or on internet . Don't have a conversation regarding your information like address and family and never go to a place where they can be alone and attack you. If you're in that situation as a teen or a kid and you can't use any force bite them , Scream do anything to get away from them.
That being said for a kid Now as adult women we often are dealing with strangers . At work places or as you return to your home . Women are always looked as a soft target . Here are somethings you can do . Learn some basic martial arts to block their attacks and some kicks so you can defend yourself . But what if they have a gun? I simply would say keep a tazer gun , a blade ring , pepper spray always around u to grab . Cause you never know when you will need them.
Writing this I felt so awful like as a women you have to buy all that just to feel safe . I'm deeply sorry for this but it's true .
With a heavy Heart I have to end this Blog With this being said I wish you all the best to be the hero you always need Everyone of us has a wonder woman inside . Women are not fragile and also if you see another woman being targeted reach your hand out for her . We all need to can unite and create a better safe society together Never alone ❣️
The time I Laughed out Loud
Have you ever had a senseless most weird convo with your siblings and you just laugh out loud and burst into tears uncontrollably ? Have you ever had that kind laughter that makes your stomach ache as you snort for air ?
I surely do, me and my 5 siblings have a great bond we all stay in one room all day doing our stuff and everyday one of us does something entirely weird and awkward and we just laugh out loud. Yesterday i was just working on my laptop when out of no wear my 19 year old brother came in room with a weird braided wig and started to sing opera and my little siblings joined him too and started wiggling and dancing in the mid of the room . I at that time was sipping water and upon seeing them do silly things I snorted it out of my nose as i laughed like a total lunatic.
I laughed till my kidneys hurt later i started singing as well. It was something so awkward,so nonsense yet it is a memory i know i sure shall remember all my life.
In my opinion these little moments of pure joy are what make life worth living. I love spending time with my brothers and sister and having these nonsense awkward silly things . These are the moments I live for although when I see how in a few years we will be living separately and having our own families . From Siblings we will become guests to each other .
So I felt like writing about how we don't know how precious these relations are till they are away from us . We should all Cherish the quality time we have with family .
That's it for today ,Thank you for your precious time and support .
Splinterlands art contest week #270 (Gem meteor)
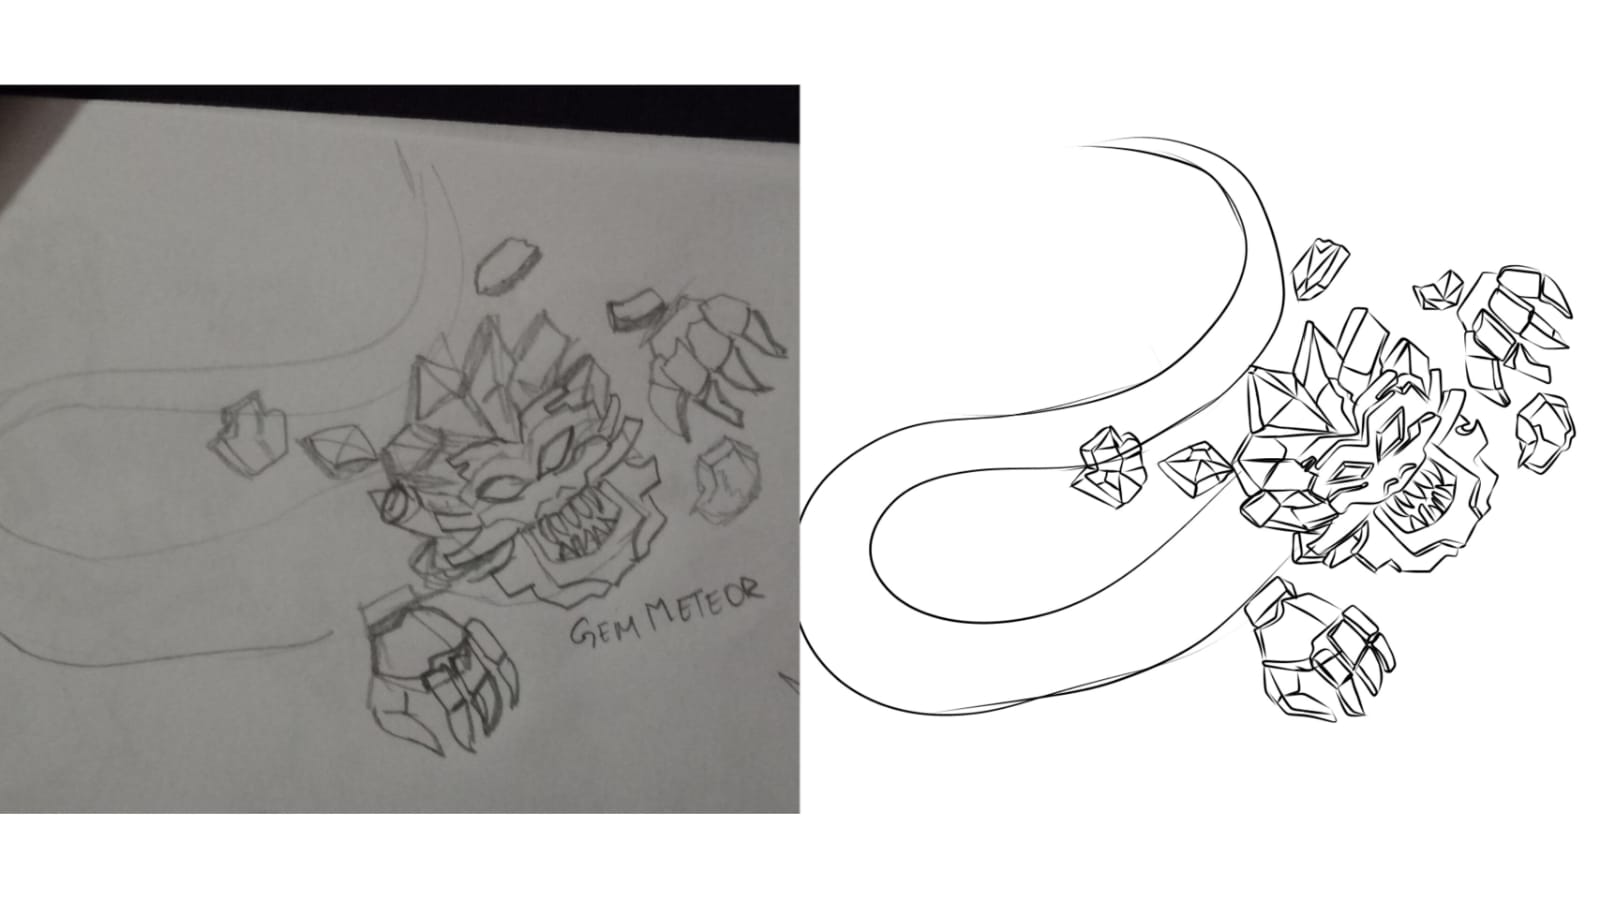
Every week I participate in the Splinterlands art contest and for my entry this week I'm drawing one of the Splinterlands card that is " Gem Meteor" .
The Character is like a Meteor crystal formed dragon like creature with claws and teeth and it's all just clustered crystals with a long tail of neon light. This is the first time I'm drawing crystal like characters so I firstly drew something similar on a rough sketch . This way I had a rough sketch to work with . Then in Medibang paint pro I made that rough sketch into more 3d crystal line art so the crystals are more defined.
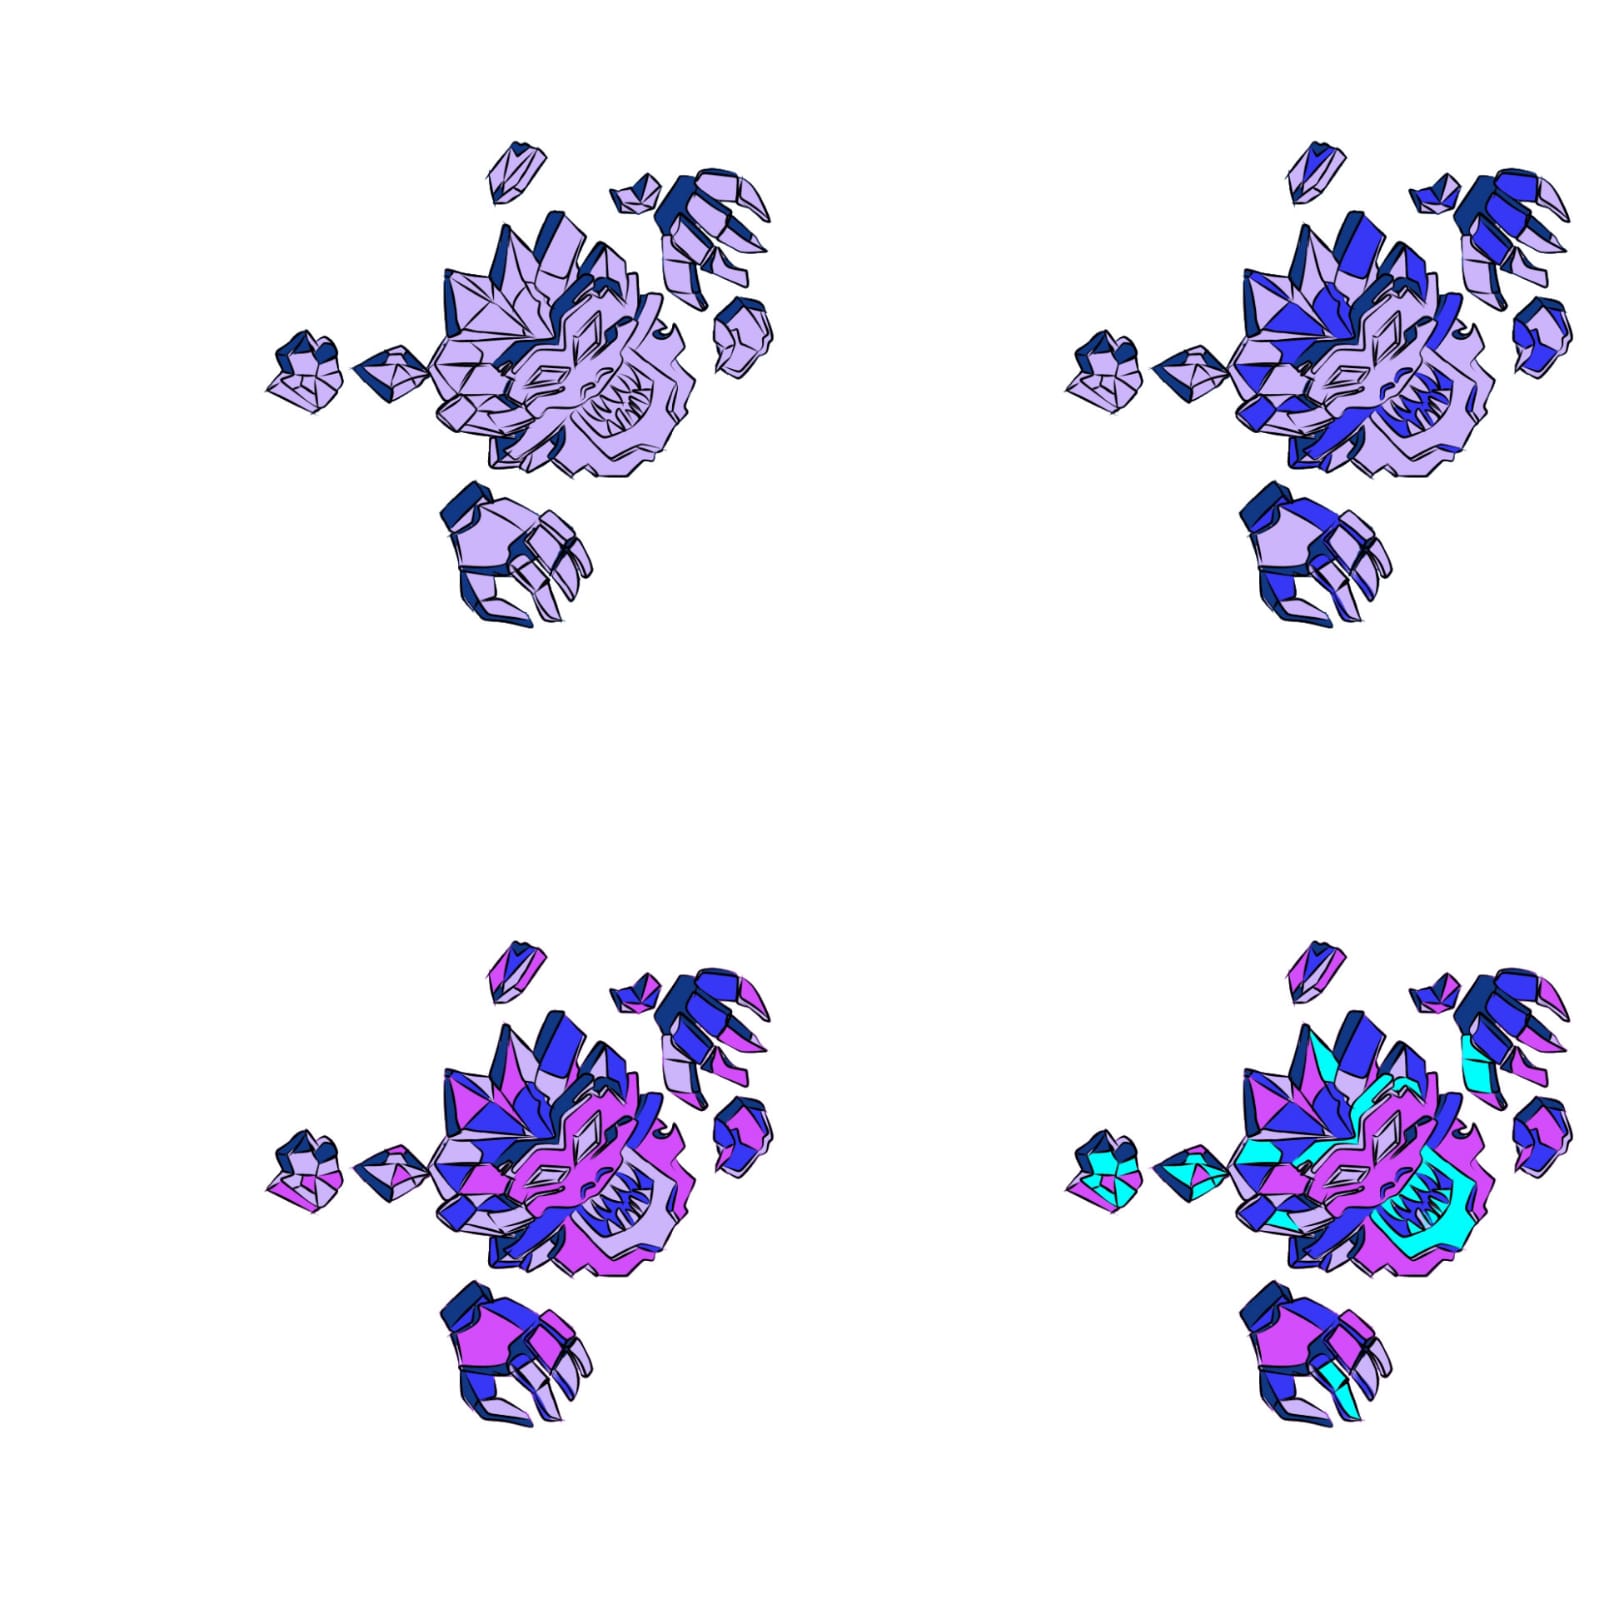
Next I just selected the tail and claws and filled a flat color layer of lilac color .Then I clipped more layers on top and filled the darkest Color on the crystals where the light was not hitting directly . After that I kept coloring the furthest crystals Dark and the nearest to light source more bright colors. Colors I used were Cyan, magenta , purple and royal blue .
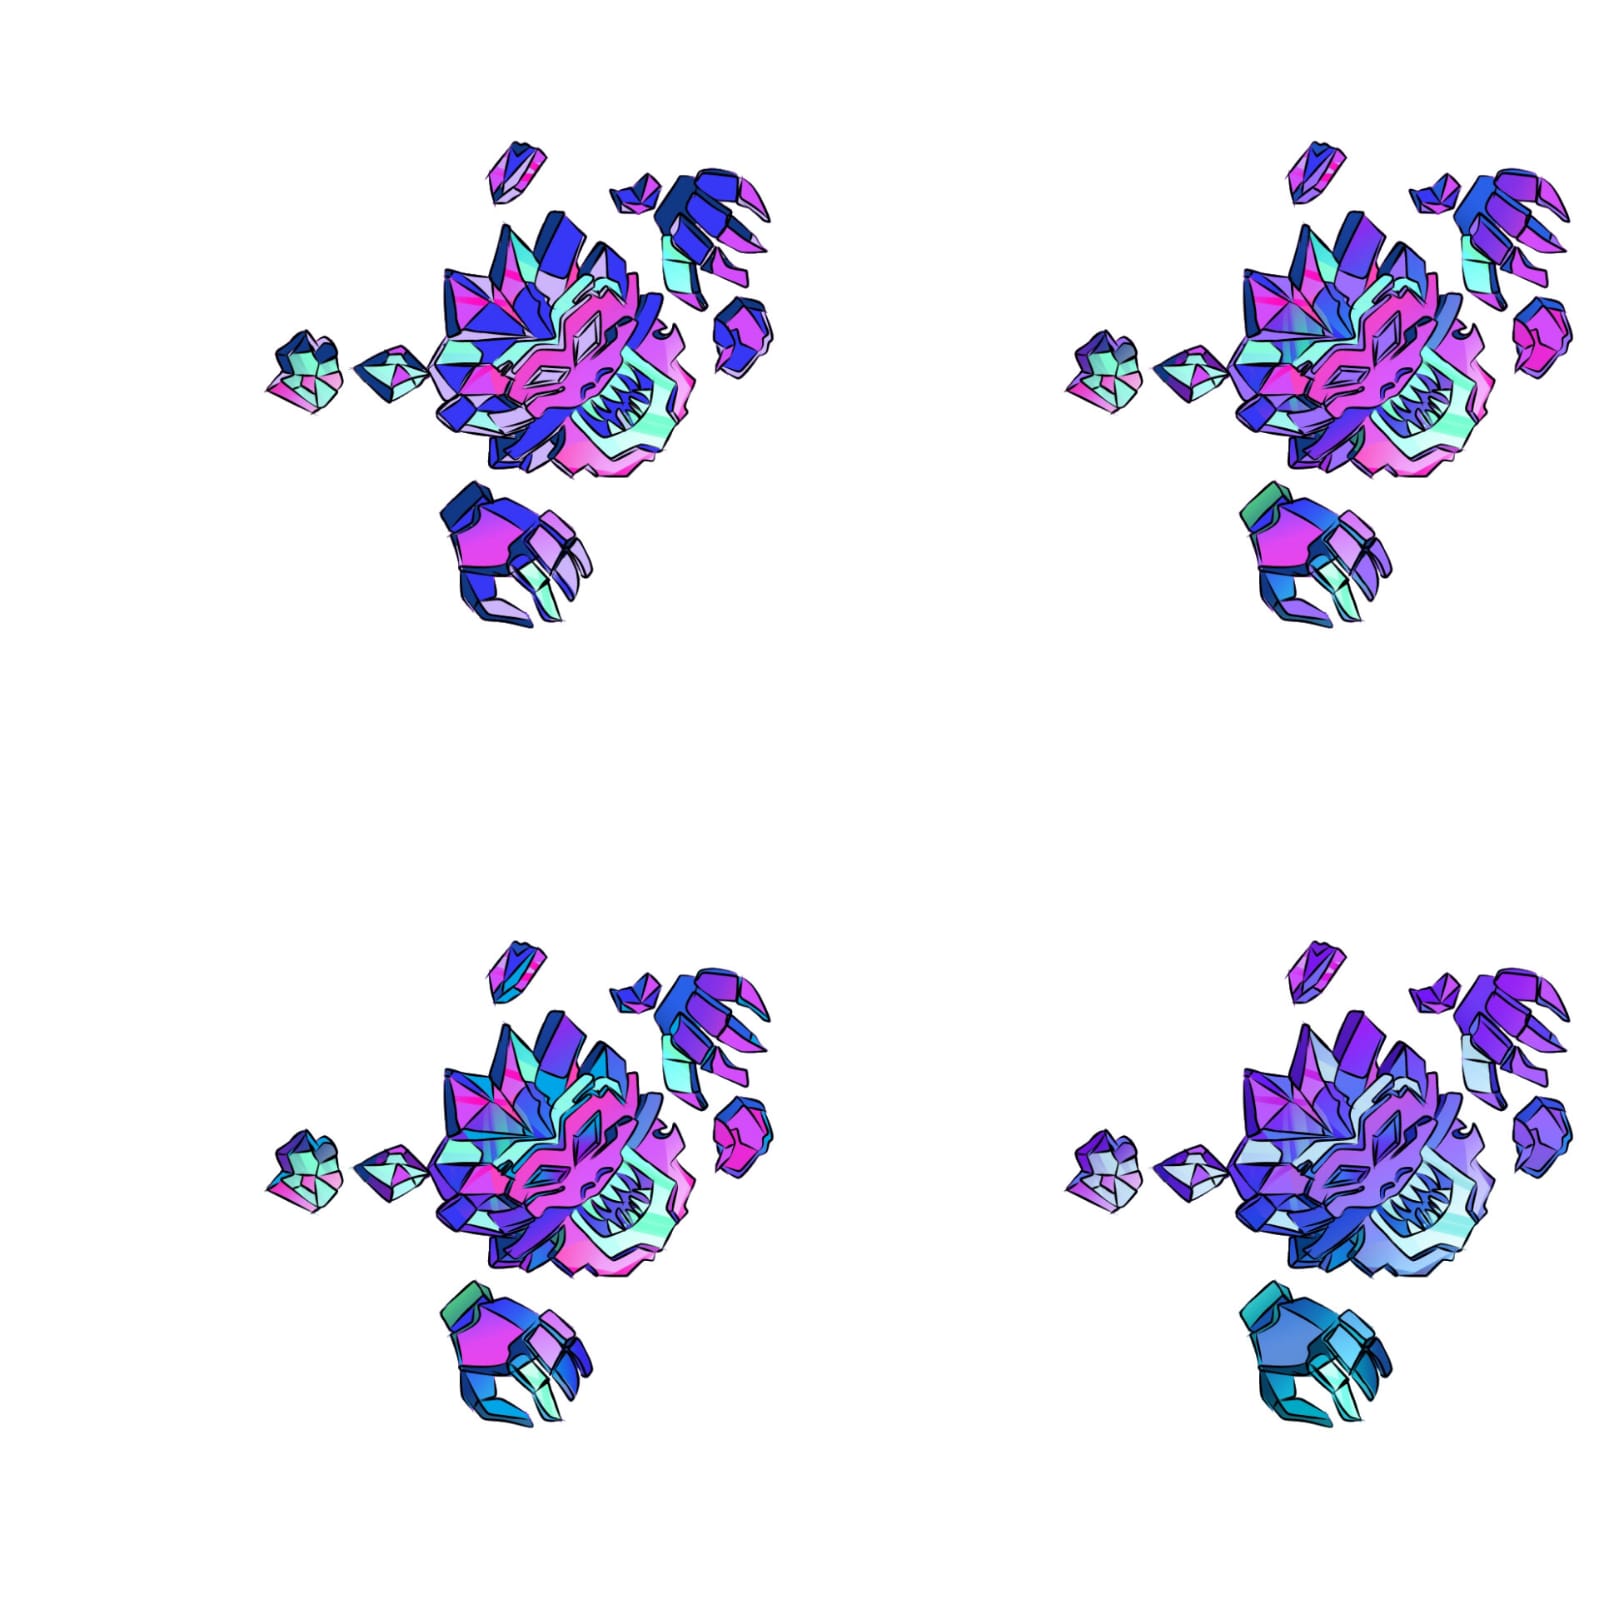
For the rendering part I selected each layer and just used selection tool to randomly add some brighter gradient or some gradient from the side crystal and I kept doing that for each crystal this gave it a very dynamic kind of glow . I added some Dark teal lines over the crystals too so it looks like it's shiny and reflective .
After that I added another layer on top to adjust the colors to a more purple blue setting I was really satisfied with the character here .
Now for the Back ground I added a Space line gradient with dark and neon shades some stars too . Then I added some cyan halo in the back of my character set that to Add so it looks like a very subtle glowy light coming. Now I added that light neon tail too with Pen sharp brush and on this I layered some sparkly multi shaded stars and set that layer to screen .
In the end I made some light adjustments and added my water mark and here is the final Result.
Thank you for your precious time and support ❤️
Weekly blog ( flowers from my garden)
So I'm here again with a new weekly blog this week was all about gardening as I have spent weeks installing some new plants in my garden .
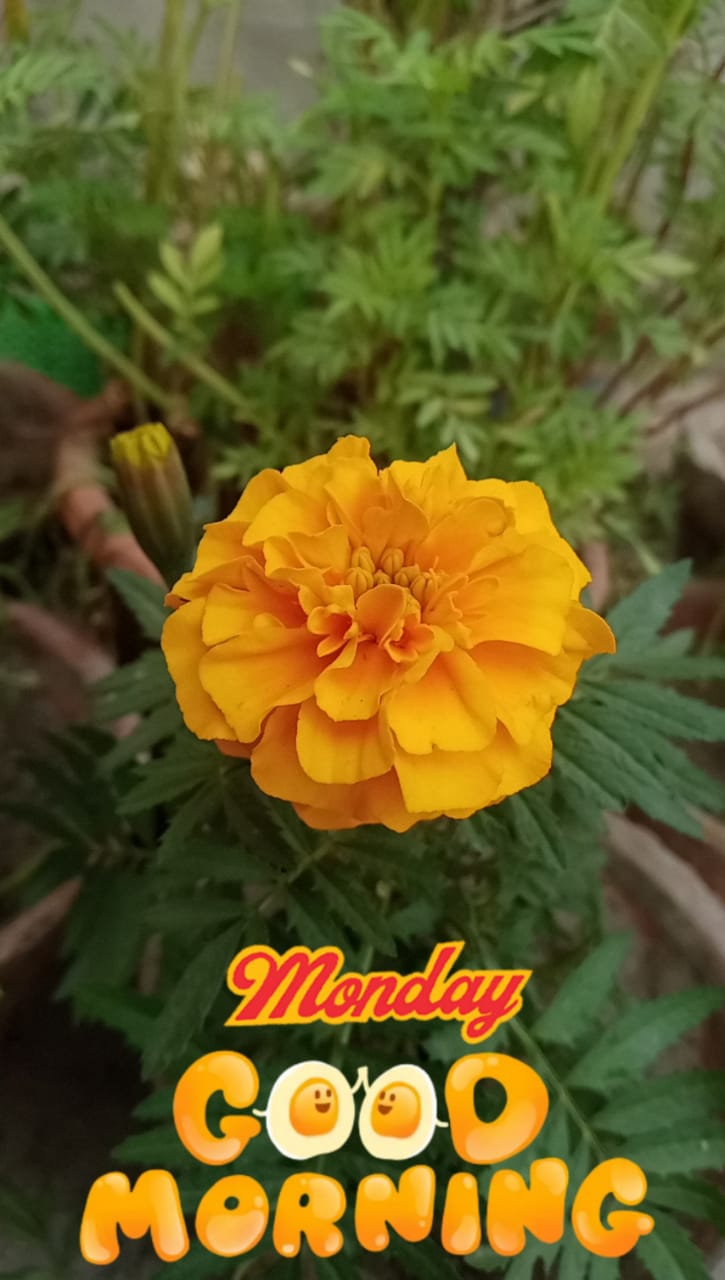
On Monday I photographed this marigold flower I bought about 5 of these all different shades and they just look so bright and fresh I love them ❤️
On Tuesday I actually had tons of flowers on my Vine and these are like pink 5 petal flowers. Idk what you call them in English but here we call them jharna bail .
On Wednesday I actually painted. Portrait with water colors it was super fun practicing that and you can see the textures I made as her fur and the hair I'm really happy to see this kind of improvement in my art.
On Thursday it was my Brothers bday and I got him a Chocolate cake with these chocolate gold coins he loved it .This was like a bento cake and it was really yummy . I always love little celebrations
On Friday I took this picture with all my tropical palms and green indoor plants I'm thinking of installing a table in between of this section to go have tea with family it just looks so good and green
Saturday was not such a big deal I was just studying some art class and making all these different heads and this one head was a fav that day
Then on Sunday I tested out different proportions and head study and that's all for my week .
How was your week do tell me about it in comments below
What does my dream life look like?
If i was to talk about my dream life it wouldn't be like to buy gucci or Dior. It wouldn't be living in a mansion with house helpers doing everything. It wouldn't be being the most wealthiest person. Most people would want gold and riches and every luxury in their life which is fine too but for me ,My dream life is really simple something that brings me inner joy .
Its a spacious apartment with minimal furniture. All walls painted white with plants and succulents in every corner to remind me of nature. A big room with a large window to see the beautiful view outside more like a farm or
country side just peaceful and unpolluted. As i sit beside an easel painting my heart away on a canvas. That's what i want to have peace and a space where i could practice my art and sell them for a living. To do what a love to be surrounded by what i love just a positive peaceful place. I just love being around greenery and nature . The house I live in now has no garden space so I made my own rooftop garden just to feel near nature . For me Simple and minimalistic peaceful life is all I would ever need
I hope one day i can have that amen.
That's all for today , Do tell me in the comments below what is your dream life?
Thank you for your precious time and support ❤️
Sketching Lana del Rey
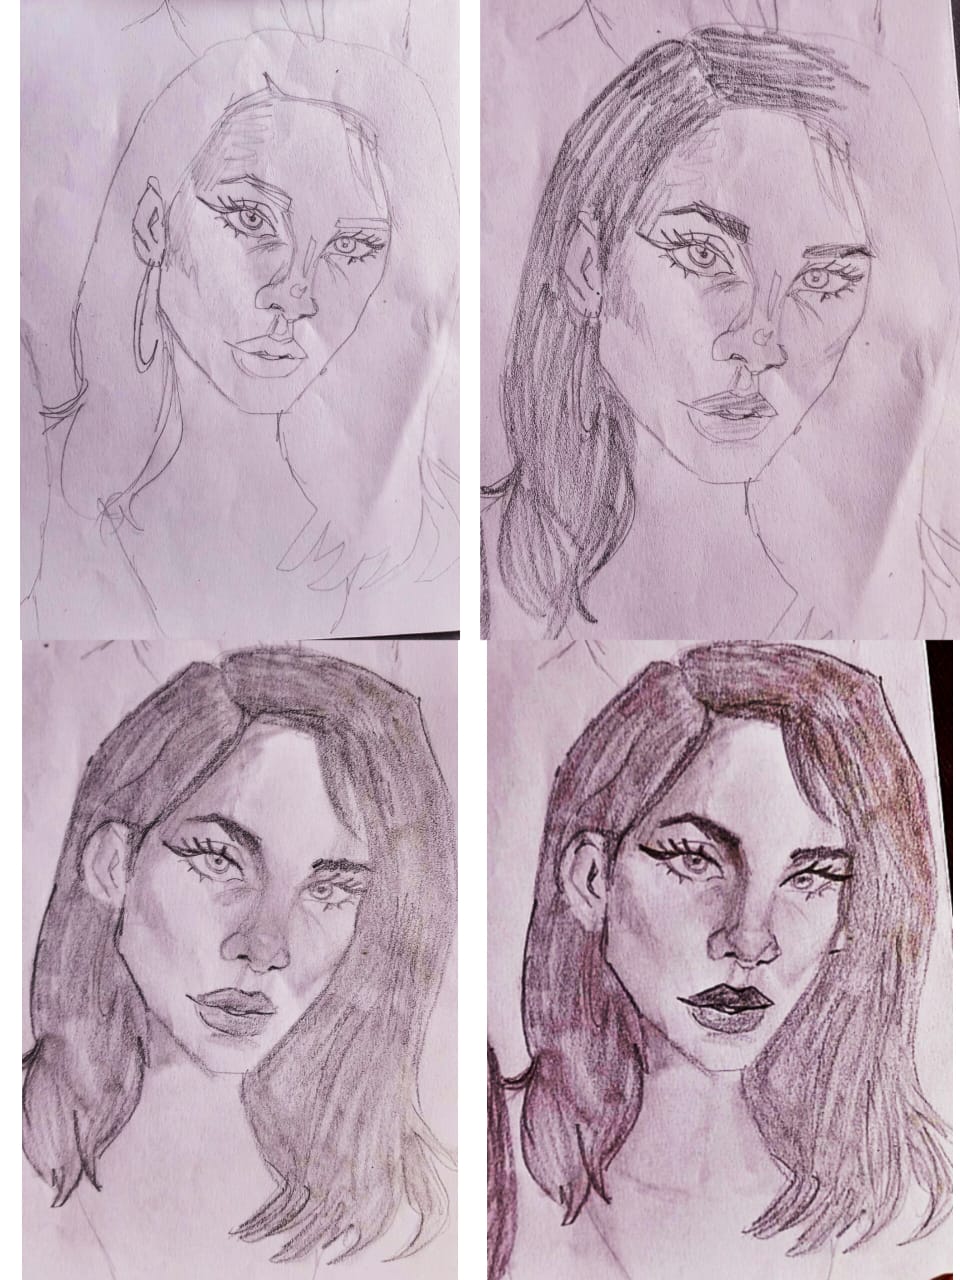
So if you know me in real you would know I'm a huge Lana Del Rey fan.
I mean vintage old sounding music has always been a vibe and Lana is a masterpiece herself so I wanted to draw her.
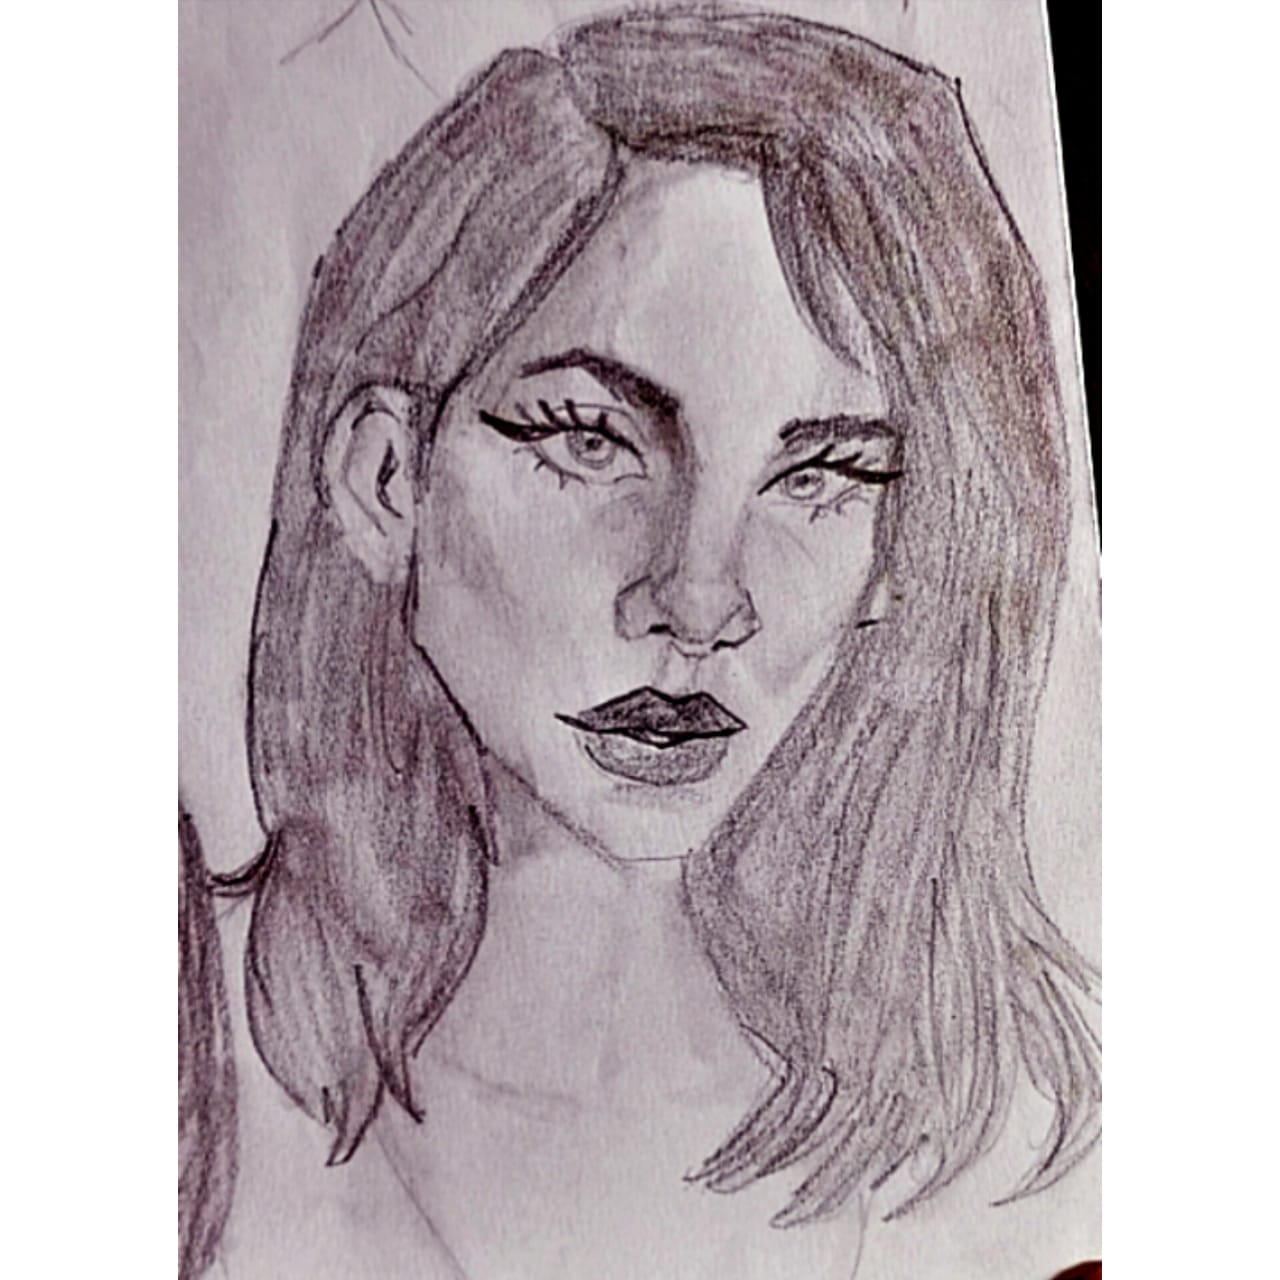
Here is the attempt I made she is so gorgeous.
So I always Start with the Andrew Loomis method and just erase the rough parts keep repeating until I have a good sketch then I trace it on my sketchbook with a graphite and then I work with the rest
So here after tracing I went on and started shading her hair and eyebrows with a 3b pencil her nose is really geometrical and her eyes are in depth , her face plates are really visible .
But later I changed her hairstyle a bit because it made her forehead quite big . After hatching everything I blended it all with a blending stump and re shaded some parts and her contours with a 4b pencil
And here is the final result.
I did some major mistakes like you know I completely forgot to re add her earrings and I changed her hair but overall it still looks like her . I will be again sketching her cause you know that's how you learn . I think Mistakes make your foundation better in arts you make mistakes then next time you correct them so I was happy doing this.
Thank you for your precious time and support ❤️
Painting more Pink Sky (miniature paintings)
I love painting miniature paintings lot and today I felt like painting some more pink sky so here I'm .
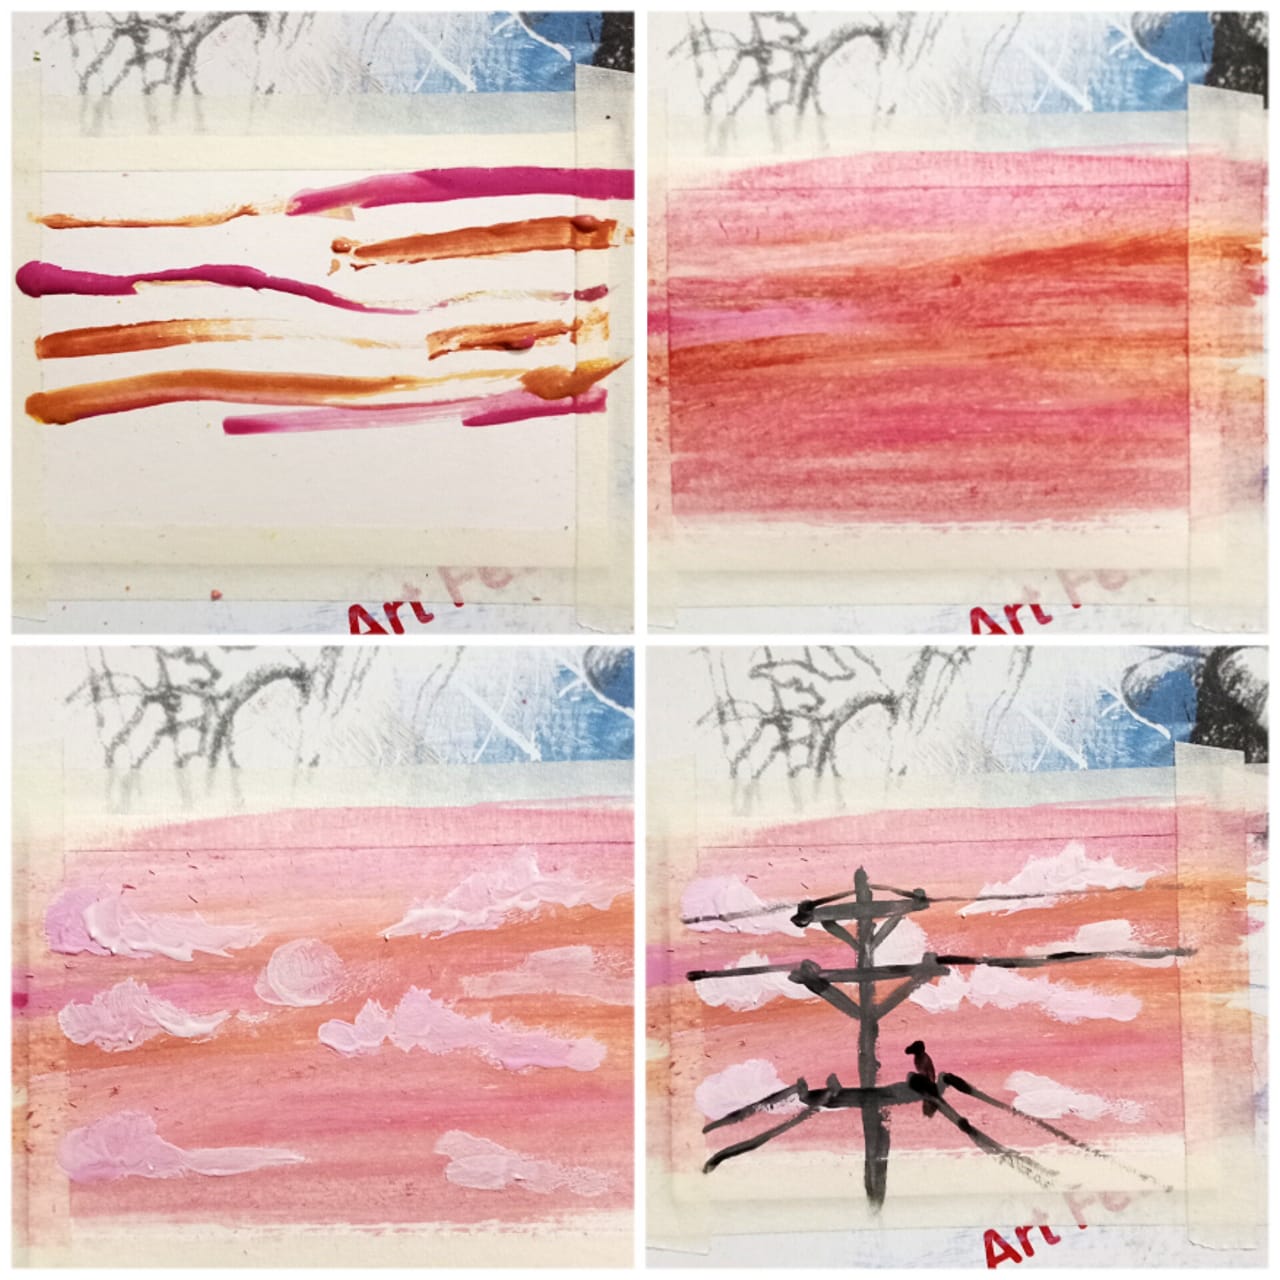
I took a 4×6 inch cartridge paper and taped it's edges on my old sketchbook tbh you don't need fancy papers or canvases to start you can always paint old boxes even I used to do that too . Utilize anything you can paint on.
So I started by dabbing some red and pink paint splashes on the paper then I blended it with a dry brush so it looks like sky gradient.
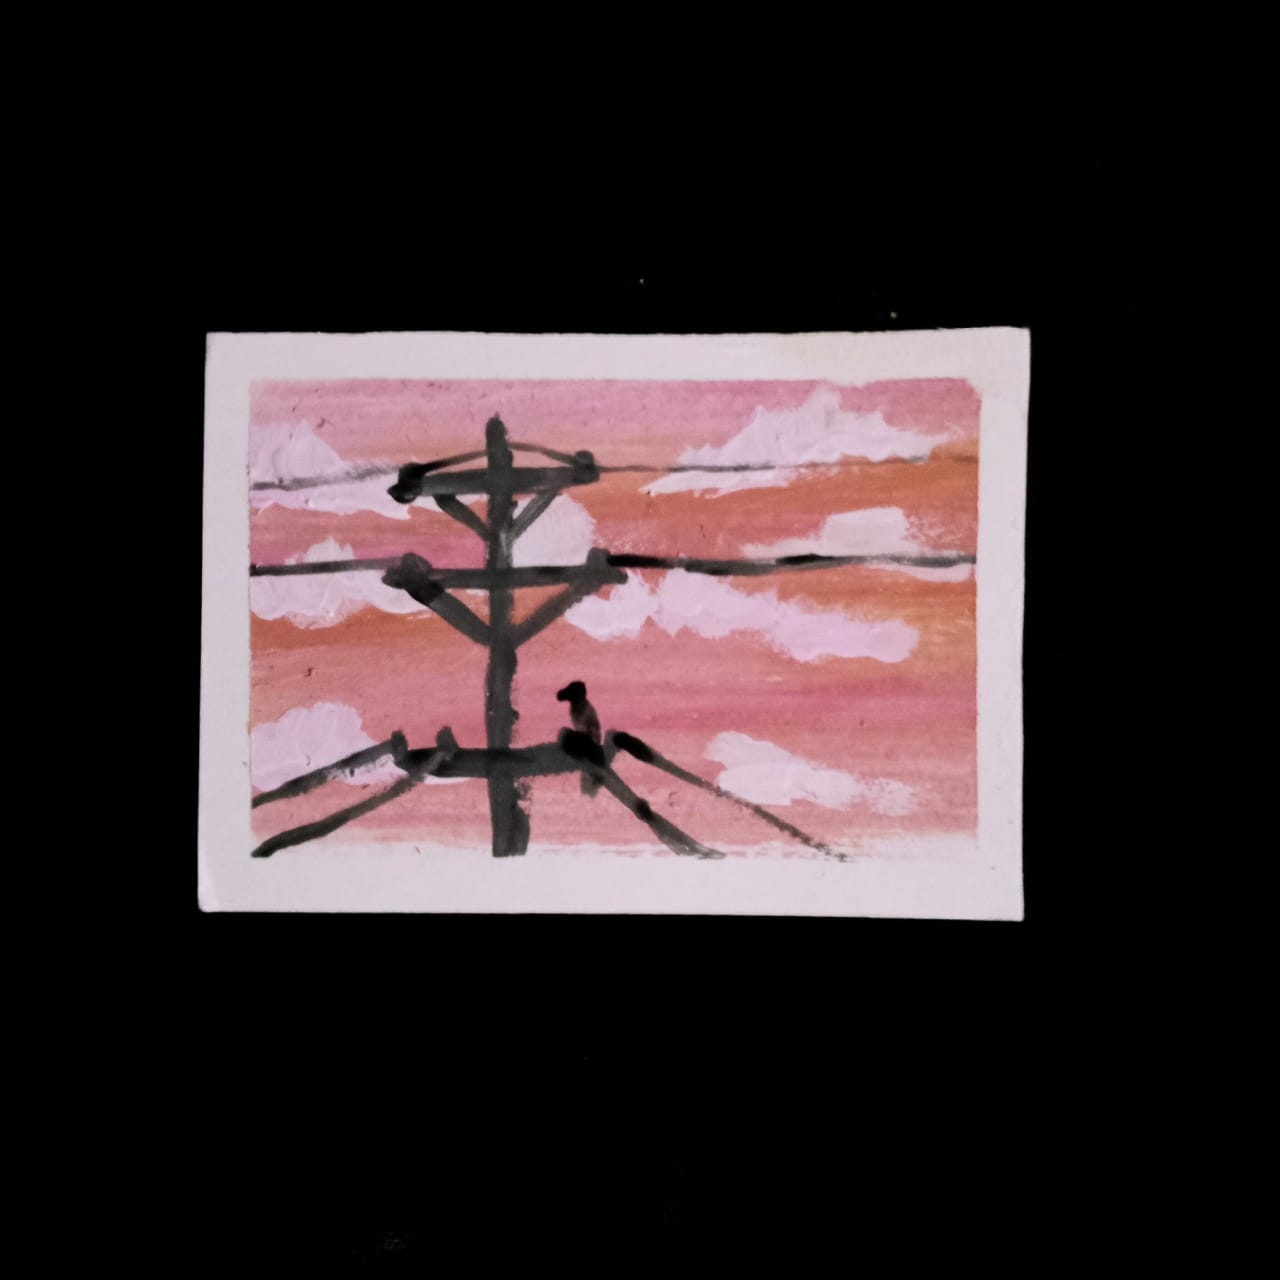
Sky can have more than one hue and that's why I used some orange splashes too blend it all up now with a dry round brush I added some white clouds by dabbing the paint brush on the paper and I moved it in a circular manner so it looks like a cloud that's our sky but the canvas seemed lonely so I added a silhouette of Electric pole with wires and for that I used black paint and a thin brush I also added a moon to the sky and a crow that's sitting on the pole .
The painting is mini so it doesn't need alot of details it's like a thumbnail painting and it should be all about expressing yourself and being happy .
The paints I used are from dollar store as I was painting with my siblings .
As I said it's about having fun and expressing yourself rather than using fanciest materials and not being satisfied . I encourage everyone to try this play with colors do it differently it's fun and everytime you have a different lil painting.
LOH #162 I would like to see the Future.
Every week Ladies of Hive community (LOH) gives women two topics of discussion and LOH week #162 topic is to talk about whether you would like to see future or would you like to see the past?
For me I choose to see the Future and here are the reasons why?
Personally the past 5year version of me would never have guessed the success I have , the better I have become like I have done things that were unbelievable for the 5 year ago version of me . That is why I wanna see the Future me like did I do any more improvement whether as an artist , whether as a personality , whether I learnt more skills I wanna see how I. Have dealt with adult hood . Hopefully I would be married by then and happy I would wanna see that too .
I would wanna see if I came over my illnesses or improved my health . I wanna see my siblings successful so Seeing the future would be great .
As for past I don't believe in regrets and remorse so I wouldn't wanna change anything at all in my past instead I am a believer that all happens for your good and failure leads to success so I wouldn't wanna see past at all. But like no one can see their future or past but we can make it better by focusing on Present so yeah do that .
Well that's my take on the topic , I'm eagerly waiting for everyone else to talk on this too .
Thank you for your precious time and support ❤️
Splinterlands art contest week #269 (water elemental)
Every week Splinterlands community helds an art contest on Hive and the format to take part is that you have to draw one of there characters from Splinterlandscard in your own style (you can use whatever art medium you want, just no tracing and. Copying someone else's art work it's like a dtiys , every I'd can take part once a week in this )
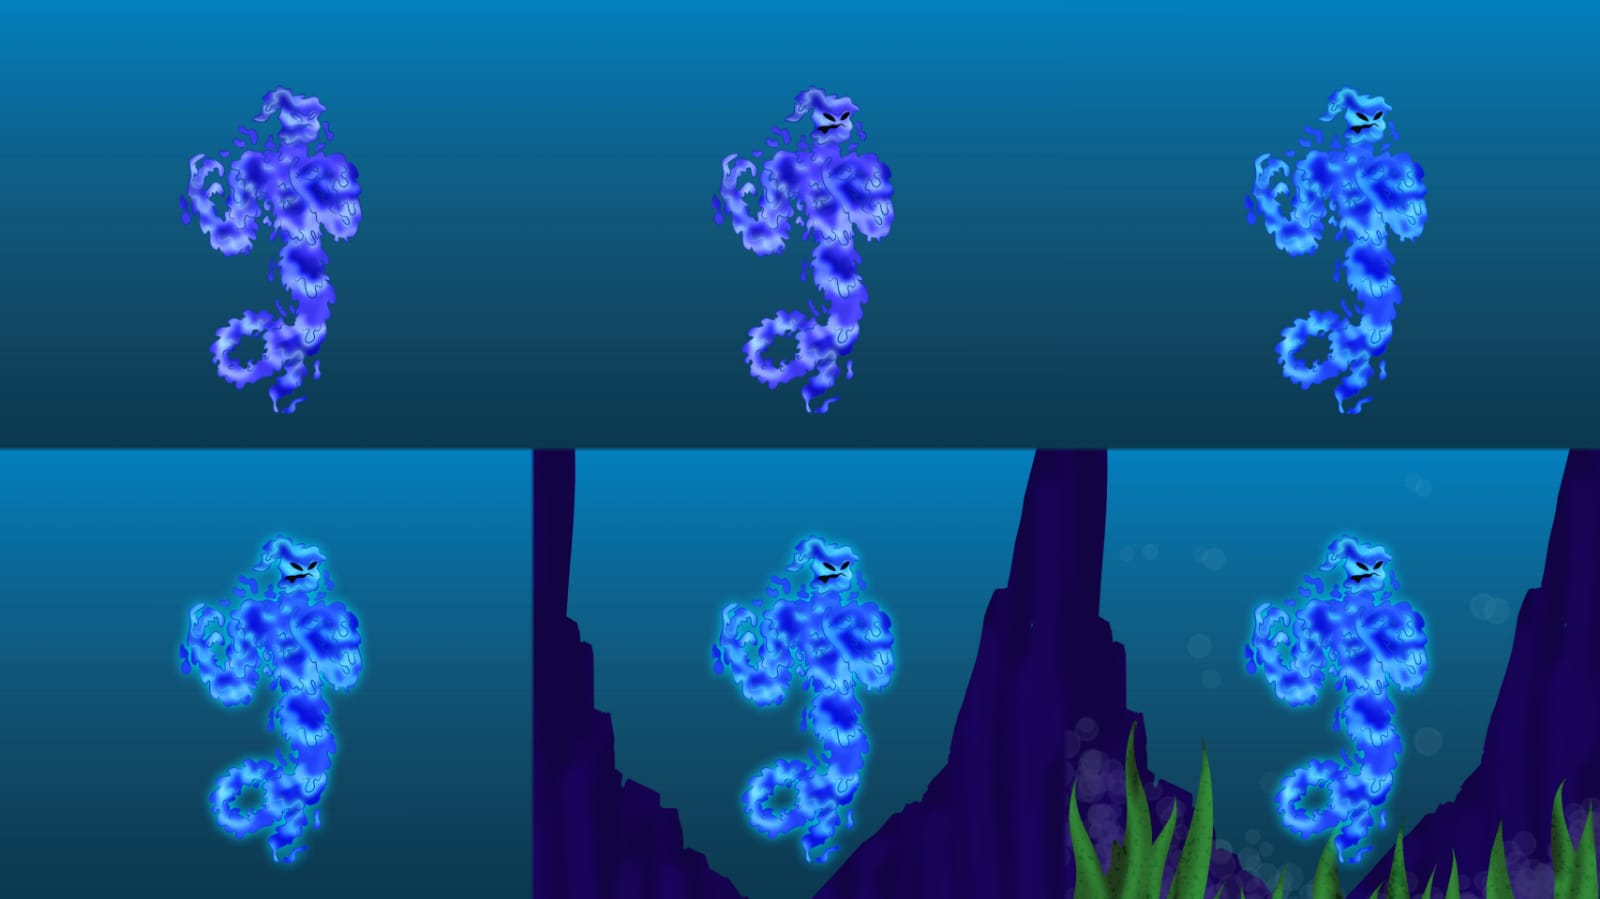
After that little intro here is my entry for the week #269 and today I'm drawing the character called water elemental .
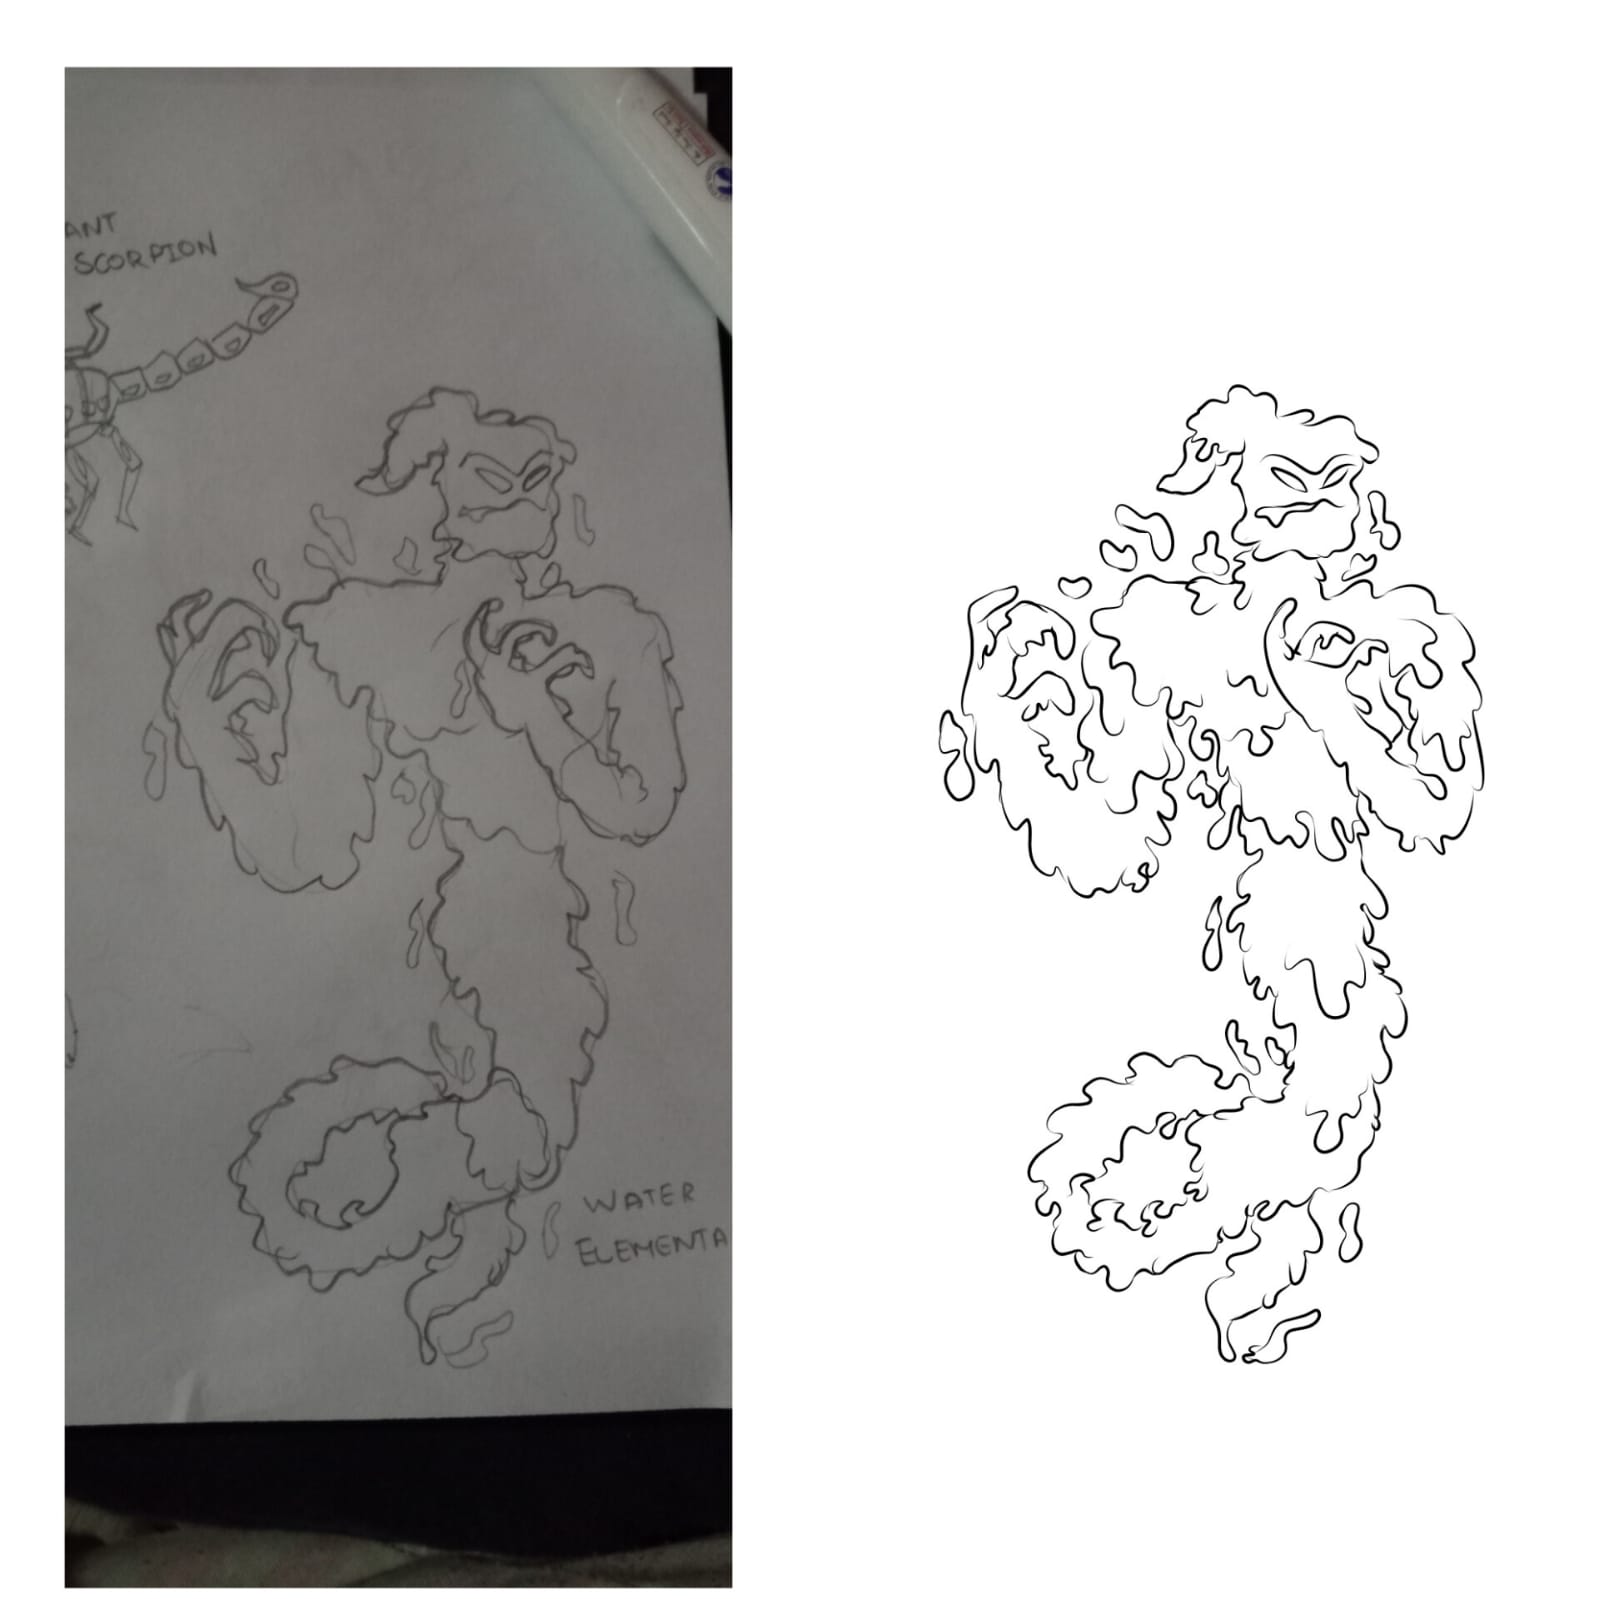
Let's talk about the characters main characteristics so it's like a water genie. That's made of water and is like wobbly and there's drops and spills around him so that's exactly what I kept in mind while sketching the facial features were also not so visible so we just made some squiggly mouth and two eyes . Another thing that this character only hand three fingers in his hand .
After I was done with the sketch I digitally converted it into a lineart with a pen sharp brush. I just made some drop like shapes and spills too .
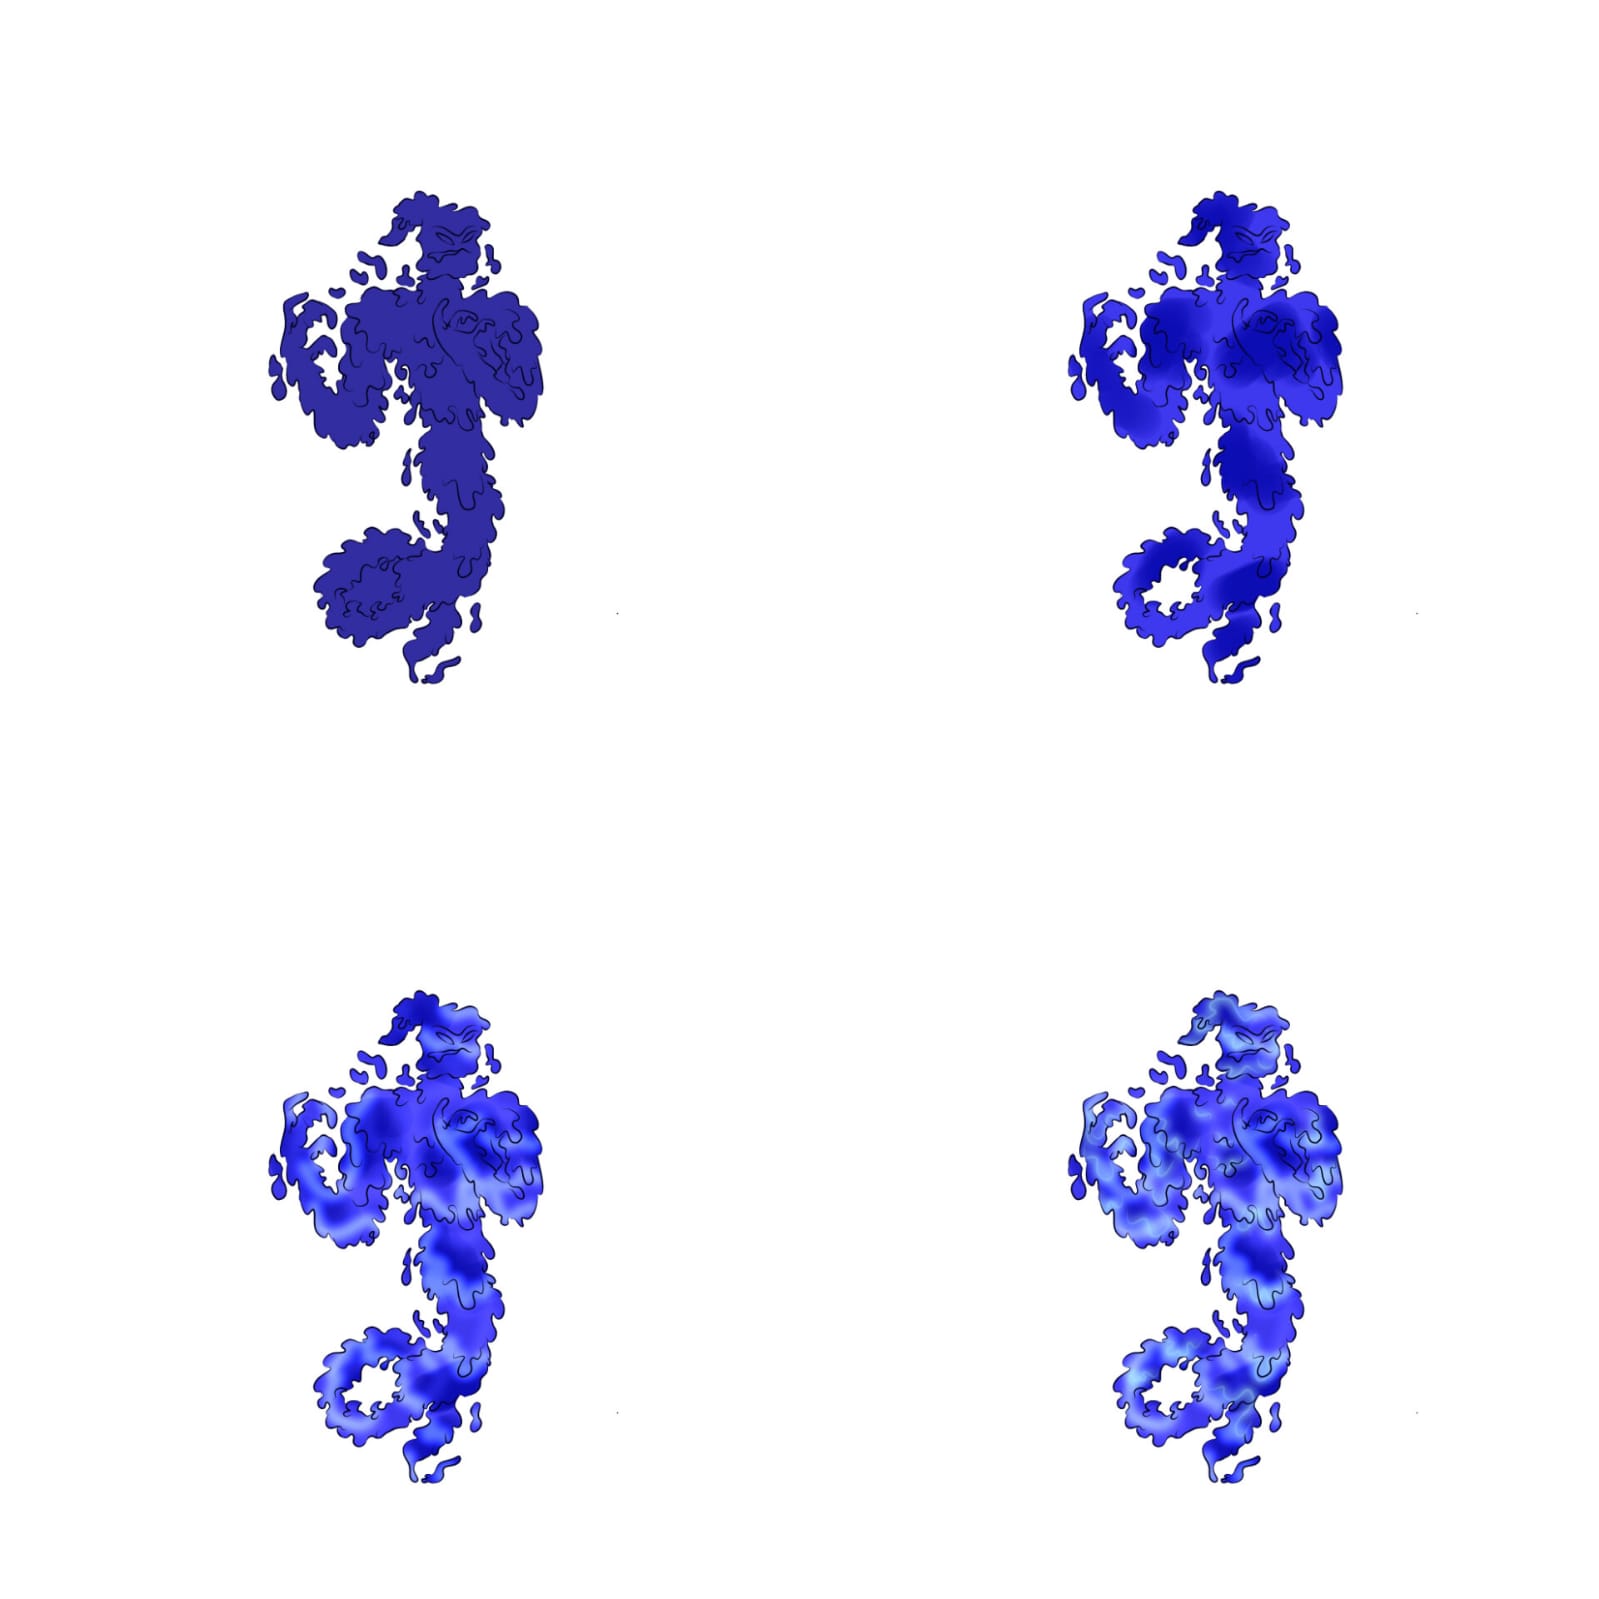
The second step is to add our flat colors since this character is all about water no dress code or any accessory we would just focus on rendering the water like texture.
So I colored it all a deep blue and then clipped a layer to shade some darker areas then I took a pale blue color and added some more highlights near the drops and lastly I used a teal color to just put on some highlights
So our main character is almost done I just put it in a folder and clipped a new layer on top with hard light and filled it with a lighter color this just made the character all glowy .
Now for the background I used a sea green colored gradient as I water my character to be under water then I added some glow to him and some rocky color in the back and some seaweed too
I didn't want much focus on the background so I blurred it a bit and here is the final result .
Thank you for your precious time and support you ❤️
 @Biyaawnurr