 @BR
@BR
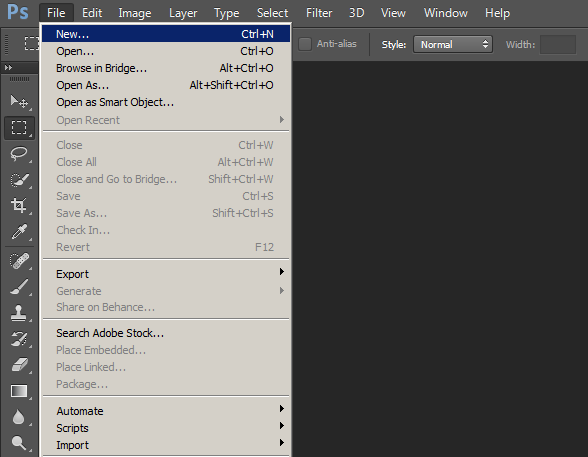
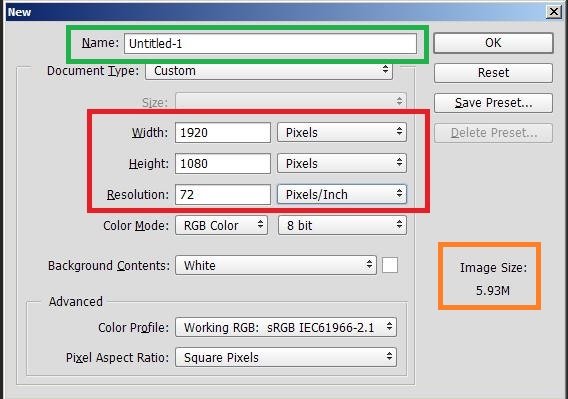
How to make your own LOGO - Photoshop Tutorial w/ Images (Simple but Cool) Everyone now a day is taking pictures and videos using their smart phones and they are uploading those multimedia files in any social media platform they have account to. Some are just uploading those multimedia files as memories of their own with their family and friends, and others are also using those files to make money from (Vlogers, YouTubers etc). You don’t need to hire and pay someone to create a logo for your videos, so I’m making and sharing some simple tutorial that can help everyone that no one can take ownership with what they have created and uploaded to their social media accounts. This is a step by step tutorial on how to make a logo of your own using Photoshop and in which in my case I am using Photoshop CC 2015. You can also use other version of Photoshop in creating the logo because they all still have the same features, tools and commands. To start off; open your Photoshop application installed in your computer and click on **“******File******”** then **“******New******…”** and a pop up window will show in which you will select or input the size of the new layer that you are about to create. When the selection window shows, you can select the Width, Height, Resolution in Pixels, Inches, Centimeters, Millimeters etc., but for this tutorial we will have to select it in “Pixels” and input: **1920** as the **Width** Pixels size **1080** as the **Height** Pixels size **72** as the **Resolution** Pixels/Inch size `(See the Image Below highlighted in Red Box)` We can also input **“300”** as the new layers Resolution if you wanted to print out a hard copy of the LOGO, but for the sake of this tutorial we will just stay for the standard resolution of **“72”**. You can also edit the name of the new layer that you will be creating by clicking the name box `(see highlighted green box)` and you can also see the image size of the layer that you are about to create `(see the highlighted orange box)` then after selecting and inputting click **“OK”**. After creating our new layer for our LOGO, hover the mouse pointer to the layer that you have created `(see highlighted green box)` right click and tick **“layer from background…”** and just hit **“OK”**. So that the new layer will not be locked as a blank background. After that, navigate to the left side corner of your tools and right click `(see image)` and select **“Paint Bucket Tool”**. We are going to use this to change the background color of our new layer. After selecting the **“Paint Bucket Tool”**, navigate to the color picker tool `(see highlighted green box)`, click it and select whichever color that you are going to use for your new layer background color. You can click the sample colors or input numbers or input in the color code at the bottom. For my case in this tutorial I am using this color somewhat blue or sky blue or turquoise blue. (But whatever it is, for me it is color blue haha) After selecting which color you will use, hit **“OK”** and click in your new layer to change the background color. Now we are ready to create our own LOGO, and as for that we need to create some shapes first in which case for me I am going to use a circle shape for my LOGO. Navigate your mouse pointer to the left side and right click the shape tools and select any kind of shape you are going to use for your LOGO. For this one I am using the **“Ellipse shape Tool”**. After selecting the ellipse shape tool, hold the **“Shift”** button on your keyboard and hold left click and move your mouse to create a perfect circle. `(Note: if you are not holding down the shift key on your keyboard, you cannot create a perfect circle).` After doing a perfect circle, click the fill selection tool at the top left `(see highlighted red box)` and choose white color so that the circle that you have created will change its color into white and you can be able to see it. As you can see in the previous image, the circle is at the right side of the layer. So we are going to move it at the exact center of the layer. First you have to select the **“Ellipse shape layer”** at the right side panel `(see highlighted red box)` then press **“Ctrl + A”** on your keyboard, then click the **“Move tool”** `(see highlighted orange box)` then click the second and second to the last option `(see highlighted green box)` and finally after doing those, press **“Ctrl + D”** to deselect the layer. Now we have to create another circle and put it inside the first circle that we have created. Again, click the ellipse shape tool, hold shift button, and create a perfect circle (only somewhat smaller). Then the same thing also from the previous image we have to move the second circle at the center of the background layer so that it will get inside the first circle that we have created. Select the second circle at the right side panel, press **“Ctrl + A”**, click the move tool and select the second and second to the last option at the upper panel. It will be hard to see the second circle that was created, so we need to change its color first. In changing the color, we can either use the **“color picker tool”** on the left side panel `(see highlighted red box)` or just double click the created layer in the right side panel and change its color. In my case I make it color black. `Note`: to change the size of the circle, click first the created shape in the right side layer panel then press **“Ctrl + T”** then hold **“Shift + Alt”** key on your keyboard and hold left mouse click and drag the corner of the guide and confirm. After doing so, we need to combine the two circles that we’ve created by clicking both the ellipse layers `(see highlighted green box)` then click on top of the panel **“layer”** a drop down menu will show then click **“Combine Shapes”** and **“subtract Front Shape”** (`see highlighted red box)`. After the result shows, we need to make a copy of the last layer that we edited. Just press **“Ctrl + J”** to copy the layer, then click on the copied layer and press **“Ctrl + T”** key on your keyboard then hold **“Shift + Alt”** key then drag the corner of the guide and make it a little bit smaller then confirm. We need to make the inner circle to be a bit thicker and to do this navigate first to the left side panel and right click then select **“Path Selection Tool”** `(see highlighted red box)`. After selecting, click the inner part of the second circle to select the path that we need to edit `(see the highlighted orange arrow)`. To make sure that we selected the correct path, look closely at the square dot that is showing in the line of the inner circle `(see highlighted yellow circle)`. The next thing we need to do is to thicken the inner circle by pressing **“Ctrl + T”** on your keyboard then hold **“Shift + Alt”** then drag the guide and make the inner circle a little bit thick and confirm. Then change the color into white by double clicking the layers and changing its color `(see highlighted boxes)`. Now we are going to create the final circle. Navigate your mouse pointer to the bottom right corner and click on create new layer `(see highlighted green arrow)` then select the shape tool; right click and select ellipse shape `(see highlighted red arrow)` then draw the circle hold **“Shift”** button on your keyboard and drag your mouse pointer. After doing so, click the ellipse layer that you created on the right side panel `(see highlighted yellow arrow)` then click move tool `(see highlighted blue arrow)` and select at the top tool panel `(see highlighted white box)` select the second and second to the last option. Lastly, make the color of the last circle as white by double clicking the ellipse layer in the right panel `(see highlighted yellow arrow)` and a pop up option will appear then select the white color. Now we are about to finish putting all up the circles that we needed for our logo and we just need to create a final simple detail first to the final circle. First make a copy of the last circle, click the ellipse shape layer in the right side panel `(see highlighted red arrow)` then hit **“Ctrl + J”** on the keyboard and a copy of the layer will appear `(see highlighted yellow arrow).` Then double click the copied layer and change its color any way you want to distinguish the copied one to the original one. After doing so, hit **“Ctrl + T”** on the keyboard to highlight and guide the copied circle, hold **“Shift + Alt”** on the keyboard and drag the corner of the guide to make the circle smaller. Now, make sure that you have selected the copied layer and also the shape tool `(see highlighted red arrow)`, then at the top tool panel select the fill to **“no fill”** `(see highlighted yellow arrow)`, the stroke to **“black”** (see highlighted green arrow), then thicken the stroke may making it **“9 pt”** `(see highlighted blue arrow)`, then make the stroke strike into **“dotted lines”** `(see highlighted pink arrow)` and finally right click the copied layer in the right side panel and select **“rasterize layer”** `(see highlighted black box).` Now we need to make the detail of the circle to be the same color and accurate to the logos’ detail. First, hold **“Ctrl”** on the keyboard and click the copied circle in the right layer panel and hide the eye of the layer so that detail will disappear and what we can only see is the highlighted selection of the detail. `(See highlighted red arrow)`. Then click on the original circle layer `(see highlighted yellow arrow)` and click the layer mask icon at the bottom right `(see highlighted green arrow)`, after that make sure that the layer is still selected and press **“Ctrl + I”** on the keyboard. Now the detail is fine and good, we only need to do is to group all the layers that we have created by selecting all the layers in the right side panel by selecting the top layer then hold **“Shift”** key on the keyboard and select the second to the last layer `(see highlighted white box)` and press **“Ctrl + G”**. So now we finished creating all the circles that we needed for our logo. What we need to do now is to put a text for our logo to be extinguished genuinely. First, navigate to the left side tool panel and select the **“type tool”** `(see highlighted red arrow)`, then drag the mouse pointer anywhere and start typing whatever word, name, title etc. `(see highlighted blue arrow)` and as for this tutorial I am using my nickname. `Note: I am using a different font (Krinkles Regular Personal) for the text that I have used to this tutorial and you can download the font link` here `this is free but be responsible in using whatever font you downloaded.` https://www.dafont.com Now that you have typed in your text, make it a little bit bigger by double clicking the text layer thumbnail to highlight the text that you have typed `(see highlighted red arrow)`, then navigate at the top tool panel and change the font size of the highlighted font `(see highlighted blue arrow)`. You can also add another text for your logo, the same as what I did I added two more text using the same procedure. `Note: You can rotate the text by clicking the text layer in the right panel then press “Ctrl + T” click the move tool and click + hold left click mouse button and move it anyway you want.` Now we have to apply a layer mask to our logo and an outside stroke to our text to make it look neat and cool. First, hide the eye icons `(see highlighted yellow box)` of all the text and only selected the **“TUTORIAL”** text that we will be going to put some stroke with. Hold the **“Ctrl”** button on the keyboard and click the text thumbnail in the right panel `(see highlighted red arrow)`. Then click the group layer `(see highlighted yellow box)` and click the layer mask icon at the bottom `(see highlighted red arrow)`. Then press **“Ctrl + I”** on the keyboard `(see highlighted yellow box)` and activate again the eye icon of your text layer `(see highlighted red arrow box)` then make sure to select the text layer and in the fill make it `“0 percent”` `(see highlighted green box)`. Now right click the text layer and select **“Blending options…”** In blending option menu, select **"stroke"** `(see highlighted red box)` then in the stroke `(see highlighted green box)` make the size a little bit thicker anyhow you want, the position is **“outside”** and the color change it to "**white"** and when done hit **“OK”**. Basically we are done now with our logo creation after we have put a stroke style on our text layer and saving it is a PNG file format. This time for the sample logo that I am creating, I am going to make the other text panel that I created be visible in the logo. Hide the eye icon of the text layer `(see highlighted red box)`, then hold **“Ctrl”** button on the keyboard and click the thumbnail of the text layer `(see highlighted red arrow)`. Then click on the group layer `(see highlighted yellow arrow)`, then navigate to the left side tool panel, then select the **“brush tool”** `(see highlighted green arrow)`, then in the fill select the color **“black”** `(see highlighted blue arrow)` and brush the selected text highlighted in the logo `(see highlighted black circle)`. As you can see in the image that I have made a three text panel `(see highlighted red box)`, so I’m doing the same procedure with the remaining text panel and the result will look like this. Now the simple logo creation is done and what we only need to do is to save the file as a **“PNG”** file so that we can use what we have created anyway we want. Before saving it, hide first the eye icon of the background layer so that the logo will only be saved as it is. If you want a **“JPEG”** file with a background ready on your logo, just activate the eye icon and save it as a JPEG file. Also don’t forget to group first the layers that you have created so that you can resize the logo anyhow you want. The same procedure, after grouping the layers click on the grouped layer then press **“Ctrl + T”** on the keyboard, hold **“Shift + Alt”** key and click + hold drag the corner guide of the logo. In my case, I change the background layer color into black so that we can see clearly the details of the logo that was created. For me it looks simple, neat and cool and I can now use it as a logo to a video or image that I am going to edit in the future. Also I can use it as my profile image here in read.cash. That’s all for this tutorial but still I think we can do a lot more with what we have created. For this one, we only created a simple clean looking logo so make sure to learn doing your own logo using Photoshop.

+28 more