How to use Bitcoin Cash with JavaScript (including Bitcoin Cash contracts)
This article is mostly aimed at the new users who want to use JavaScript and browser or node.js on server-side.
This article is divided into 4 parts:
Setting up and sending money in a regular Bitcoin Cash transaction using JavaScript (actually TypeScript) and
bitboxlibrary;P2SH contracts in Bitcoin Cash:
How to lock some money into a contract;
How to spend the money completing the contract;
Using CashScript (and Spedn) languages to send and spend P2SH contracts
A few bonus notes and links about SLP, Badger and signing / verifying the messages.
Setting up
To send a transaction in Bitcoin Cash there are a few things you must do:
Create/initialize a wallet ("node") to get its private key
Get unspent outputs and add them to the transaction
Figure out the sum to send and miner's fee
Add outputs to the transaction
Sign your transaction using the private key
First things first - import the library:
(You should have node.js installed)
yarn add bitboximport {BITBOX} from "bitbox-sdk/lib/BITBOX";
const bitbox = new BITBOX();Sidenote: I'll be using TypeScript throughout the article. To easily run TypeScript - do
npm install -g ts-nodeand then just runts-node script.tsinstead ofnode script.js- that's it.Also if you're planning to use it in browser - see our section about setting up WebPack.
This connects to "mainnet" Bitcoin Cash network with the real Bitcoin Cash coins, you can alternatively use "TestNet3" with worthless test Bitcoin Cash coins (here's the explorer and the faucet for this network).
// alternatively connect to the testnet3 network:
// const bitbox = new BITBOX({restURL: 'https://trest.bitcoin.com/v2/'});
Generate a "mnemonic" (12 words, 128 bits): (a "mnemonic" is 12 words that are used to generate random private key or base for HD wallets). User must keep his/her mnemonic secret as it gives away the private key needed to spend the money.
const mnemonic = bitbox.Mnemonic.generate();...or provide your own mnemonic (to use the same wallet every time):
const mnemonic = 'big apple grows fast ...'; // 12 wordsGenerate a wallet from the mnemonic:
const wallet = bitbox.HDNode.fromSeed(bitbox.Mnemonic.toSeed(mnemonic));Get a HD node (another wallet) from the base wallet by changing the numbers 0/0 to 0/1, 0/2, 0'/1/0, 1'/0/0, etc.. (HD node is kind of like "give me a different wallet, using the same mnemonic as a base and these numbers"):
const node = bitbox.HDNode.derivePath(wallet, "m/44'/145'/0'/0/0");wallet and node are both the same type, just different private keys, addresses, etc.
Get the CashAddress of this node or wallet
const nodeCashaddr = bitbox.HDNode.toCashAddress(node);
// 'bitcoincash:q....'
Get the balance of this address
Note: satoshi is the smallest "cent" in Bitcoin Cash network. It's 1/100 000 000th of a whole Bitcoin Cash, so 1 BCH = 100 million satoshis.
To avoid rounding errors - everything in Bitcoin Cash is calculated in "satoshis". There are no fractional satoshis (at least for now, in 2019).
// @ts-ignore
const details: AddressDetailsResult = await bitbox.Address.details(nodeCashaddr);
console.log(`You have ${details.balanceSat} satoshis
             + ${details.unconfirmedBalanceSat} unconfirmed satoshis`);
(About @ts-ignore: I'm using TypeScript for examples, there's a weird type definition here in bitbox that allows you to also get multiple results, but we have to @ts-ignore it to avoid compilation errors)
Create a transaction, which sends Bitcoin Cash to a regular address (called "P2PKH" / "pay-to-public-key-hash")
Create a TransactionBuilder first:
const tb: TransactionBuilder = new bitbox.TransactionBuilder();
// or for TestNet3:
// const tb: TransactionBuilder = new bitbox.TransactionBuilder('testnet');
Unspent Transaction Outputs
First, we need to get unspent coins (UTXO = "unspent transaction outputs", i.e. the coins that haven't yet been spent).
Here's what UTXOs are:
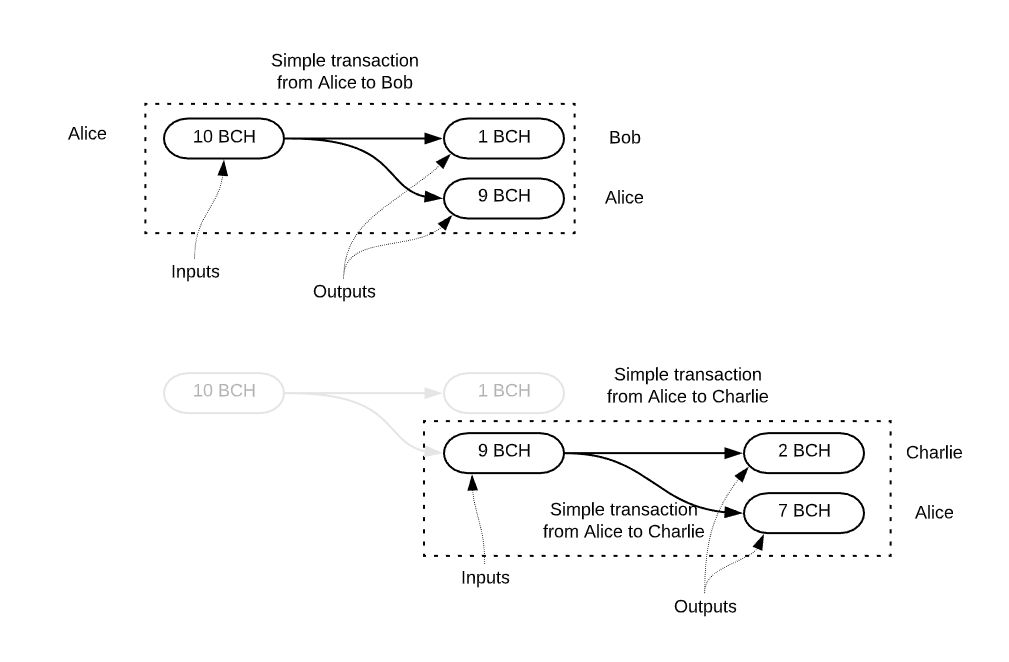

Get UTXOs for your address:
// @ts-ignore
const utxos: AddressUtxoResult = await bitbox.Address.utxo(nodeCashaddr);
Now, select among these UTXOs some that we want to use. To preserve your privacy you need to use only one UTXO at a time, but we're going to use them all instead, to send all the available money.
let selectedUtxos = utxos.utxos;
// let selectedUtxos = utxos.utxos.filter(...);
Add UTXOs as input to the transaction:
for (const utxo of selectedUtxos) {
    tb.addInput(utxo.txid, utxo.vout);
}
Figure out how many satoshis we're going to send by summing all the selected UTXOs:
const sum = selectedUtxos.reduce((p, i) => p + i.satoshis, 0);
// kind of like .sum('satoshis')
Next, calculate the miners' fee that we're going to pay:


I would recommend setting miner's fee to about 1.01 satoshi per byte transferred. (Transaction is sent in internal binary format, this format has some length in bytes. For each of these you need to pay.)
Typical transaction is about 220 bytes. Let's calculate the humber of bytes and multiply it by 1.01:
const outputsCount = 1;
const fee = Math.floor(1.01 * bitbox.BitcoinCash.getByteCount(
        {P2PKH: selectedUtxos.length}, {P2PKH: outputsCount}
      ));
We're going to pay 1.01 satoshi per byte of transaction to make sure our TX goes through if/when the blocks are full. Sometimes you have problems with exactly 1.00 sat/byte.
TO calculate the fee you call getByteCount method and provide it with the humber of P2PKH inputs and outputs. P2PKH is a "regular" Bitcoin Cash transaction. I will explain why it's called P2PKH and how it works later in the article.
Usually, if you send money to someone - you will send some amount to someone and some to yourself as change - that means that you typically have two P2PKH outputs. But we're sending all the money, without change, so we have just one P2PKH output.
Don't forget Math.floor otherwise you'd end up with fractional satoshis (not possible to send).
Add outputs (where to send money and how many satoshis to send):
tb.addOutput('bitcoincash:q...', sum - fee);You can't pay miners directly, so to pay them - you just send less amount as outputs than goes in as inputs. Anything that is not sent as an output goes to miners.
Now we need to sign the inputs with our private key (that allows us to spend it):
for (const [i, utxo] of Object.entries(selectedUtxos)) {
    tb.sign(Number(i), node.keyPair, undefined, tb.hashTypes.SIGHASH_ALL,
            utxo.satoshis);
}Alternatively, sign using Schnorr (as far as I understand - the transaction takes less space in bytes that way - i.e. cheaper):
... {
    ...
    tb.sign(Number(i), node.keyPair, undefined, tb.hashTypes.SIGHASH_ALL,
            utxo.satoshis, tb.signatureAlgorithms.SCHNORR);
}
Broadcast the transaction and print the transaction ID:
const tx: any = await bitbox.RawTransactions.sendRawTransaction(
  tb.build().toHex()
);
console.log(tx);
// aa0978ae3...
Congratulations! 🎉 You've sent a Bitcoin Cash transaction. 🧐
Here are some common pitfalls that you can experience:
await
You have awaits in the code, to make it run - you need to wrap it into an async function:
async main() {
   // all code goes here
}

main();
I would remind that to easily run TypeScript code - just install ts-node as I described in the beginning and run ts-node script.ts instead of node script.js. TypeScript is amazing!
Error: bitcoincash:... has no matching Script
Usually it's one of the following:
You are trying to send to
bchtest:address on MainNet or tobitcoincash:on TestNet3The address you're trying to send to is incorrect (garbage, not a string, etc...)
The number of satoshis you provided is zero, negative or fractional (it's impossible to send 0.5 satoshis)
Error: 'insufficient priority (code 66)'
Your miner fee is too low. For example, you are sending the total amount as outputs, not leaving anything for miners. You need to subtract at least 1 satoshi per each byte of transaction (see fee above), but 1.01 sat/b is more recommended.
Bitcoin Cash contracts (P2SH)
Short intro about Bitcoin Cash Script
We're going to create a very simple contract.
"If you can provide two strings that when concatenated (joined)
say 'read.cash', then you're free to take the money."
In other words, something like this:
function allowSpend(a, b) {
  return a + b == 'read.cash';
}
In Bitcoin Cash script the previous "locking script" is expressed like this:
OP_CAT
'read.cash'
OP_EQUAL
Roughly translated:
OP_CAT: "take two items from somewhere, concatenate(join) them, put concatenated thing back"
"put there also a string
read.cash"OP_EQUAL: "take two items from there, if they are equal, put back
1""if the thing 'there' is
1, then allow spending money".
"There" is called a "Stack". That's how Bitcoin Cash Script (and Bitcoin Script) operates. It puts thing to stack and gets things back from there.
I call this a "locking script" (often it's called the "redeem script").
I prefer "locking", because you also have an "unlocking script" (officially called "scriptSig").
So, now, if you run our "locking script", as a first step it would try to take two items from the "stack", but there's nothing on the stack.
That's where "unlocking script" comes into the play. Here's the "unlocking script":
<'read.'>
<'cash'>
Basically:
"put a string
read.on the stack""put a string
cashon the stack"
If you now run first the "unlocking script" and then the "locking script" - there would be two things on the stack, which OP_CAT would take and join, putting them back as one and happily continuing on to run.
It's should actually be backwards (first, put "cash", then put "read", because then you'd take back first "read", which was put there last, and then "cash" - that's how the stack works, but I guess
OP_CATreverses the order).
How stack works: If you "put1", then "put2", thenOP_DROP, which removes an item from the stack, you are left with1(because the latest item2is removed or "dropped").
You can also do this for "unlocking script":
<'r'>
<'ead.cash'>
It'll work too!
Or even this:
<'read'>
<' me now'>
OP_DROP // <- deletes the ' me now' from the stack
<'.cash'>
It should unlock in theory, but the last one won't work in Bitcoin Cash, because to avoid malleability problem - you can only have "push" operations ("put stuff on the stack") in "unlocking scripts".
Now, if we run first the "unlocking script", then the "locking script", you should see that it ends up with "1" on the stack.
(unlocking)
"putread.on the stack""push
cashon the stack"(locking)
"take two items from the stack, concatenate them, put concatenated thing back""put to the stack a string
read.cash""take two items from the stack, if they are equal, put back
1""if the thing on the stack is
1, then allow spending money"
(Note: this step is always present in script)
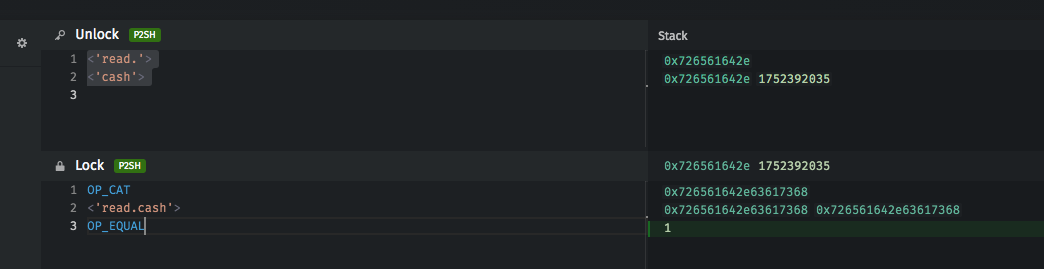
I highly recommend ide.bitauth.com to debug Bitcoin Cash scripts. The screenshot is from there.
There could be many "unlocking scripts", which is the power of the contracts in Bitcoin Cash scripting.
Now that you understand how Bitcoin Cash script works, let's do it!
Send some money to a Bitcoin Cash contract
So, let's do the first step - lock some money into a contract.
The first part is the same:
const bitbox = new BITBOX();
const mnemonic = 'foxy fox 1';
const wallet = bitbox.HDNode.fromSeed(bitbox.Mnemonic.toSeed(mnemonic));
const node = bitbox.HDNode.derivePath(wallet, "m/44'/145'/0'/0/0");

const tb: TransactionBuilder = new bitbox.TransactionBuilder();
We're creating a HD node and a TransactionBuilder.
let nodeCashaddr = bitbox.HDNode.toCashAddress(node);
console.log(`My source of funds: ${nodeCashaddr}`);

// @ts-ignore
const details: AddressDetailsResult
             = await bitbox.Address.details(nodeCashaddr);

console.log(`You have ${details.balanceSat} satoshis
             + ${details.unconfirmedBalanceSat} unconfirmed satoshis`);
It'll show you the address where to send some satoshis that a script can then send to a P2SH contract.
Now, let's get UTXO's (unspent transaction outputs) and add them as inputs:
// @ts-ignore
const utxos: AddressUtxoResult = await bitbox.Address.utxo(nodeCashaddr);
let selectedUtxos = utxos.utxos;
for (const [i, utxo] of Object.entries(selectedUtxos)) {
    tb.addInput(utxo.txid, utxo.vout);
}
Calculate the total sum and the fee. This time we're calculating for 1 regular "P2PKH" input and (here's something new) for 1 p2SH output.
const outputsCount = 1;
const fee = Math.floor(1.011 * bitbox.BitcoinCash.getByteCount(
    {P2PKH: selectedUtxos.length}, {P2PKH: outputsCount}
));
P2SH is "pay-to-script-hash".
If you want to lock the money into a contract - you send them to a special address that is actually a signature (hash) of the "unlocking script". Let's find out this address for our contract.
First, the "locking script". As discussed above, it looks like this:
OP_CAT
'read.cash'
OP_EQUAL
Translated into Bitbox it looks like this:
const script = bitbox.Script.encode([
    bitbox.Script.opcodes.OP_CAT,
    Buffer.from("read.cash", "ascii"),
    bitbox.Script.opcodes.OP_EQUAL
]);
Now, it's time to find out what the address is:
const p2sh_hash160 = bitbox.Crypto.hash160(script);
const scriptPubKey = bitbox.Script.scriptHash.output.encode(p2sh_hash160);
const address = bitbox.Address.fromOutputScript(scriptPubKey);

console.log(`Will send to P2SH: ${bitbox.Address.toCashAddress(address)}`);
The encoded hash and CashAddress of our contract is bitcoincash:pzzrvzj4utd67lkrky2ql3m9mxzmt8saccmcl9tkce . This is the P2SH address.
As soon as you know the address - you can actually send money there using any Bitcoin Cash wallet.
All previous steps are only required to calculate the address and to send money programmatically. As soon as you know the address - any wallet can send there, it looks exactly like if you're sending money to a friend.
But, spending the money from P2SH address is not possible with any regular Bitcoin Cash wallet.
We can now add this address as an output:
tb.addOutput(address, sum - fee);Sign and send:
for (const [i, utxo] of Object.entries(selectedUtxos)) {
    tb.sign(Number(i), node.keyPair, undefined, tb.hashTypes.SIGHASH_ALL, utxo.satoshis);
}

const tx: any = await bitbox.RawTransactions.sendRawTransaction(
    tb.build().toHex()
);
Note: You should wrap that last call in try-catch to catch any errors.
Spending the money from the contract ("P2SH as input")
Again, starting as usual:
async function send() {
const bitbox = new BITBOX();
const mnemonic = 'foxy fox 1';
const wallet = bitbox.HDNode.fromSeed(bitbox.Mnemonic.toSeed(mnemonic));
const node = bitbox.HDNode.derivePath(wallet, "m/44'/145'/0'/0/0");

const tb: TransactionBuilder = new bitbox.TransactionBuilder();
This should be familiar now.
Next step - we need to use our P2SH contract as an input in our transaction to spend money locked in the contract:
const contractCashaddr = 'bitcoincash:pzzrvzj4utd67lkrky2ql3m9mxzmt8saccmcl9tkce';Let's find out the balance:
// @ts-ignore
const details: AddressDetailsResult =
                          await bitbox.Address.details(contractCashaddr);

console.log(`Contract has ${details.balanceSat} satoshis
             + ${details.unconfirmedBalanceSat} unconfirmed satoshis`);
Ok, let's get the money out of our contract. Let's find out all the UTXOs we can spend:
// @ts-ignore
const utxos: AddressUtxoResult = await bitbox.Address.utxo(contractCashaddr);
let selectedUtxos = utxos.utxos;

const sum = selectedUtxos.reduce((p, i) => p + i.satoshis, 0);

const fee = 200;
Calculating the miner's fee is pretty tricky with the P2SH contracts. For a simple contract like ours 200 might be enough. More complex ones might easily require 500+.
With P2SH we need to add our outputs first:
tb.addOutput('bitcoincash:qp...', sum - fee); // some walletHere's the tricky part. P2SH addresses don't contain "locking scripts", despite that they are hashes of those scripts. So, we need the "locking script" to unlock too. Copy it from the above:
const lockingScript = bitbox.Script.encode([
    bitbox.Script.opcodes.OP_CAT,
    Buffer.from("read.cash", "ascii"),
    bitbox.Script.opcodes.OP_EQUAL
]);
Ok, as you remember the unlocking script is "put 'read.' to the stack", then "push 'cash' to the stack", expressed as bitbox is:
const unlockingScript = bitbox.Script.encode([
    Buffer.from("read", "ascii"),
    Buffer.from(".cash", "ascii"),
]);
Here comes the tricky part, we need to add inputs:
for (const [i, utxo] of Object.entries(selectedUtxos)) {
    tb.addInput(utxo.txid, utxo.vout);
    inputScripts.push({ vout: Number(i), script: bitbox.Script.encodeP2SHInput(
        unlockingScript,
        lockingScript,
    ) });
}

tb.addInputScripts(inputScripts);
Please note that our locking script doesn't require that we sign the transaction. We are basically creating an "almost anyone can spend" transaction. If that someone could figure out what "script" we used to lock our funds - they'd steal it pretty fast, since we don't require any signature with a private key. (We'll get back to that)
And we're ready to broadcast our spending transaction:
const tx2: any = await bitbox.RawTransactions.sendRawTransaction(
      tb.build().toHex()
);
Awesome!
By the way, if you are having a problem with spending a transaction - see the "Meep" section below.
Signatures
Ok, so far we have created a contract that anyone can sweep as long as they can guess two strings.
Now we want to require someone's signature on transaction, just like a regular P2PKH transaction would. We'll require a signature from our node private key.
Let's take a look at the regular (P2PKH "pay to public key hash") transaction:
OP_DUP
OP_HASH160
123456789012345678901234567890
OP_EQUALVERIFY
OP_CHECKSIG
Where 1234567890.... is the hash of the public key that is allowed to spend this transaction. That's why it's called "Pay to public key hash".
Which kind of means "check that the stack contains 1. spender's public key that matches the public key hash that we hardcoded here (123...) and 2. signature that covers all inputs and outputs that also matches this public key".
That's the "locking script" of a regular P2PKH transaction.
The "unlocking script" of P2PKH is:
signature
public_key
So, joined together they would do the following:
OP_DUP: Duplicate last thing on the stack (public key)
The stack now: public key, public key, signature.Get the thing from the stack and replace it with the RIPE MD 160 hash of it
Now you have on the stack: hash of public key (calculated), hash of public key (provided by unlocking script) and signaturePut hardcoded string to the stack: 123....
The stack: 123..., hash of public key (calculated), hash of public key (provided by unlocking script) and signatureOP_EQUALVERIFY: Check that two things on the stack are equal, abort if not. If yes - don't put anything to the stack.
The stack: hash of public key (provided by unlocking script) and signatureOP_CHECKSIG: Take two things - public key and signature, check that signature is for this whole transaction and that it matches the public key. Put '1' if yes.
If the last thing is '1' - allow spending.
That's how your "regular" Bitcoin Cash transaction works.
Ok, let's add this P2PKH "locking" and "unlocking parts" to our read.cash contract.
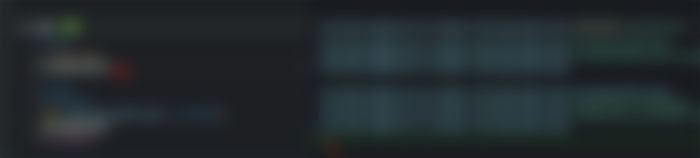
Let's get some help from BitAuth IDE to check our contract
We can import this program into ide.bitauth.com and make sure it works:

Of course, it doesn't work. It's all about that little "1" that we have left on the stack after OP_EQUAL in line #3.
Now, instead of duplicating (OP_DUP) a public key, as a regular P2PKH would be, it's duplicating a "1"


So, later then OP_EQUAL tries to compare two things - it compares hardcoded public key hash of node (or "alice") to the hash of "1". It doesn't match, so OP_EQUALVERIFY fails.
This "1" shouldn't be there. We could either drop it or use OP_EQUALVERIFY that doesn't leave 1 on the stack.

Perfect! It works!
Let's translate it to our program.
To be clear - the actual contract ("locking script") looks like this:
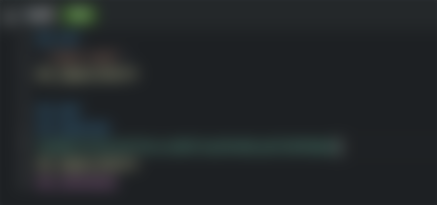
The big number here is node's public key hash.
By the way - to get
alice_keyto work in the IDE - you need to add(+)anEntityin the IDE (links on the left) and the add a variable of the typeKey. The private key you can find out with:
console.log('0x' + node.keyPair.d.toBuffer(32).toString('hex'));
// 0xb5149aedbec9a25727cfc61e959cd2464f991d8e45c799e3f64515853da52edd
Ok, so we would need a few changes:
First of all, the sending script to calculate P2SH address now should contain this script:
const script = bitbox.Script.encode([
    bitbox.Script.opcodes.OP_CAT,
    Buffer.from("read.cash", "ascii"),
    bitbox.Script.opcodes.OP_EQUALVERIFY,
    bitbox.Script.opcodes.OP_DUP,
    bitbox.Script.opcodes.OP_HASH160,
    bitbox.Crypto.hash160(node.getPublicKeyBuffer()),
    bitbox.Script.opcodes.OP_EQUALVERIFY,
    bitbox.Script.opcodes.OP_CHECKSIG,
]);
The new contract CashAddress would be: bitcoincash:prxzzjyw3uyrfyfxgd4hmngzlf8scy6ehys9337shw
Second, the the script is now bigger, so we need a bigger fee when spending from the P2SH address:
const fee = 250;Then, again we change the lockingScript to match:
const lockingScript = bitbox.Script.encode([
    bitbox.Script.opcodes.OP_CAT,
    Buffer.from("read.cash", "ascii"),
    bitbox.Script.opcodes.OP_EQUALVERIFY,
    bitbox.Script.opcodes.OP_DUP,
    bitbox.Script.opcodes.OP_HASH160,
    bitbox.Crypto.hash160(node.getPublicKeyBuffer()),
    bitbox.Script.opcodes.OP_EQUALVERIFY,
    bitbox.Script.opcodes.OP_CHECKSIG,
]);
The trickiest part is that we need to move unlockingScript generation inside of the UTXO iteration, because now we need a new signature for each UTXO, like this:
const inputScripts: { vout: number, script: Buffer }[] = [];

for (const [i, utxo] of Object.entries(selectedUtxos)) {
    tb.addInput(utxo.txid, utxo.vout);

    // produce the signature

    const unlockingScript = bitbox.Script.encode([
        // <alice_key.signature.all_outputs>
        node.getPublicKeyBuffer(),
        Buffer.from("read", "ascii"),
        Buffer.from(".cash", "ascii"),
    ]);

    inputScripts.push({ vout: Number(i), script: ScriptUtil.encodeP2SHInput(
        unlockingScript,
        lockingScript,
    ) });
}

tb.addInputScripts(inputScripts);
Actually, we're going to calculate <alicekey.schnorr_signature.all_outputs> (note: "schnorr"), but it doesn't matter that much.
Digging all the way around Bitbox docs I still haven't found a single example of how to produce this signature (or actually how to spend P2SH outputs for that matter), so we're basically using adapted code from Rosco Kalis:
// produce the signature

function sign(tb: TransactionBuilder, lockingScript: Buffer, utxo: any,
              node: HDNode): Buffer {
    const tx = tb.transaction.buildIncomplete();

    // Bitcoin cash replay protection
    const hashtype = tb.hashTypes.SIGHASH_ALL | tx.constructor.SIGHASH_BITCOINCASHBIP143;
    const sighash = tx.hashForCashSignature(0, lockingScript, utxo.satoshis, hashtype);
    return node.keyPair
        .sign(sighash, tb.signatureAlgorithms.SCHNORR)
        .toScriptSignature(hashtype, tb.signatureAlgorithms.SCHNORR);
}
Again, the "locking script" here is generally named the "redeem script", I just find the "locking" / "unlocking" scripts a bit easier to remember.
So, the end code for adding inputs looks like this:
const inputScripts: { vout: number, script: Buffer }[] = [];

for (const [i, utxo] of Object.entries(selectedUtxos)) {
    tb.addInput(utxo.txid, utxo.vout);

    const unlockingScript = bitbox.Script.encode([
        sign(tb, lockingScript, utxo, node), // <node.schnorr_signature.all_outputs>
        node.getPublicKeyBuffer(),
        Buffer.from("read", "ascii"),
        Buffer.from(".cash", "ascii"),
    ]);

    inputScripts.push({ vout: Number(i), script: ScriptUtil.encodeP2SHInput(
        unlockingScript,
        lockingScript,
    ) });
}

tb.addInputScripts(inputScripts);
And if you did everything right - you should get your transaction away from P2SH address. 🎉 🧐
Meep
If you ever get stuck with a "why doesn't this P2SH work", you can dump your hex transaction like this:
console.log(tb.build().toHex());
// 02000000012d1e637bf15869e07309940f529.... very long code
And then use meep debugger from Chris Pacia:
meep debug --tx=02000000012d1e637bf15869e07309940f529....It will give you a step-by-step execution of your transaction with stack and operations.

CashScript
The signing code was actually taken from the CashScript project by Rosco Kalis and bitcoin.com. The project is to say the least totally awesome 🎉 (The hint for "meep" debugger also came as I was researching CashScript.)
In CashScript our whole locking script would have looked like this:
require(a + b == "read.cash");
require(hash160(node_public_key) == node_public_key_hash);
require(checkSig(signature, node_public_key));
😳 What??
That's some serious improvement over this:
OP_CAT
<'read.cash'>
OP_EQUALVERIFY
OP_DUP
OP_HASH160
0xb862323bcb5f33cce3857ea39460cabf2699b8d1
OP_EQUALVERIFY
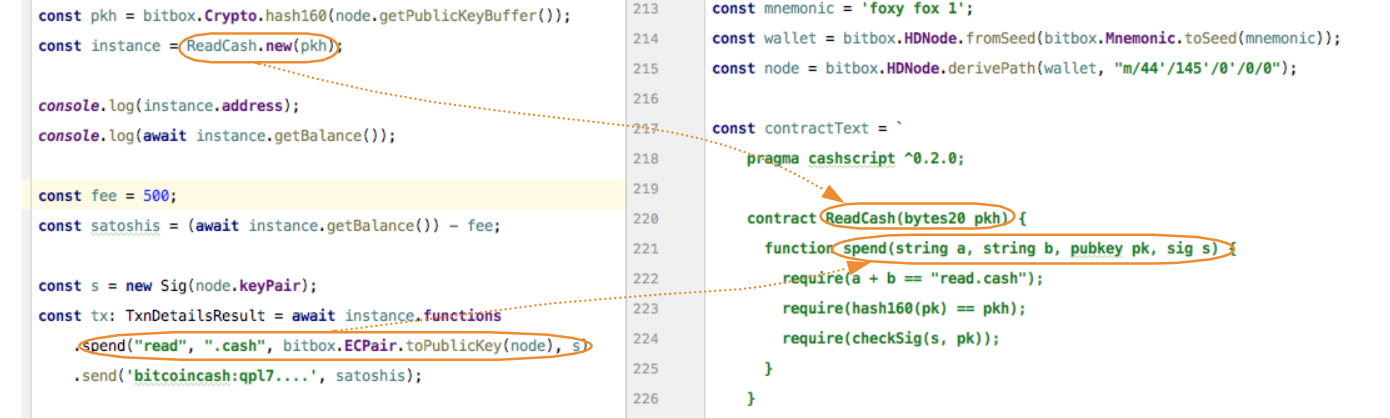
OP_CHECKSIGHere's the full contract in CashScript:
const contractText = `
    pragma cashscript ^0.2.0;

    contract ReadCash(bytes20 pkh) {
      function spend(string a, string b, pubkey pk, sig s) {
        require(a + b == "read.cash");
        require(hash160(pk) == pkh);
        require(checkSig(s, pk));
      }
    }
`;
Note: PK = public key, PKH = public key hash. These abbreviations are often used.
Here's how to get it "deployed":
$ yarn add cashscriptconst ReadCash: Contract = Contract.compile(contractText, 'mainnet');
const pkh = bitbox.Crypto.hash160(node.getPublicKeyBuffer());
const instance = ReadCash.new(pkh);
console.log(instance.address);You can now send some satoshis to this address.
How many satoshis are there?
console.log(await instance.getBalance());Ok, let's send all of it to the address bitcoincash:qpl7....:
const fee = 500;
const satoshis = (await instance.getBalance()) - fee;
const s = new Sig(node.keyPair);
const tx: TxnDetailsResult = await instance.functions
.spend("read", ".cash", bitbox.ECPair.toPublicKey(node), s)
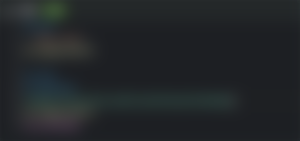
.send('bitcoincash:qpl7....', satoshis);To better understand what's going on - here's an image:
"🧐 Why didn't you tell me all this in the first place? 🤬" - The Angry Reader
Well, now at least you understand what's going on inside and what the limitations of Bitcoin Cash scripting are. You don't have any "memory", hash tables, you can't create "Tokens" (SLP tokens are actually strings which something else, other than Bitcoin Script parses), you can't call other functions on the blockchain, but there are a lot of possibilities still, see some examples here.
Spedn
There's also the Spedn language, which looks basically the same:
contract ReadCash(Sha256 pubKeyHash) {
  challenge spend([byte] a, [byte] b, PubKey pubKey, Sig sig) {
    verify a . b == "read.cash";
    verify sha256(pubKey) == pubKeyHash;
    verify checkSig(sig, pubKey);
  }
}
Then you need to do something like this:
$ yarn add spednconst compiler = new Spedn();
const { ReadCash } = await compiler.compileCode(`
contract ReadCash(Ripemd160 pubKeyHash) {
challenge spend([byte] a, [byte] b, PubKey pubKey, Sig sig) {
verify a . b == "read.cash";
verify hash160(pubKey) == pubKeyHash;
verify checkSig(sig, pubKey);
}
}
`);
const pkh = bitbox.Crypto.hash160(node.getPublicKeyBuffer());
const readcash = new ReadCash({pubKeyHash: pkh});
console.log(readcash.getAddress("mainnet"));
const coins = await readcash.findCoins("mainnet");
const satoshis = coins.reduce((s, i) => s = s + i.utxo.satoshis, 0);
const txid = await new TxBuilder("mainnet")
.from(coins, (input, context) =>
input.spend({
a: 'read',
b: '.cash',
sig: context.sign(node.keyPair, SigHash.SIGHASH_ALL),
pubKey: node.getPublicKeyBuffer()
})
)
.to("bitcoincash:qrc2...", satoshis - 500)
.broadcast();
compiler.dispose();Note: if you omit the second parameter in .to("bitcoincash:qrc2...")- full amount minus minimum fee would be sent.
Please follow the official docs.
Spedn is pretty awesome too 🎉
Bonuses
Sign a regular message using private key
Using private key WIF:
bitbox.BitcoinCash.signMessageWithPrivKey(
  node.keyPair.toWIF(),
  'message to sign'
) // returns base64
Get Buffer suitable for scripting with OP_CHECKDATASIGVERIFY:
const oracleMessage = new Buffer('message to sign');
// const oracleMessage = new Buffer([15,23,43]);
// const oracleMessage = new Buffer('92af18', 'hex');
const buffer: Buffer = node.keyPair.sign(new Crypto().sha256(oracleMessage)).toDER();
Verify signed message
Verifies base64-encoded message (taken from here):
bitbox.BitcoinCash.verifyMessage(
  'bitcoincash:qp2zvw3zpk5xx43w4tve7mtekd9kaxwj4uenq9eupv',
  'IIYVhlo2Z6TWFjYX1+YM+7vQKz0m+zYdSe4eYpFLuAQDEZXqll7lZC8Au22VI2LLP5x+IerZckVk3QQPsA3e8/8=',
  'EARTH'
)
Send to OP_RETURN
We haven't tried it yet, but a snippet from here is useful:
// encode #BCHForEveryone as a buffer
let buf = new Buffer('#BCHForEveryone');

// encode w/ OPRETURN
let data = BITBOX.Script.encode([
  BITBOX.Script.opcodes.OPRETURN,
  buf
])

// get size of tx to calculate fee
let byteCount = BITBOX.BitcoinCash.getByteCount({ P2PKH: 1 }, { P2PKH: 2 });

// calculate fee @ 1 sat/B
let sendAmount = originalAmount - byteCount;

// add cash address output
transactionBuilder.addOutput("bitcoincash:qpuax2tarq33f86wccwlx8ge7tad2wgvqgjqlwshpw", sendAmount);

// add OP_RETURN and data as output w/ 0 satoshis
transactionBuilder.addOutput(data, 0);
memo.cash
https://bigearth.github.io/bitblog/2018/04/15/memobch-utility-methods.html
SLP tokens
Haven't tried yet, here's something to play with.
Using Badger Wallet to send transactions
Here is some useful snippet from Gabriel Cardona.
WebPack
Here are a few useful things to get WebPack to compile the scripts for your browser
webpack.config.js
const path = require('path');
const TerserPlugin = require('terser-webpack-plugin');

const config = {
    entry: './src/index.js',
    output: {
        path: path.resolve(__dirname, 'dist'),
        filename: 'index.js'
    },
    // support TypeScript -- it's awesome 🎉
    resolve: {
        extensions: [".ts", ".tsx", ".js"]
    },
    module: {
        rules: [
            {
                test: /\.tsx?$/,
                loader: "ts-loader",
                options: {
                    transpileOnly: true
                }
            }
        ]
    },
    // avoid errors with `ECpair` type expected, got M
    optimization: {
        minimize: true,
        minimizer: [
            new TerserPlugin({
                terserOptions: {
                    mangle: { reserved: [ 'Object', 'Array', 'BigInteger',
                                          'Boolean', 'Buffer', 'ECPair',
                                          'Function', 'Number', 'Point', ], },
                    safari10: true,
                }
            })
        ],
    },
    // to avoid problems with CashScript wanting `fs` module
    node: {
        fs: 'empty'
    }
};

module.exports = config;
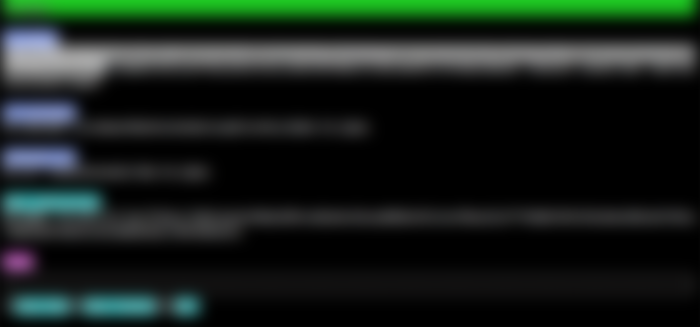
I'm trying to follow this guide :) First I was having issues with testnet address balances not fetching for some addresses but got around that by moving to mainnet, now I'm stuck on the transaction building part. I get these errors: error TS2304: Cannot find name 'TransactionBuilder'. error TS2304: Cannot find name 'AddressUtxoResult'.